Do you have a question about the PowerBase N1F-GT-250-B and is the answer not in the manual?
Read instructions, use appropriate tool, maintain clean area, consider environment, keep bystanders away.
Dress appropriately, use head/hearing protection, maintain balance, stay alert, grip securely.
Remove tools, avoid cutting line contact, prevent unintentional start, disconnect power, use outdoor/RCD cords.
Inspect for damage, store tools properly, maintain tools, ensure professional repair.
Wear eye protection, restrict use to trained users, stop if bystanders are near, ensure adequate lighting.
Inspect for damage, use guards properly, keep clear of cutting means, use approved parts/elements.
Be careful with line trimming devices, keep ventilation clear.
Thoroughly read electrical safety instructions before connecting to the mains supply.
Ensure your electricity supply voltage matches the rating plate before use.
If the plug needs fuse replacement, ensure the cover is refitted. Dispose of old plugs safely.
Understand safety symbols and their meanings to avoid accidents. Refer to manual before use.
Avoid rain operation, maintain hazard zone, disconnect damaged cables, double insulation, recycling advice.
Wear ear protection, wear eye protection, wear dust mask.
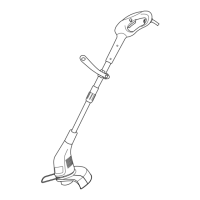
The main grass trimmer appliance.
Protective guard for the cutting head.
Screw used for assembling the safety guard.
Additional guard, possibly for protecting flowers.
The auxiliary handle for gripping the trimmer.
Use outdoor-rated cords, avoid two-core types, unwind fully, check wire gauge.
Handle damaged cables safely, do not repair damaged cables, follow manufacturer instructions.
Place unit on flat surface, push front handle onto shaft, move to position, and tighten bolt.
Insert flower guard and safety guard into motor housing slots and screw tight.
Ensure guard is properly installed for protection; improper installation can cause damage.
Never use the product without the guard fitted.
Cable restraint prevents excessive strain on connections.
Push a cable loop through handle space and secure over restraint before switching on.
Pull switch away from motor, rotate 180 degrees to engage edge cutting mode.
Press locking button, then on/off switch to turn on. Release to turn off.
Wait for cutting head to stop rotating after switching off before laying down the tool.
Loosen knob, adjust tube length to desired position, and secure knob.
Always wear eye protection. Keep unit low, work right-to-left, ensure full speed before cutting.
Manually feed line, check length, correct overfed line, adjust tube length.
Press manual feed button, then gently pull line until it reaches the line cutter.
Gently pull second line after feeding. If line exceeds cutter, too much has been fed.
Remove spool cap and turn spool counter-clockwise to shorten overfed line.
Press release latch and pull cover straight off the cutting head assembly.
Keep areas clean, press cover firmly, check fit by trying to remove without depressing latches.
It is recommended to purchase spool and line complete for convenience.
Remove old spool, place new spool aligning cut-outs with eyelets, feed line, and refit cover.
Take 4m line, insert into spool holes, and wind in direction of arrows.
The trimmer is designed for line with a maximum diameter of 1.2 mm.
Leave 100mm line unwound in cleat. Coil line neatly on spool for optimal automatic feed.
Never use water or chemical cleaners. Wipe with a dry cloth.
Always check the cutting head and guard before each use.
Always store your power tool in a dry place.
Keep the motor ventilation slots clean.
Have the unit professionally repaired if any parts are damaged.
Address tool running slowly by checking spool housing and line; fix cutting issues by checking head and line.
Model No. N1F-GT-250/350-B, Rated Voltage 230-240V AC 50Hz, Input Power 350W.
No Load Speed 12000rpm, Cutting Width 250MM, Cutting Line Diameter 1.2mm.
Protection Class II, Machine Weight 2kg.
83,8 dB(A) KPA: 1,0 dB(A)
96 dB(A)
3,88 m/s² K=1,5 m/s²
Follow instructions for replacing moulded plugs, disposing of old ones, and handling damaged cables.
Connect blue wire to N terminal and brown wire to L terminal. Ensure correct fuse is fitted.
Do not dispose of waste electrical products with household waste. Recycle where possible.
Guaranteed for 12 months against manufacturing defects for domestic use only. Excludes misuse, abuse, and unauthorized modifications.
Declares compliance with EMC, Low Voltage, CE Marking, Machinery, and Noise directives, listing standards.