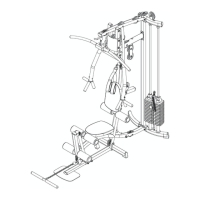
Be careful to assemble all components in the
sequence they are presented.
S T E P
4
Inch
MM
14
A. Attach Seat Pad (AA) to the Seat Pad Frame (L) as shown using:
Two 56 (5/16” x 1 5/8” hex head bolt)*
Two 62 (5/16” spring lock washer)
Two 61 (5/16” washer)
Attach two End Caps (23) to the front and back of Seat Pad Frame (L) as shown.
*NOTE:
Do NOT over-tighten these bolts. Tighten these bolts until spring lock washer is flat.
Over-tighten these bolts will cause T-nuts in pads to strip out.
B. Slide two Plastic Bushings (20)* into the opening in the Lower Main Frame (A) as shown.
Slide the Seat Pad Frame (L) into the two Plastic Bushings (20).
Hold the Seat Pad Frame (L) in place with T-shapped Pop Pin (21).
To stop the Seat Pad Frame (L) from slidding all the way out insert:
One 57 (5/16” x 1/2” socket head bolt)
One 61 (5/16” washer)
*NOTE:
These parts might be pre-installed.
C. Attach Back Pad (AA) to the Back Pad Frame (M) as shown using:
Two 56 (5/16” x 1 5/8” hex head bolt)*
Two 62 (5/16” spring lock washer)
Two 61 (5/16” washer)
Attach two End Caps (23) to the top and bottom of Back Pad Frame (M) as shown.
*NOTE:
Do NOT over-tighten these bolts. Tighten these bolts until spring lock washer is flat.
Over-tighten these bolts will cause T-nuts in pads to strip out.
D. Attach Back Pad Frame (M)* onto Back Pad Adjustment (N)* using:
One 95 (1/2” x 5 1/4” hex head bolt)
Two 97 (1/2” washer)
One 96 (1/2” nylon lock nut)
*NOTE:
These two parts might be pre-installed.
E. Slide two Plastic Bushings (20) into the opening in the Upper Main Frame (D) as shown.
Slide the Back Pad Adjustment (N) into the two Plastic Bushings (20).
Hold the Back Pad Adjustment (N) in place with T-shapped Pop Pin (21).
Attach End Cap (2) to Back Pad Adjustment (N) as shown.
Insert T-shapped Pop Pin (26) as shown.
To stop the Back Pad Adjustment (N) from slidding all the way out insert:
One 57 (5/16” x 1/2” socket head bolt)
One 61 (5/16” washer)
F. You can now wrench tighten all bolts and nuts in this step. Do NOT re-tighten any of the pad bolts.
Leave all pulley bolts hand tight until cable installation in step 10 is completed.
 Loading...