EasyManua.ls Logo

PowerXL SMOKELESS GRILL User Manual

PowerXL SMOKELESS GRILL
2 pages
To Next Page IconTo Next Page
Page #1 background imageLoading...
Page #1 background image
Disassemble the packed
parts and remove all
packaging materials. Wash
all parts with soap and
water. Dry the parts
before use.
Attach the Power Cord
to the Base Unit
and then plug the
Power Cord into
an outlet.
Press the Power Button
and then the Fan Button.
Set the temperature to
a medium or high heat
setting for 4–6 mins.
to preheat the grill.
Then, set the desired
cooking temperature and
add your food!
STEP 1
Reassemble the parts in
the same order they
were packaged.
(see reverse side for
detailed instructions).
STEP 3
STEP 4
STEP 5
STEP 2
Ensure that the Water
Tray is in place and
ll with about
2 cups of water.
See owner’s manual
for complete instructions
and important safety
information before
using this product.
PXL-SG_QSG_RTL_ENG_V1_210222
IMPORTANT: Unpack all parts from the box and remove any clear or blue protective lm on the components.
Wash with warm, soapy water before rst use (only select accessories are dishwasher safe).
Question and Answer IconNeed help?

Do you have a question about the PowerXL SMOKELESS GRILL and is the answer not in the manual?

PowerXL SMOKELESS GRILL Specifications

General IconGeneral
Cooking Surface13.75" x 8"
Power1500 Watts
Non-Stick SurfaceYes
Removable Drip TrayYes
Dishwasher Safe PartsYes
Temperature ControlAdjustable
MaterialPlastic and Metal
ColorBlack
Temperature Range200°F to 450°F
TypeElectric Indoor Grill
FeaturesSmokeless technology, LED smart temperature control
Warranty1 Year

Summary

Quick Start Guide

Step 1: Prepare Grill Parts

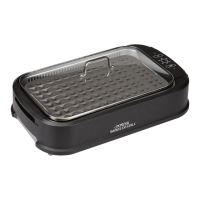
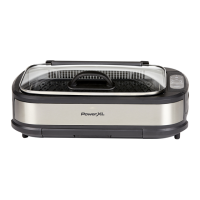
Disassemble parts, remove packaging, wash with soap and water, and dry before use.

Step 2: Add Water to Tray

Ensure Water Tray is in place and fill with approximately 2 cups of water.

Step 3: Reassemble Grill

Reassemble the parts in the same order they were packaged. Refer to reverse side for details.

Step 4: Connect Power

Attach the Power Cord to the Base Unit and plug it into an electrical outlet.

Step 5: Preheat and Cook

Press Power/Fan, set medium/high heat for 4-6 mins to preheat, then set temp and add food.

Assembly Instructions

Step 1: Place Base Unit

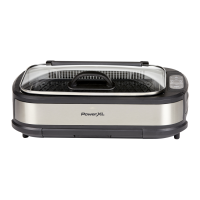
Place the Base Unit on a stable, level surface.

Step 2: Insert Water Tray

Place the Collection Pan/Water Tray inside the center of the Base Unit.

Step 3: Position Drip Tray

Place the Drip Tray on top of the Collection Pan/Water Tray inside the Base Unit.

Step 4: Install Heating Element

Place the Heating Element on top of the Drip Tray, aligning arrows.

Step 5: Add Grill Plate

Place either the Grill Plate or Griddle Plate on top of the Heating Element.

Step 6: Use Glass Lid

When cooking, place the Glass Lid over the Grill Plate or Griddle Plate.

Related product manuals