7
VENTILATED AREAS. GASOLINE FUMES CAN IGNITE IN
THE PRESENCE OF ANY OPEN FLAME, PILOT LIGHT,
CLOTHES DRYER, WATER HEATER, ETC.
Your machine should be started and operated for
several minutes at least every 30 days.
If the machine cannot be operated every 30 days,
follow the storage recommendations within the engine
documentation. Disconnect all hoses and drain
completely. Also, be certain that the pump is drained
completely. Turn over the engine with the recoil
starter several times to do this.
NOTE: A fuel shut-off valve is positioned on the
engine. The valve should be closed during storage
periods.
USING YOUR PRESSURE WASHER
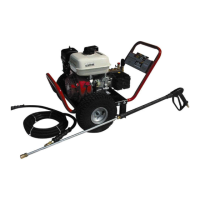
Refer to the General Product Information Section for
visual reference to this section.
Assembly
The first step after removing your generator from the box
is assembling the handle and the hoses. The handle is
mounted to the base plate along with the rear support
piece using the carriage bolts supplied. Please note that
the battery kit for electric start models should be intalled at
the same time as the handle. The gun and hose can now
be attached using the quick connect fittings. Refer to the
pictures in the parts list section of this manual for
clarification.
Preparation for Starting the Pressure Washer
After assembly you are almost ready. Next, remove the
shipping cap from the oil inlet on the pump and replace it
with the supplied dipstick. Now add oil to the engine as
specified in the engine documentation. Finally, put
gasoline into the fuel tank on the engine.
Starting the Pressure Washer
Verify that the lubrication levels are correct. Connect the
pump to a water supply capable of providing at least
4.5gpm and turn the water on. Most outdoor faucets
provide an adequate supply of water. If you are not sure
you have a proper water supply then simply measure the
amount of time it takes to fill a container of a known
quantity, such as a one gallon milk jug, and determine the
flow rate. You should never run the machine without being
connected to an adequate water supply. Squeeze the gun
trigger until a steady flow of water comes from the tip.
Turn the fuel valve to the ON position and choke the
engine as needed. Be sure to set the lock-off device on
the gun. Turn the engine ON/OFF switch to the ON
position and now give a firm pull on the recoil starter (or
turn the key for electric start models). Return the choke to
the standard position as the engine warms up.
Stopping the Pressure Washer
Discontinue use of the spray gun. Turn the engine switch
to the off position. When the engine is at rest, squeeze the
trigger to release the pressure in the pump. Turn the fuel
valve to the off position. Turn the water supply off.
Squeeze the trigger to release any remaining water from
the pump. Note: This does not replace the procedures for
storing the pressure washer because it will not completely
empty the pump and hoses.
Using your Pressure Washer
Your pressure washer is designed to clean surfaces
through the use of high water pressure. The extreme
pressure produced can damage surfaces if care is not
used. Always test in an obscure area to determine the
proper spray angle and distance between tip and surface
starting about 2 feet away and gradually moving closer.
The spray angle is determined by the color coded tips or
by turning the knob on the adjustable style tip.
Interchanging tips or adjusting spray angle on
adjustable tips should only been done with the gun
lock-off feature engaged. The following is a description
of the tips. Note that all tips are not included with your
pressure washer.
Adjustable Tip. This tip is typically barrel shaped and
rotates around the lance axis to adjust spray angle. To
apply chemicals with this tip, grasp the tip firmly and pull
away from the gun making certain the trigger is locked off.
This should “click” into the low pressure mode. After
applying chemicals simply pull the tip back to the original
position for high pressure spraying. Experiment with the
angle adjustments for the optimum cleaning position for
each surface.
The following 5 tips are typically included as a set when
the adjustable tip is not used. These utilize a quick-
coupler to switch between tips.
Low Pressure – Black. This tip is used to apply
chemicals at low pressure. This nozzle has a 25° spray
angle.
0° - Red. Provides the most cleaning force but over a
smaller area.
15° - Yellow. Provides strong cleaning force over a
slightly larger area.
25° - Green. Provides good cleaning force over a larger
area. Popular for surfaces which do not have too much
tough dirt because of the wider area and good force.
40° - White. Provides the most gentle force but over the
largest area.
Chemical Application. Always dress properly when using
chemicals. Chemical application can only be done in the
low pressure mode through the supplied chemical
injection system. The chemical tube should be inserted
into the chemical tank and the Black tip installed or the
adjustable tip set in low pressure position. The chemicals
are automatically drawn into the water flow and applied to
the surface to be cleaned. After application, return to the
desired high pressure settings to clean. Chemicals should
never be introduced through the water supply because
they will damage the internals of the pump. They should
only be supplied through the downstream chemical
injector included with the machine. Care should always be
taken when using chemicals because they can be harmful
to people, animals, and plants. Care should also be taken
to prevent overspray on the pressure washer itself
because they can corrode the external components.
 Loading...