Operating Instructions
Checking for Leaks
Tank/Gas Line Connection
• Make 2 cl/2-3 oz.a of leak solution by mixing one part liquid dishwashing soap
with three parts water.
• Turn gas tank “ON” at valve.
• Spoon leak check solution at all “x” locations (See page 5, illustration 3).
• If any bubbles appear turn gas tank “OFF”, reconnect and re-test. If you conti-
nue to see bubbles after several attempts, disconnect gas source and contact
your local gas supplier for assistance.
• If no bubbles appear after one minute turn tank “OFF”, wipe away solution and
proceed.
Placement
CAUTION: Tipping danger. Use stakes to secure.
Once you have selected the location, secure the Predator Dynamic device by pla-
cing a stake in each of the (2) front feet.
Maximum performance may require relocating your Predator Dynamic device from
time to time. To move, remove stakes, place your foot on the cart base and tilt
backward by holding the handle. Pull to the new location. Re-install stakes.
Turning Off
Turn gas tank “OFF” by turning valve clockwise until it stops.
CAUTION: The gas supply must be turned off at the gas tank when this outdoor gas
appliance is not in use.
Cleaning and Care
CAUTION: All cleaning and maintenance should be done when Predator Dynamic is
cool and with the fuel supply disconnected.
CAUTION: DO NOT clean any Predator Dynamic part in a self cleaning oven.
CAUTION: This Predator Dynamic should be thoroughly cleaned and inspected on a
regular basis.
CAUTION: Abrasive cleaners will damage this product.
CAUTION: Always make sure vaccuum fan blades spin freely. CO
2
engine will
get distroyed if not taken care of:
1. Turn gas valve OFF.
2. Wait 10 minutes to fully
stopp and cool off.
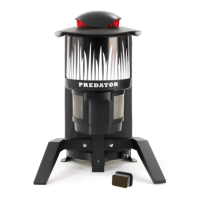
3. Remove hat.
4. Remove clear plastic
cowl (4 x philps screws).
5. Gently clean using bottle
brush dipped in soap water.
6. Check and blow the air passages
(air-inlet, under fan and heatsink)
for fresh air in blockage
A. Clear plastic cowl.
B. Fan blades.
Watch cleaning instruction video at www.predatormosquitotraps.com
Before Each Use:
1. Keep the Predator Dynamic area clean and free from any combustible materials,
gasoline, and other flammable vapors and liquids.
2. Do not obstruct the flow of the combustion of gas and the ventilation air.
3. Keep the ventilation opening(s) of the gas tank area free and clear from debris.
4. See “Cleaning Instructions” for proper cleaning instructions.
Cleaning Instructions / Routine Service
To ensure maximum performance and to lengthen the life of your Predator Dynamic
device, perform these steps each time your tank is empty. This model will consume
a standard 10 kg gas tank every 15-18 days.
Note: While unit is in use, check the following weekly:
• Check catch container and clean.
• Check air passages for blockage.
1. Turn valve on gas tank “OFF”.
2. Disconnect hose/regulator gas line from tank by turning knob counterclockwise.
3. Remove empty tank replace with full gas tank.
4. Remove catch container, empty and clean.
5. Slide catch container back into place.
6. Remove used Rapid Action™ Sticky Paper and dispose of properly.
7. Slide fresh Rapid Action™ Sticky Paper in place and remove protective paper.
8. Remove Rapid Action™ cover by turning counterclockwise.
9. Remove used Rapid Action™ attractant (if necessary) and properly dispose.
Note: Rapid Action™ attractant lasts 30 days.
10. Remove fresh Rapid Action™ attractant from package (if necessary). Dispose
of packaging properly.
11. Place Rapid Action™ attractant back into holder with holes orienting upward.
12. Replace Rapid Action™ Attractant cover.
13. Place the Rapid Action™ Attractant into the multi attractant compartment.
14. Check engine and gas lines for any sign of damage or missing parts. Repair
any problems before attempting to start.
15. Reconnect gas line to gas tank by turning knob clockwise.
16. Remove tank cover from empty gas tank and place on full gas tank.
17. Perform leak check.
18. Start following “Lighting” instructions.
19. Wash hands with soap and water.
Replacing Igniter Battery
If you do not hear a clicking sound when the igniter button is depressed, the battery
may have lost its charge. Replace battery as follows:
1. Turn gas tank valve “OFF”.
2. Open battery compartment by turning cap on bottom of engine counterclockwise.
3. Remove used battery and properly dispose.
4. Place fresh AA battery into compartment – negative (–) end goes in first.
5. Secure cap by turning clockwise until it stops.
6. Start following “Lighting” instructions.
End of Season Storage
To lengthen the life of your Predator Dynamic device, perform these simple steps at
the end of the mosquito season.
1. Turn valve on gas tank “OFF”.
2. Disconnect regulator/hose assembly from tank by turning knob counterclockwise.
3. Remove tank cover.
4. Remove gas tank and store outdoors away from children and must not be sto-
red in a building, garage or other enclosed area.
5. Remove and properly dispose of the Rapid Action™ Sticky Paper and Rapid
Action™ attractant.
6. Cover your Predator Dynamic device to protect from dust and store it in a cool
dry place.
CAUTION: Storage of an outdoor gas appliance indoors is only permissible if the
tank is disconnected and removed from the outdoor gas appliance.
Limited Warranty
Amplecta AB (“Vendor”) warrants to the original retail purchaser of this product,
and to no other person, that if this product is assembled and operated in accor-
dance with the printed instructions accompanying it, then for a period of one (1)
year from the date of purchase, all parts in such product shall be free from defects
in material and workmanship.
Vendor may require reasonable proof of your date of purchase. Therefore, you
should retain your sales slip or invoice. This Limited Warranty shall be limited to the
repair or replacement of parts, which prove defective under normal use and service
and which Vendor shall determine in its reasonable discretion upon examination
to be defective. Before returning any parts, you should contact Vendor’s Customer
Service Department using the contact information listed below. If Vendor confirms,
after examination, a defect covered by this Limited Warranty in any returned part,
and if Vendor approves the claim, Vendor will replace such defective part without
charge. If you return defective parts, transportation charges must be prepaid by
you. Vendor will return replacement parts to the original retail purchaser, freight or
postage prepaid.
B A
 Loading...