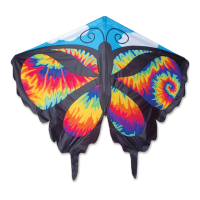
This document provides assembly instructions and usage guidelines for the "BUTTERFLY" kite from PREMIER COLLECTIONS.
Function Description
The BUTTERFLY kite is a recreational flying device designed for outdoor use in specific wind conditions. Its primary function is to be flown in the air, providing an enjoyable experience for users. The assembly process involves connecting various rods and lines to form the kite's structure, which then interacts with wind to achieve flight.
Important Technical Specifications
The kite's structure is composed of several types of rods and lines:
- Outer Leading Edge Rod: 2 units
- Tail Spreader Rod: 2 units (upper and lower)
- Upper Spreader Rod: 1 unit
- Wingtip Shaping Rod: 2 units
- Antenna Rods: Pre-inserted, connect to an Antenna Connector on the Spine Rod.
- Spine Rod: Central structural element.
- Inner Leading Edge Rods: Connect to Outer Leading Edge Rods and a Vinyl Leading Edge Connector on the Spine Rod.
- Line Tensioner: Used to adjust the bow of the Upper Spreader Rod.
- Tensioning Line: Creates an approximately 12-inch bow.
- Wingtip Pockets: Designed to hold Wingtip Shaping Rods.
- Reinforced Stops: Guide the Wingtip Shaping Rods within the pockets.
- Arrow Nocks: Located on Wingtip Shaping Rods, hook onto loops near pocket openings.
- Trailing Edge Pockets: Hold the capped ends of Lower Tail Spreader Rods.
- Bridle: Features a daisy chain that needs to be undone for flight.
- Main Tow Loop: Where the flying line is attached.
Recommended Line: 150 LB TEST LINE.
Usage Features
The BUTTERFLY kite is designed for flight in specific wind conditions, categorized by the Beaufort Scale.
Optimum Wind Conditions:
- CALM (0 MPH): Smoke rises vertically. Not suitable for flying.
- LIGHT AIR (1-2 MPH): Direction of wind shown by smoke, but not by wind vanes. Not ideal for flying.
- LIGHT BREEZE (3-7 MPH): Wind felt on face, leaves rustle, ordinary vane moves. Suitable for flying.
- GENTLE BREEZE (8-12 MPH): Leaves and small twigs in constant motion; wind extends light flag. Ideal for flying.
- MODERATE BREEZE (13-18 MPH): Raises dust and loose paper; small branches move. Suitable, but approaching stronger conditions.
- FRESH BREEZE (19-24 MPH): Small trees & leaves begin to sway; crested wavelets form on inland water. May be too strong for optimal flight.
- STRONG BREEZE (25-30 MPH): Large branches in motion; utility wire whistle; windows rattle. Likely too strong for safe or optimal flight.
Flight Instructions:
- Tie flying line to Tow Loop.
- Launch: Have a friend stand about 75 ft. downwind, holding the kite with its head pointed towards the sky.
- Release: As the wind catches the kite, signal your friend to release it while you bring in the line with long, steady pulls.
- Ascension: Slowly let out more line as the kite flies upward.
Maintenance Features
The manual does not explicitly detail maintenance features, but the assembly instructions imply certain aspects that could be considered part of maintenance or care:
- Careful Assembly: The instructions emphasize "carefully insert" and "slide" actions, suggesting that proper handling during assembly is crucial to prevent damage to the rods, connectors, and fabric.
- Storage: While not explicitly stated, the initial step of "Unroll kite and lay out flat facedown" suggests that the kite is designed to be rolled up for storage, which would help protect its components.
- Inspection: Before each flight, it is implied that users should inspect the kite's components, such as the rods, lines, and connectors, to ensure they are properly assembled and in good condition. For instance, Step 3 mentions "Slide pre-inserted Antenna Rods out and into Antenna connector," indicating that these parts are designed for repeated assembly and disassembly.
- Component Replacement: The modular nature of the rods and connectors suggests that individual components could potentially be replaced if damaged, although the manual does not provide details on obtaining spare parts.
- Line Management: The instruction to "Undo daisy chain on bridle" before attaching the flying line highlights the importance of proper line management to prevent tangles and ensure correct kite function.
Overall, the BUTTERFLY kite is a user-assembled, wind-powered recreational device designed for flight in moderate wind conditions, requiring careful setup and launch procedures.