Do you have a question about the Premier Kites Skeleton 13 ft and is the answer not in the manual?
Locate and prepare the kite's head struts for assembly.
Insert main cross struts into designated head pockets A, B, C, and D.
Insert the horizontal head strut into head pockets E and F.
Insert the lower head strut into head pockets G and H.
Tie spine, cross struts, and horizontal strut together using center webbing.
Align and attach neck and head velcro, centering the spine strut.
Connect head clips to the body's shoulder loops for secure attachment.
Bend and insert the lower hip strut into hip sleeves and pockets.
Attach the flying line securely to the kite's tow loop.
Launch the kite with a partner by signaling for release as wind catches it.
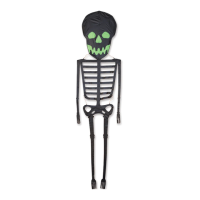
The Premier Kites 13 ft. Skeleton KITE is a large, recreational kite designed for outdoor enjoyment, offering a unique skeletal aesthetic and a straightforward assembly process. Its primary function is to fly in various wind conditions, providing a visually striking presence in the sky.
The Skeleton Kite is designed to be a stable and engaging flying experience. Its large size and specific structural design allow it to catch and utilize wind effectively, lifting it high into the air. The kite's skeletal appearance, achieved through its frame and fabric design, makes it distinctive. The assembly process is engineered to be intuitive, guiding the user through each step to ensure correct setup for optimal flight performance. Once assembled and launched, the kite functions as an aerial display, moving gracefully with the wind. The design also incorporates features for easy breakdown and storage, emphasizing convenience for the user.
The usage of the 13 ft. Skeleton KITE begins with its assembly. The manual provides a step-by-step guide, starting with the removal of components from the bag and identification of the Head Struts. The initial steps involve inserting the Main Cross Struts into designated Head Pockets (A, B, C, and D), followed by the Horizontal Head Strut into Head Pockets E and F, and finally the Lower Head Strut into Head Pockets G and H. These steps establish the primary framework of the kite's head section.
A crucial usage feature is the method of securing the central structure. Step 5 instructs the user to tie the Spine, Cross Struts, and Horizontal Cross Strut together with the Center Webbing using a simple bow knot, similar to tying a shoe. This ensures the structural integrity of the kite's core.
Further assembly involves connecting the head to the body. Step 6 details lining the Center of the Neck Velcro with the center of the Head Velcro and attaching them, ensuring the Spine Strut is centered on the Neck Velcro. This connection is vital for the kite's overall shape and stability. Step 7 then requires attaching Head Clips to the Body Shoulder Loops, further integrating the head and body sections.
The lower section of the kite also has specific usage features. Step 8 explains that the Upper Hip Strut and Lower Hip Strut come pre-installed in the Center Hip Sleeve. The user needs to bend the Lower Hip Strut into a curve and insert it through the Lower Hip Sleeves and into the Lower Hip Pockets. This action completes the structural setup of the kite's lower body, giving it its full form.
A notable usage feature highlighted in the manual is the kite's design for easy disassembly and storage. The head of the Skeleton Kite is designed to be easily disconnected from the body. This feature simplifies both assembly and disassembly, making it convenient to pack away the large kite when not in use.
Once assembled, the kite is ready for flying. The flying instructions outline a simple two-step process. Step 1 involves attaching the flying line to the tow loop, which is the designated point for connecting the control line. Step 2 describes the launch procedure: a friend stands about 75 feet downwind, holding the kite with its nose pointed towards the sky. As the wind catches the kite, the user signals their friend to release it while steadily pulling in the line until the kite is aloft. As the kite ascends, the user slowly releases more line to allow it to climb higher. This cooperative launch method is a common usage feature for larger kites, ensuring a smooth takeoff.
The manual also includes a "Optimum Wind Conditions" chart, which is a key usage feature. This chart helps users determine the ideal wind speeds (measured in MPH) for flying the 13 ft. Skeleton KITE, ranging from calm to strong breeze conditions. This guidance ensures that users fly the kite in appropriate weather, maximizing enjoyment and minimizing potential damage.
The Premier Kites 13 ft. Skeleton KITE incorporates certain aspects related to maintenance, primarily concerning the fabric and structural integrity.
A significant maintenance-related note is provided regarding the kite's fabric. The manual states that all un-hemmed edges of the Skeleton kite's fabric are hot-cut. This manufacturing technique is a preventative maintenance feature designed to prevent fraying of the fabric edges. While hot-cutting significantly reduces fraying, the manual acknowledges that "some fraying will occur under ordinary use." This is presented as a normal occurrence and not a defect, with the assurance that it "will not affect the performance of the kite." This information helps manage user expectations regarding the appearance of the fabric over time and indicates that minor fraying does not require intervention or repair, as it will not impact the kite's flight capabilities.
Beyond this specific note on fabric, the design for easy disassembly also contributes to maintenance. By allowing the head to be easily disconnected from the body, the kite can be broken down into more manageable pieces. This makes it easier to inspect individual components for wear and tear, clean specific sections if needed, and store the kite in a way that prevents damage to its larger, assembled form. While not explicitly stated as a maintenance step, the ability to separate components facilitates better care and longevity of the kite. For instance, if a strut needs replacement or a section of fabric requires cleaning, the modular design simplifies access and handling.
The use of durable materials for the struts and webbing, though not detailed in specifications, is implied by the kite's design for outdoor use and repeated assembly/disassembly. The "Spine Strut (Pre-Installed)" and "Spine Sleeve" indicate a robust central structure designed to withstand the stresses of flight. Similarly, the "Bridle Loop" and "Tow Loop" are critical connection points that are expected to endure repeated use. While the manual does not provide explicit instructions for cleaning or repairing these components, the overall design suggests a focus on durability to minimize the need for frequent maintenance.
In summary, the maintenance features are primarily preventative (hot-cut fabric edges) and design-oriented (easy disassembly for inspection and storage), aiming to ensure the kite's longevity and consistent performance with minimal user intervention for repairs, especially regarding minor fabric wear.
| Brand | Premier Kites |
|---|---|
| Type | Skeleton Kite |
| Size | 13 ft |
| Wingspan | 13 ft |
| Material | Ripstop Nylon |
| Frame | Fiberglass |