Do you have a question about the Pressure-Pro TPMS+ and is the answer not in the manual?
Connect the Monitor to a 12V power source via an accessory lighter or hard-wiring.
Configure the unit's time and date through the on-screen prompts using arrow keys.
Set up multiple vehicles or tow vehicles in the system via the Vehicle Settings menu.
Name individual vehicles within the system using the Monitor's naming prompts.
Customize alert settings for low pressure, high pressure, temperature, and leaks.
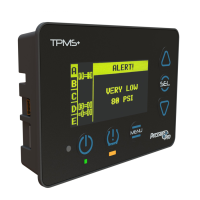
Powers the Monitor on/off and returns it to normal operation mode.
Powers the Monitor and returns it to normal operation mode.
Quick access prioritization of alerts and serves as an alert/warning reminder light.
Selects and moves forward through Monitor functionality during programming and use.
Navigates through screens and positions within the Monitor interface.
Follow a step-by-step guide to select, add, and attach sensors to vehicle tires.
Crucial note: Do not put sensors on tires until programming is complete.
Pull over, check tyre, and perform a soap bubble test if no visual leaks are found.
Monitor draws power; unplug it and remove sensors for storage longer than one month.
Hardwiring is preferred; use a 2 AMP IN-LINE FAST BLOW FUSE for protection.
Yes, use Vehicle Settings to turn ON/OFF specific vehicles; settings are saved.
Monitor displays '00' reading, then 3 dashes after 15 minutes.
Amber indicator light remains solid as a reminder after an alert is acknowledged.
Navigate to Menu -> Sensors -> Delete Sensors and confirm deletion.
Use a filtered valve stem or core to prevent Sensor clogging.
No, pressure increase is normal; 10-15% over cold is ideal for automotive use.
Sensors weigh 17 grams; balancing may be needed for smaller tyres, not RV/Trucks.
Transmit within 60s of installation, every 5 mins, and upon pressure changes.
No, settings are retained; monitor displays dashes until new reading is received.
Try moving the monitor, removing/reattaching the sensor for optimal RF transmission.
Check for poor interaction between sensor and valve core; retighten sensor.
Ensure cord is connected; check/replace fuse in cigarette lighter plug.
Use Menu -> Display -> Measurement Units to select imperial or metric.
Contact your Dealer or Distributor to order a replacement Sensor.
Monitor signals 25% loss, reads '00'; signal may be lost if sensor/stem is blown off.
Remove sensors for long-term storage; mark locations for easy re-installation.
Know tyre condition before moving; running on deflated tyres can cause damage.
Consider an Optional Antenna Kit or Echo Repeater for unique RF signal needs.
Adjust reference pressure via Menu -> Vehicle Settings -> Ref Pressures.
Monitor saves time-stamped data; logs up to 45 days, exportable in .xml format.
Instructions: MENU -> VEHICLE SETTINGS -> Logging -> EXPORT LOG.
Infer vehicle movement, stops, operating conditions, and air loss events from data.
Details on transmit range, frequency, operating temperature, weight, dimensions, and batteries.
Details on power requirements, dimensions, tyre positions, and alert level options.
System complies with FCC rules; RF signals subject to interference; no signal guarantee.
Covers defects in material/workmanship for one year from purchase date.
Excludes misuse, unauthorized alteration, improper installation, and external damage.
Repair or replacement is the sole remedy; excludes incidental/consequential damages.
Contact supplier for return authorization; include sales slip; you pay shipping.
TyreSafe Australia contact details for ordering, technical assistance, and warranty.
| Connectivity | USB |
|---|---|
| Display | LCD screen |
| Protocols Supported | Multiple TPMS protocols |
| Power Source | Rechargeable battery |
| Functionality | Reads, diagnoses, and programs TPMS sensors |
| Compatibility | Wide range of vehicle makes and models |