EasyManua.ls Logo

Presto Precise Digital Pressure Canner - User Manual

Presto Precise Digital Pressure Canner
2 pages
Print Icon
To Next Page IconTo Next Page
Loading...
POSSIBLE CAUSE
ERROR CODES Pressure Canning
Select canning recipe from Instruction Manual. Prepare jars, lids, and
bands. Prepare food as directed for canning.
Place removable pot in canner. Put canning rack in pot.
Pour 3 quarts of water into pot, up to ll line.
Fully insert power cord and plug into 120VAC wall outlet.
PRESSURE CAN
will ash.
Press the control knob to select the Pressure Can mode.
0I0
lights up. Rotate control knob adjusting to specic processing time
for recipe and jar size being used.
Verify you have set the right program and time.
Press .
INSERT JARS
lights up. Fill jars half full with water and place
on canning rack.
Remove regulator from canner cover.
Place cover on canner and lock. Conrm gasket is on sensor.
Lower sensor arm and turn green latch clockwise to lock in place.
Press
.
WARM
lights up. Jar warming will take about 20 minutes.
At this time, complete food preparation.
Canner will beep twice and
FILL JARS
lights up.
Unlock and lift sensor arm. Remove cover.
Lift out one jar at a time. Discard water from jar and immediately ll jar
according to canning recipe. Position lid and secure with band.
Place lled jar on canning rack and repeat until all jars are lled.
Place cover on canner and lock. Lower sensor arm and turn green latch
clockwise to lock in place. Conrm that regulator is not on the cover.
Press
and
HEAT
lights up.
Once the proper temperature is reached,
VENT
and
0I0
will light up
and the timer will begin to count down.
When venting time expires, unit will start beeping.
PUT REGULATOR ON
will light up. Using a pot holder, place regulator on
vent pipe, press down and rotate so regulator lever points to CAN position.
Press
to advance to canning phase. Beeping will stop.
If the air vent/cover lock did not lift during venting, air/steam will continue
to release until it lifts.
CAN
lights up. The processing time set in phase 1 appears.
Once the required pressure canning temperature is reached, the unit
will beep twice and
CANNING
will light up. Timer begins to count down.
Canner is now processing.
When processing time expires, canner beeps 4 times.
COOL
lights up. Cooling phase may take about 1½ hours.
When
0I0
lights up, the timer begins the nal cool down.
When time expires, unit beeps 10 times and
DONE
lights up.
Press and hold
for 3 seconds. Conrm air vent/cover lock has
dropped. Unlock and lift sensor arm. Remove cover.
Using a jar lifter, carefully remove jars by lifting straight up. Place jars
upright on a towel. Do not retighten bands. Allow jars to cool naturally.
Check seals no earlier than 12 hours, but no later than 24 hours.
1
Getting
Ready
2
Jar
Warming
3
Fill Jars
4
Venting
5
Canning
6
Cooling
7
Done
CANCEL
ADVANCE
CONTROL KNOB
Insucient liquid.
Regulator was not removed from
canner cover in jar warming phase.
Regulator was not removed from
canner cover during venting.
Canning process was
interrupted.
Cooling process was
interrupted.
E3
EI0
E20
E50
E4
E I
E2 E5
PRESSURE CANNING METHOD
Quickstart Guide
Digital Pressure Canner
®
E60
Reference Instruction Manual for a detailed
explanation on how to remedy the following
error codes. See Troubleshooting section.
Contact Presto Consumer Service for the
error codes below. Unplug canner. See
Consumer Service Information section in
Instruction Manual.
Regulator was not installed on
canner cover after venting.
E2I
Minimum Mason Jar Capacity: When using
the digital canner for pressure canning, use at
least 2 quart jars, 4 pint jars, or 8 half-pint jars.
Maximum Mason Jar Capacity
JAR TYPE
Regular mouth Wide mouth
Half-pints
10 14*
Pints
8 7
Quarts
5 4
* To properly double-deck, see Instruction Manual.
IMPORTANT: Read your Instruction/Recipe Manual carefully before each use for important operating instructions. Once you
have become familiar with how your Presto Precise® Digital Pressure Canner operates, this condensed guide
will become a convenient reference tool.
Question and Answer IconNeed help?

Do you have a question about the Presto Precise Digital Pressure Canner and is the answer not in the manual?

Summary

Pressure Canning Method

Getting Ready

Steps for preparing jars, food, and the canner for pressure canning.

Jar Warming

Process for warming jars before filling them with food.

Fill Jars

Instructions for filling jars with food and securing lids for canning.

Venting

Procedure for venting the canner to release air before processing.

Canning

The main processing phase where jars are heated under pressure.

Cooling

The phase where the canner cools down after processing.

Done

Final steps after cooling, including removing jars and checking seals.

Error Codes Pressure Canning

Boiling Water Canning Method

Getting Ready

Steps for preparing jars, food, and the canner for boiling water canning.

Jar Warming

Process for warming jars before filling them with food.

Fill Jars

Instructions for filling jars with food and securing lids for canning.

Canning

The main processing phase where jars are heated in boiling water.

Cooling

The phase where the canner cools down after processing.

Done

Final steps after cooling, including removing jars and checking seals.

Error Codes Boiling Water Canning

Overview

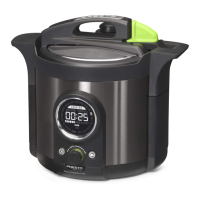
The Presto Precise® Digital Pressure Canner is a versatile kitchen appliance designed for both pressure canning and boiling water canning methods, offering precise control and automated features to simplify the home canning process. It is intended for users who want to preserve food safely and efficiently, with a focus on ease of use and consistent results.

Function Description:

The primary function of the Presto Precise® Digital Pressure Canner is to create a controlled environment for preserving food in jars. It achieves this through two distinct canning methods:

  1. Pressure Canning: This method is used for low-acid foods (e.g., vegetables, meats, poultry, seafood) that require higher temperatures to destroy harmful bacteria. The canner builds and maintains specific pressure levels, ensuring the internal temperature of the jars reaches the necessary point for safe preservation. The digital interface allows for precise setting of processing times based on the recipe and jar size.

  2. Boiling Water Canning: This method is suitable for high-acid foods (e.g., fruits, jams, jellies, pickles, tomatoes with added acid). In this mode, the canner heats water to a rolling boil, completely immersing the jars, to process the food. The digital controls manage the heating and processing times for this method as well.

The device automates several critical steps in the canning process, including jar warming, venting (for pressure canning), heating, processing, and cooling. Its digital display provides clear feedback on the current stage of canning and any necessary user actions.

Usage Features:

The Presto Precise® Digital Pressure Canner is designed with a user-friendly interface and automated steps to guide the user through the canning process.

General Setup:

  • Recipe Selection: Users begin by selecting a canning recipe from the Instruction/Recipe Manual, which dictates the method (pressure or boiling water), processing time, and jar size.
  • Jar Preparation: Jars, lids, and bands must be prepared according to standard canning practices.
  • Initial Water Fill: The removable pot is placed in the canner with the canning rack, and 3 quarts of water are added up to the fill line.
  • Power Connection: The power cord is fully inserted into a 120VAC wall outlet.
  • Mode Selection: The control knob is used to select either "Pressure Can" or "Boiling Water Can" mode. The display will flash the selected mode, and pressing the control knob confirms the selection.
  • Processing Time Setting: After selecting the mode, the display shows a default time (e.g., "010" for pressure canning, "005" for boiling water canning). The control knob is rotated to adjust this to the specific processing time required by the recipe and jar size.

Pressure Canning Specific Usage:

  • Jar Warming: After setting the program and time, the user presses the control knob. "INSERT JARS" lights up, prompting the user to fill jars half full with water and place them on the canning rack.
  • Cover and Lock: The regulator is removed from the canner cover. The cover is placed on the canner and locked, ensuring the gasket is on the sensor. The sensor arm is lowered and the green latch turned clockwise to lock it in place.
  • Warming Cycle: Pressing the control knob initiates the "WARM" cycle, which lasts approximately 20 minutes. During this time, the jars are warmed, and the user can complete food preparation.
  • Filling Jars: The canner beeps twice, and "FILL JARS" lights up. The user unlocks and lifts the sensor arm, removes the cover, and takes out one jar at a time. The water is discarded, and the jar is immediately filled with food according to the recipe. The lid is positioned, and the band secured. This process is repeated for all jars.
  • Venting Phase: The cover is placed back on the canner and locked, and the sensor arm is secured. The control knob is pressed, and "HEAT" lights up. Once the proper temperature is reached, "VENT" and "010" (or the set venting time) light up, and the timer begins to count down. The unit beeps when venting time expires.
  • Regulator Placement: "PUT REGULATOR ON" lights up. Using a pot holder, the user places the regulator on the vent pipe, presses down, and rotates it so the lever points to the "CAN" position. Pressing the control knob advances to the canning phase, and the beeping stops.
  • Canning Cycle: "CAN" lights up, displaying the set processing time. Once the required pressure canning temperature is reached, the unit beeps twice, and "CANNING" lights up. The timer begins to count down, indicating that the canner is actively processing the food.
  • Cooling Phase: When processing time expires, the canner beeps 4 times. "COOL" lights up. The cooling phase can take about 1.5 hours. When "010" (or the set cooling time) lights up, the timer begins the final cool down.
  • Done: When the final cooling time expires, the unit beeps 10 times, and "DONE" lights up. The user presses and holds the control knob for 3 seconds. The air vent/cover lock is confirmed to have dropped. The sensor arm is unlocked and lifted, and the cover is removed.
  • Jar Removal: Using a jar lifter, jars are carefully removed straight up and placed upright on a towel. Bands should not be retightened. Jars are allowed to cool naturally, and seals are checked 12-24 hours later.

Boiling Water Canning Specific Usage:

  • Jar Warming: Similar to pressure canning, after setting the program and time, the user presses the control knob. "INSERT JARS" lights up, prompting the user to fill jars half full with water and place them on the canning rack.
  • No Regulator: A key difference is that the regulator is never used for boiling water canning.
  • Cover and Lock: The cover is placed on the canner and locked, ensuring the gasket is on the sensor. The sensor arm is lowered and the green latch turned clockwise to lock it in place.
  • Warming Cycle: Pressing the control knob initiates the "WARM" cycle, which lasts approximately 20 minutes. During this time, the jars are warmed, and the user can complete food preparation and heat at least 3 quarts of water to boiling in a large kettle for later use. More water may be needed if the canner is not filled to jar capacity.
  • Filling Jars: The canner beeps twice, and "FILL JARS" lights up. The user unlocks and lifts the sensor arm, removes the cover, and takes out one jar at a time. The water is discarded, and the jar is immediately filled with food according to the recipe. The lid is positioned, and the band secured. This process is repeated for all jars.
  • Adding Boiling Water: Boiling water is poured into the canner so the water level is 1 inch above the jars.
  • Canning Cycle: The cover is placed back on the canner and locked, and the sensor arm is secured. Pressing the control knob initiates the "HEAT" cycle, and the set processing time appears. Once the boiling water canning temperature is reached, the unit beeps twice, and "CANNING" lights up. The timer begins counting down.
  • Cooling Phase: When processing time expires, the canner beeps 4 times. "COOL" and "005" (or the set cooling time) light up. The timer begins to count down. During this time, the sensor arm is unlocked and lifted, and the cover is carefully removed.
  • Done: When the final cooling time expires, the unit beeps 10 times, and "DONE" lights up. The user presses and holds the control knob for 3 seconds.
  • Jar Removal: Using a jar lifter, jars are carefully removed straight up and placed upright on a towel. Bands should not be retightened. Jars are allowed to cool naturally, and seals are checked 12-24 hours later.

Safety Features:

  • Cover Lock: The cover locking mechanism ensures the canner is properly sealed during operation.
  • Sensor Arm: The sensor arm and green latch confirm the cover is securely locked.
  • Air Vent/Cover Lock: For pressure canning, this mechanism ensures all air is vented before pressure builds and prevents the cover from being opened while under pressure.
  • Error Codes: The digital display provides specific error codes (e.g., E3 for insufficient liquid, E10/E20/E21/E30 for regulator issues, E50/E60 for interrupted processes) to alert the user to potential problems and guide troubleshooting.

Maintenance Features:

While the provided quickstart guide focuses on operational steps, general maintenance for such a device typically involves:

  • Cleaning: The removable pot, canning rack, and cover components (excluding electrical parts) should be cleaned after each use. The exterior of the canner can be wiped down.
  • Gasket Inspection: The cover gasket should be regularly inspected for wear, cracks, or damage, as a proper seal is crucial for both pressure and boiling water canning. Replacement may be necessary over time.
  • Regulator Cleaning (Pressure Canning): The pressure regulator should be kept clean and free of food particles to ensure accurate pressure control.
  • Air Vent/Cover Lock Cleaning: This mechanism should also be kept clean to ensure it operates freely.
  • Storage: The canner should be stored in a clean, dry place.

The Presto Precise® Digital Pressure Canner aims to make home canning accessible and reliable through its automated processes, clear digital feedback, and integrated safety mechanisms, allowing users to preserve a wide variety of foods with confidence.

Presto Precise Digital Pressure Canner Specifications

General IconGeneral
BrandPresto
ModelPrecise Digital Pressure Canner
CategoryKitchen Appliances
TypePressure Canner
MaterialStainless Steel
Power SourceElectric
Voltage120V
Digital DisplayYes
Automatic Pressure ControlYes
Automatic VentingYes
Suitable for Induction CooktopsNo
Control TypeDigital
Safety FeaturesLocking Lid
Wattage1500 watts

Related product manuals