installation
INSTALLING THE OPTIONAL
OUTSIDE AIR KIT (CAK-42)
NOTE: This Kit must be installed before fireplace is
WALL
\
,
I
HOSE
;
framed in.
Installing the Optional Combustion
Air Kit (CAK-42)
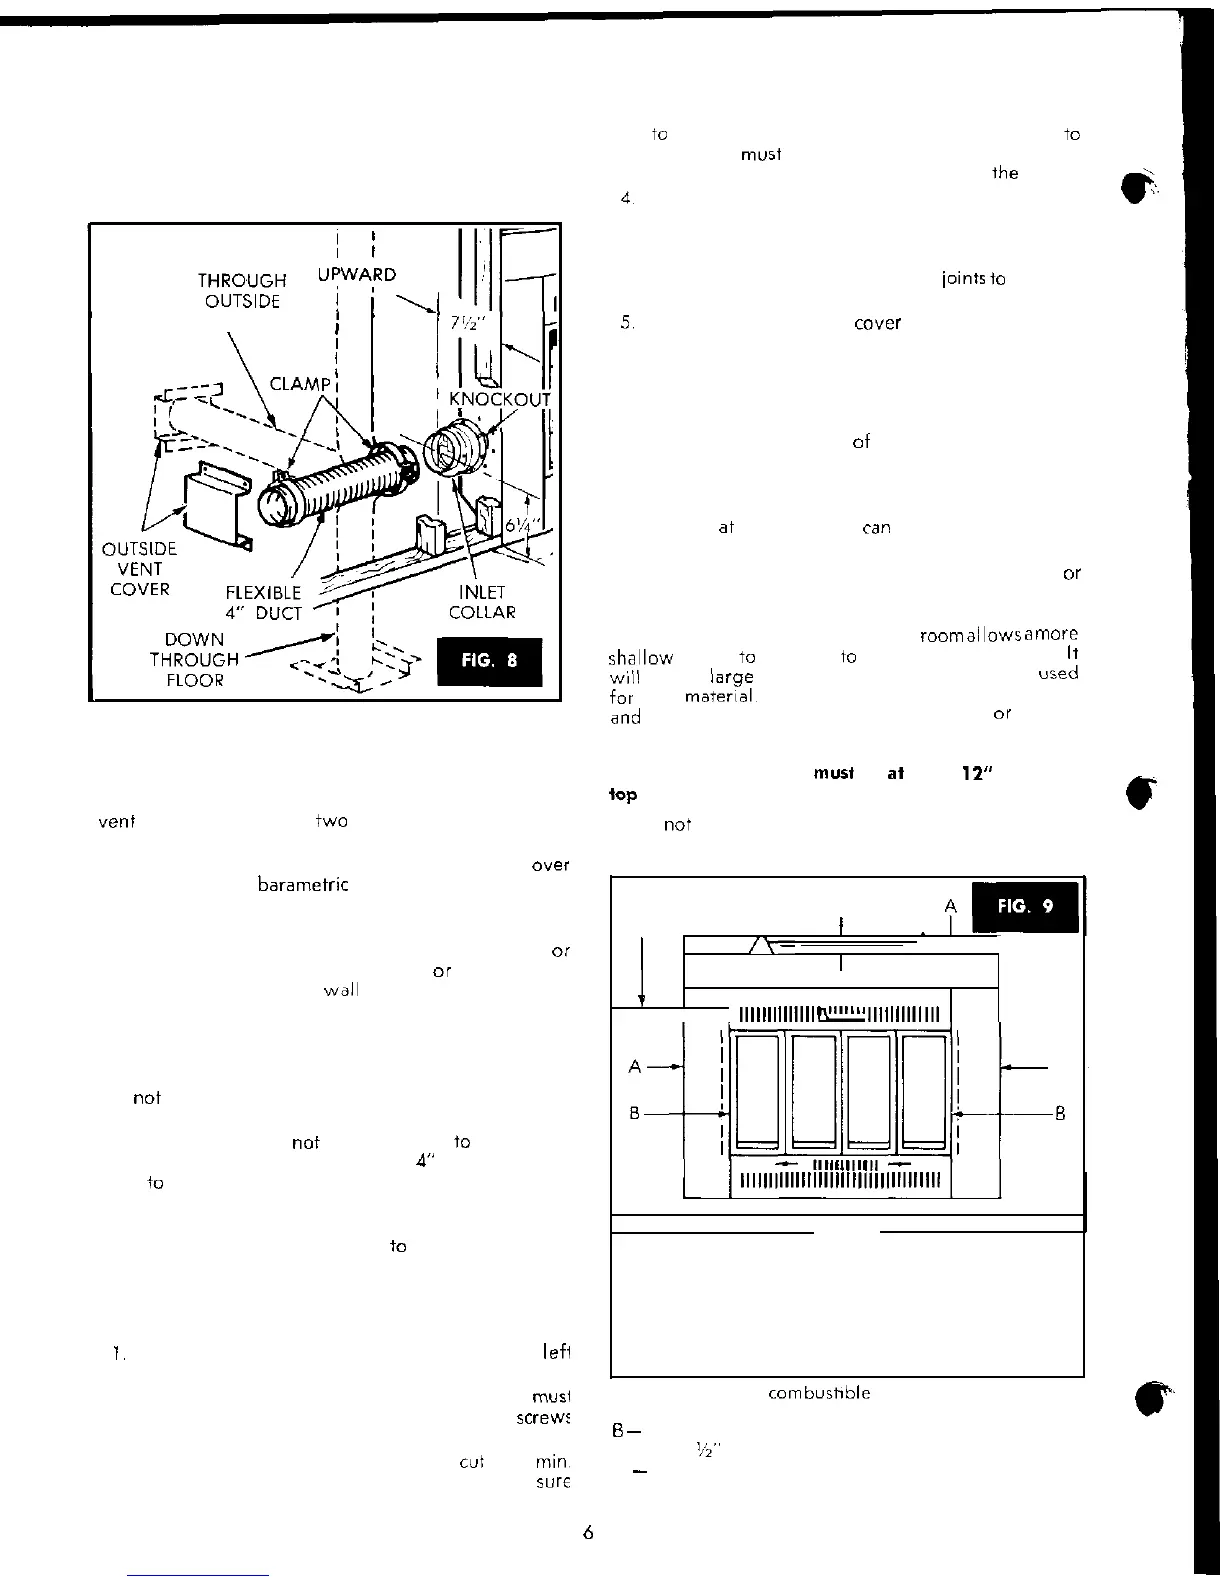
The kit consists of an inlet collar (with barometric
damper), 42” length of 4” flexible metal duct, outside
“en+
cover assembly and
+wo
hose clamps.
Remove the 2” diameter knockout on the lower left
side of the fireplace and mount the air inlet collar over
it (6 screws). The barametric damper in the inlet will
automatically open or close as the combustion air is
needed.
The combustion air duct can be straight upward
or
downward along side of fireplace,
or
to the rear if
fireplace is on an outside
wall
or in a chase,
The barometric damper will allow the combustion air
to be taken from any direction.
DO NOT TAKE AIR FROM ATTIC SPACE, ABOVE THE
ROOF, OR ANY OTHER ROOM (ESPECIALLY GARAGE).
Do not take air from any area where another fuel
burning appliance is installed.
If the flexible duct is not long enough to reach the
outside, it can be extended with any
c
diameter metal
pipe
to
any length needed.
When installing the inlet collar, be sure the label “This
Side Up” is toward the top or the dampers will not
work properly. Attach the duct
to
the inlet and out-
side vent securely with the hose clamps. Use duct
tape on all joints to be sure they are air tight.
Installation
I.
Remove 2 inch round knockout from lower
lefi
side of fireplace.
2. Position inlet collar (Label “This Side Up” must
be facing up). Fasten securely with six
screw
provided.
3. Locate outside vent cover and
cut
a 5”
min
diameter hole for the 4” flexible air duct. Be sure
6
to
extend the 5” opening all the way through
to
outside. It
must
be through any insulation, vapor
barrier, or sheet metal to the outside of
ihe
home.
Attach duct to outside vent cover with hose clamp
provided, push duct (with vent cover attached)
through wall or floor from outside and secure
duct to inlet collar on fireplace with hose clamp
provided. Use duct tape on all
ioints
to
be sure
they are air tight.
Attach outside vent cover to wall or flooring
with four screws provided.
FINISHING
Fireplace may be installed so face material is flush
with, or projecting in front of finished wall. For flush
installation, fireplace is recessed back of finished wall
surface, the thickness of the face material.
For projecting installation, the fireplace is flush with
finished wall
at
minimum and
can
be any distance into
the room. (See Fig. 4.)
Flush installations are recommended for smooth or
thin face materials. Use a molding to cover crack be-
tween finished wall and face material.
Projecting the fireplace into a room
alloys
a
mOie
shallow
cavity
to
be used
to
contain the fireplace. It
will
accent large natural materials (i.e. fieldstone) used
for
face materials The cracks between face material
and
wall can be filled with colored caulking,
01
mortar.
The top is usually covered by a mantel
NOTE: Any mantel
must
be
at
least
12”
from the
top
of fireplace top grille opening.
l Do not block off the air opening at the bottom
of the fireplace
2” MIN. HEIGHT
C
TO MANTEL .
I
I
/\-
I
1
t
I
lllllllllllllln”“1”1111111111111
:~~~~~
llllllllllllllllllllllllllllllllllll
-A
-8
NOTE
I
Do not allow any opening between the front of
the fireplace and the surrounding materials. Cold
air may enter or hot air be lost if there is an
opening. Fill this area with non-combustible caulk
or equal. Check with local codes for installation
procedures.
A Do not install combushble material closer than
line A.
6
~
Do not install non-combustible material any closer
than
%”
to line B for clearance for doors.
C
-
Non-combustible material can be installed up to
this line.
c
 Loading...