Section 2
PowerPlasma S Features
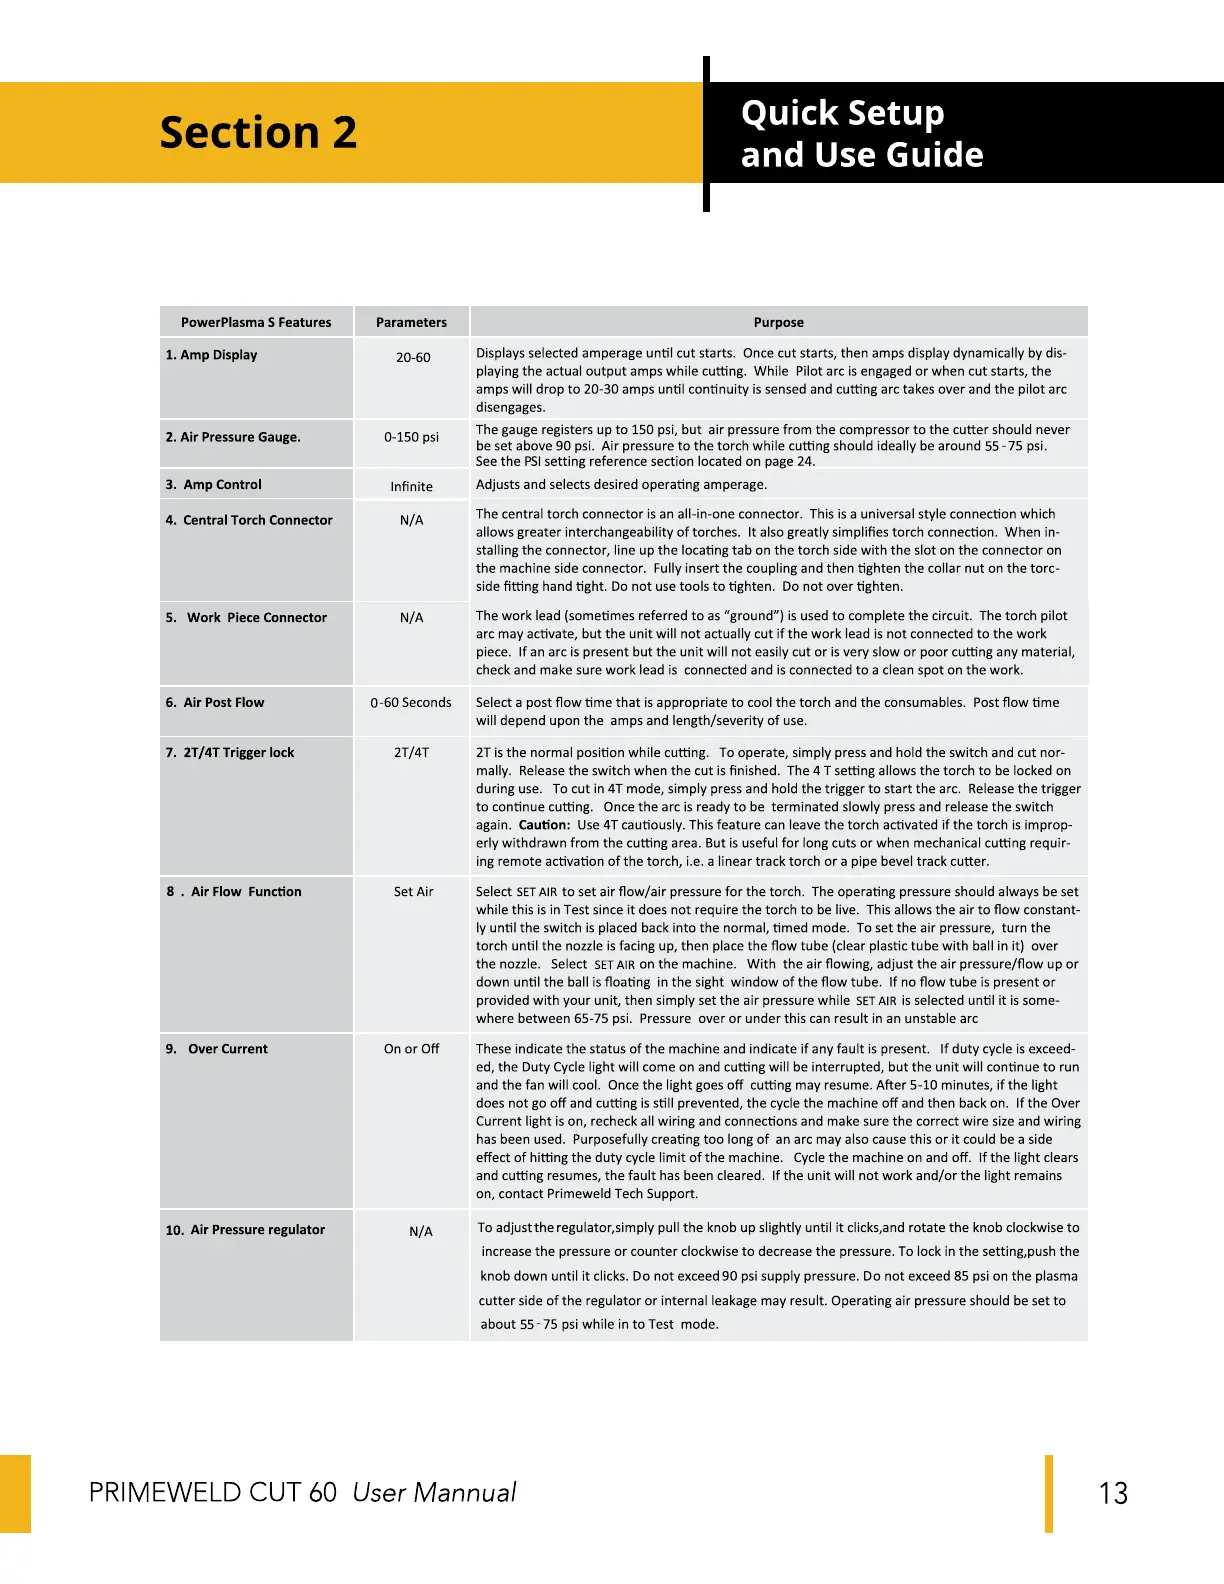
1. Amp Display
2. Air Pressure Gauge.
Amp Control
3.
4. Central Torch Connector
Work Piece Connector
5.
6. Air Post Flow
2T/4T Trigger lock
7.
8 . Air Flow Function
9. Over Current
10. Air Pressure regulator
Parameters
20-60
0-150 psi
Infinite
N/A
N/A
0-60 Seconds
2T/4T
Set Air
On or Off
N/A
Quick Setup
and Use Guide
Purpose
Displays selected amperage until cut starts. Once cut starts, then amps display dynamically by dis-
playing the actual output amps while cutting. While Pilot arc is engaged or when cut starts, the
amps will drop to 20-30 amps until continuity is sensed and cutting arc takes over and the pilot arc
disengages.
The gauge registers up to 150 psi, but air pressure from the compressor to the cutter should never
be set above 90 psi. Air pressure to the torch while cutting should ideally be around 55-75 psi.
See the PSIsetting reference section located on page 24.
Adjusts and selects desired operating amperage.
The central torch connector is an all-in-one connector. This is a universal style connection which
allows greater interchangeability of torches. It also greatly simplifies torch connection. When in-
stalling the connector, line up the locating tab on the torch side with the slot on the connector on
the machine side connector. Fully insert the coupling and then tighten the collar nut on the torc-
side fitting hand tight. Do not use tools to tighten. Do not over tighten.
The work lead (sometimes referred to as "ground") is used to complete the circuit. The torch pilot
arc may activate, but the unit will not actually cut if the work lead is not connected to the work
piece. If an arc is present but the unit will not easily cut or is very slow or poor cutting any material,
check and make sure work lead is connected and is connected to a clean spot on the work.
Select a post flow time that is appropriate to cool the torch and the consumables. Post flow time
will depend upon the amps and length/severity of use.
2T is the normal position while cutting. To operate, simply press and hold the switch and cut nor-
mally. Release the switch when the cut is finished. The 4T setting allows the torch to be locked on
during use. To cut in 4T mode, simply press and hold the trigger to start the arc. Release the trigger
to continue cutting. Once the arc is ready to be terminated slowly press and release the switch
again. Caution: Use 4T cautiously. This feature can leave the torch activated if the torch is improp-
erly withdrawn from the cutting area. But is useful for long cuts or when mechanical cutting requir-
ing remote activation of the torch, i.e. a linear track torch or a pipe bevel track cutter.
Select SETAIRto set air flow/air pressure for the torch. The operating pressure should always be set
while this is in Test since it does not require the torch to be live. This allows the air to flow constant-
ly until the switch is placed back into the normal, timed mode. To set the air pressure, turn the
torch until the nozzle is facing up, then place the flow tube (clear plastic tube with ball in it) over
the nozzle. Select SETAIR on the machine. With the air flowing, adjust the air pressure/flow up or
down until the ball is floating in the sight window of the flow tube. If no flow tube is present or
provided with your unit, then simply set the air pressure while SETAIR is selected until it is some-
where between 65-75 psi. Pressure over or under this can result in an unstable arc
These indicate the status of the machine and indicate if any fault is present. If duty cycle is exceed-
ed, the Duty Cycle light will come on and cutting will be interrupted, but the unit will continue to run
and the fan will cool. Once the light goes off cutting may resume. After 5-10 minutes, if the light
does not go off and cutting is still prevented, the cycle the machine off and then back on. If the Over
Current light is on, recheck all wiring and connections and make sure the correct wire size and wiring
has been used. Purposefully creating too long of an arc may also cause this or it could be a side
effect of hitting the duty cycle limit of the machine. Cycle the machine on and off. If the light clears
and cutting resumes, the fault has been cleared. If the unit will not work and/or the light remains
on, contact Primeweld Tech Support.
To adjust the regulator,simply pull the knob up slightly until it clicks,and rotate the knob clockwise to
increase the pressure or counter clockwise to decrease the pressure. To lock in the setting,push the
knob down until it clicks. Do not exceed 90 psi supply pressure. Do not exceed 85 psi on the plasma
cutter side of the regulator or internal leakage may result. Operating air pressure should be set to
about 55-75 psi while in to Test mode.
PRIME-WELD CUT 60
User Mannual
13
 Loading...