EasyManua.ls Logo

Prince Castle DCFT-MCD Series User Manual

Prince Castle DCFT-MCD Series
66 pages
To Next Page IconTo Next Page
Page #1 background imageLoading...
Page #1 background image
Vertical Toaster
DCFT-MCD Series
527-504revM_EN
Printed in USA 12/20 © 2020
Service
Manual
Product Identification
Heel and Crown Bun In-FeedBig Mac Club Bun In-Feed
LCD
Display
Temperature
Button
Left and Right
Scroll Buttons
Menu
Button
Adjustment
Knobs
Display
Indicator Light
Power Switch
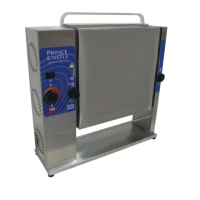
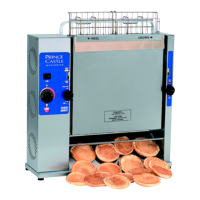
355 East Kehoe Blvd. • Carol Stream, IL 60188 USA
Telephone: 630-462-8800 • Toll Free: 1-800-PCASTLE
Fax: 630-462-1460 • www.princecastle.com
LIMITED WARRANTY
This product is warranted to be free from defects in material and/or workmanship for a period of two (2) years from date of original
installation, not to exceed 30 months from date of shipment from our factory. Any part or component which proves to be faulty in material
and/or workmanship within the warranty period will be replaced or repaired (at the option of Prince Castle, Inc.) without cost to the
customer for parts or labor.
This warranty is subject to the following exceptions/conditions:
Use of any non-genuine Prince Castle parts voids this warranty and all work must be
performed by an authorized Prince Castle
Service Agent.
All labor shall be performed during regular work hours. Overtime premium will not be covered.
Travel charges are limited to 200 kilometers (100 miles) round trip, 2 hours travel time, one trip per repair.
Damage caused by carelessness, neglect, and/or abuse (e.g., using wrong current, dropping, tampering with or altering electrical
components, or improper cleaning) is not covered.
Equipment damaged in shipment, by fire, flood or an act of God is not covered.
Damage to non-stick coated surfaces is not covered by this warranty.
Prince Castle will provide replacement parts to customer so customer can replace such parts if they are defective. Replacement
instructions are set out in the product’s Operation Manual.
PRINCE CASTLE SHALL NOT BE LIABLE FOR INCIDENTAL OR CONSEQUENTIAL DAMAGES, LOSSES, OR EXPENSES. THIS
IS PRINCE CASTLE’S ONLY WARRANTY. PRINCE CASTLE MAKES NO OTHER WARRANTY, EXPRESS OR IMPLIED. ALL
IMPLIED WARRANTIES OF MERCHANTABILITY AND/OR FITNESS FOR ANY PARTICULAR PURPOSE ARE HEREBY
DISCLAIMED AND EXCLUDED.

Questions and Answers:

Prince Castle DCFT-MCD Series Specifications

General IconGeneral
BrandPrince Castle
ModelDCFT-MCD Series
CategoryToaster
LanguageEnglish

Summary

Product Identification

Limited Warranty

Electrical Specifications

Disconnect Power

Safe Service Practices

Serial Number Matrix

Tools Required for Servicing Unit

Display Menu Options

Management Programming

Accessing Programming Mode

Details how to enter the programming menu by holding the MENU button.

Setting Temperature Scale (F/C)

Explains how to select between Fahrenheit and Celsius for temperature display.

Adjusting Set Point Temperatures

Describes how to modify platen temperatures for main, front club, and rear club settings.

Changing Display Language

Outlines the steps to select a different language for the unit's interface.

Selecting Toast Time

Details the procedure for setting the desired toast duration via the display menu.

Selecting MFY Store Setting

Explains how to choose between MFY and BOP store settings, affecting heater operation.

Exiting Programming Mode

Describes how to exit the programming menus and return to the ready state.

Remove Top Cover

Remove/Replace Front Door Assembly

Remove/Replace Back Door Assembly

Remove/Replace Club Belts

Remove/Replace Heel Compression Adjust Assembly

Remove/Replace Crown Compression Adjust Assembly

Remove/Replace Membrane Switch and Display Assembly

Remove/Replace Motor and Drive Train Assembly

Remove/Replace Club Assembly

Remove/Replace Club Gear Transfer Belt

PCB Removal/Replacement

Remove/Replace High Limit Switch

Remove/Replace Conveyor Belt

Remove/Replace Right Side Main Probe

Remove/Replace Front Club Probe

Remove/Replace Rear Club Probe

Troubleshooting Steps

Exploded View and Parts List

Section 1: Initial View and Part Numbers

Displays an exploded view of the unit with associated part numbers for identification.

Section 2: Additional Parts View

Continues the exploded view of the unit, showing additional parts and their corresponding numbers.

Section 3: Further Components View

Presents a third exploded view with part numbers, detailing more components of the unit.

Section 4: Component Identification View

Displays a fourth exploded view and parts list, highlighting various components and their identifiers.

Section 5: OEM Part Number List

Features a fifth exploded view and a detailed list of OEM part numbers and their descriptions.

Section 6: Parts Not Shown List

Lists and describes parts not visually depicted in the exploded views.

Wiring Diagram

Service Analysis Sheet

Test Points Diagram

Daily Cleaning: Release Sheets and Belts

Procedure Step 1: Turn Off and Cool Down

Instructs to turn off the unit and wait for it to cool before starting cleaning.

Procedure Step 2: Remove Release Sheet

Details how to remove, inspect, and handle the release sheet during cleaning.

Daily Cleaning: Release Sheet and Belt Cleaning

Procedure Step 2 (cont.): Clean Release Sheet

Explains how to clean the release sheet using specified solutions and rinse it.

Procedure Step 3: Clean Conveyor and Club Belts

Guides through cleaning the conveyor and club belts using appropriate solutions.

Daily Cleaning: Wire Bun Chute and Landing Zone

Procedure Step 4: Clean Wire Bun Chute

Details the process for removing and cleaning the wire bun chute.

Procedure Step 5: Clean Landing Zone and Reinstall Chute

Explains how to clean the landing zone and reinstall the wire bun chute.

Daily Cleaning: Toaster Exterior and Accessories

Procedure Step 6: Clean Toaster Exterior

Provides instructions for cleaning the exterior surfaces of the toaster unit.

Procedure Step 7: Turn Toaster On

Instructs to turn the toaster back on and allow it to warm up.

Procedure Step 8: Assemble Bun Infeed Accessory

Details how to assemble and install the optional bun infeed accessory.

Bi-Weekly Cleaning: In-Feed Assemblies

Procedure Step 1: Turn Off and Unplug

Instructs to turn off the unit and unplug it, then put on heat-resistant gloves.

Procedure Step 2: Remove and Clean Release Sheet

Refers to the daily procedure for removing and cleaning the release sheet.

Procedure Step 3: Remove In-Feed Cover

Details how to remove the in-feed cover and take it to the sink for cleaning.

Procedure Step 4: Wash, Rinse, Sanitize Cover

Explains how to wash, rinse, and sanitize the in-feed cover at the sink.

Procedure Step 5: Reinstall In-Feed Cover

Guides on reinstalling the in-feed cover after cleaning.

Procedure Step 6: Re-install Release Sheet

Refers to the daily procedure for reinstalling the release sheet.

Procedure Step 7: Turn Toaster ON

Instructs to turn the toaster on and wait for it to reach operating temperature.

Monthly Deep Clean: Conveyor Belt

Procedure Step 1: Turn Toaster Off

Instructs to turn off the toaster and put on heat-resistant gloves.

Procedure Step 2: Remove Release Sheet

Guides on removing and inspecting the release sheet.

Procedure Step 3: Prepare Grill Cleaner

Explains how to prepare the specific grill cleaner for the deep cleaning process.

Procedure Step 4: Spread Solution onto Belt

Details how to apply the cleaner solution evenly across the belt.

Procedure Step 5: Clean Conveyor and Club Belts

Guides through cleaning the conveyor and club belts using the prepared cleaner.

Procedure Step 6: Wipe Residue

Instructs to wipe off residue using a sanitizer-soaked cloth until soils are removed.

Procedure Step 7: Rinse Entire Belt

Guides on rinsing the entire belt with a clean sanitizer-soaked cloth.

Procedure Step 8: Close Conveyor Door

Instructs to close the conveyor door.

Procedure Step 9: Repeat for Other Side

Guides to repeat cleaning steps for the other side of the belt.

Procedure Step 10: Clean Landing Zone

Explains how to clean the landing zone by wiping out crumbs.

Bi-Annual Club Belt Replacement

Procedure Step 1: Turn Off and Unplug

Instructs to turn off the toaster and put on heat-resistant gloves.

Procedure Step 2: Loosen Side Cover

Details how to loosen and remove the left-hand side cover.

Procedure Step 3: Pivot Latch Arm

Explains how to pivot the latch arm and secure it in a metal clip.

Procedure Step 4: Remove Belt Tension

Guides on removing belt tension by pivoting the tension arms.

Procedure Step 5: Remove Old Belts

Instructs to remove the old club belts.

Procedure Step 6: Install New Belts

Guides on installing the new club belts.

Procedure Step 7: Ensure Belt Ride

Advises to ensure the belt bead rides in the groove of the belt rollers.

Procedure Step 8: Pivot Tension Arms

Explains how to pivot tension arms down and engage the latch arm.

Procedure Step 9: Engage Hooks and Secure Cover

Guides on engaging hooks and securing the side cover with a thumbscrew.

Procedure Step 10: Turn Toaster ON

Instructs to turn the toaster on and allow it to warm up.

Fault Codes Matrix

Allowable Labor Limits

Related product manuals