19 EN | ENGLISH
The user is personally responsible for possible harm to the health and
property of third parties in the event of improper use of the device or its
misuse.
THE PRINCIPLE OF OPERATION
The torque from the crankshaft of the engine through the clutch of the
centrifugal type is transmitted to the shaft of the trimmer crossbar and
then through the gearbox to the mowing headset.
ASSEMBLING
1. Put the lower gearbox on the crossbar, while aligning the guide hole
on the gearbox with the hole on the crossbar, then screw the bolt
through them to pre-fix the gearbox on the crossbar.
2. Tighten the gearbox on the crossbar with two clamping bolts.
3. Put the first attachment of the suspension bracket on the rod.
4. Put on the sealing element.
5. Put on the second mount of the suspension bracket.
6. Secure the suspension bracket.
7. Put the upper gearbox on the rod, while aligning the guide hole on
the gearbox with the hole on the rod, then screw the bolt through
them to pre-fix the gearbox on the rod.
8. Tighten the gearbox on the rod with the clamping bolt.
9. Fix the engine of the petrol pump with 4 bolts. (Important! The
lower gearbox should be directed downwards relative to the engine
standing on the protection of the gas tank).
10. Secure the handle attachment unit below the angle adjustment bar
by first unscrewing the 2 tightening bolts on it. And tightening them
after installation on the crossbar.
11. To secure the trimmer handles, loosen the handle fastener (4 bolts
on the handle attachment unit), insert the handles and tighten the
fastener so that the trimmer handles do not turn.
12. Install the protection, to do this, fix the metal mount of the
protection on the crossbar with a bolt.
13. Fasten the protection to the protection mount with two bolts. Attach
the knife for cutting nylon thread to the protection.
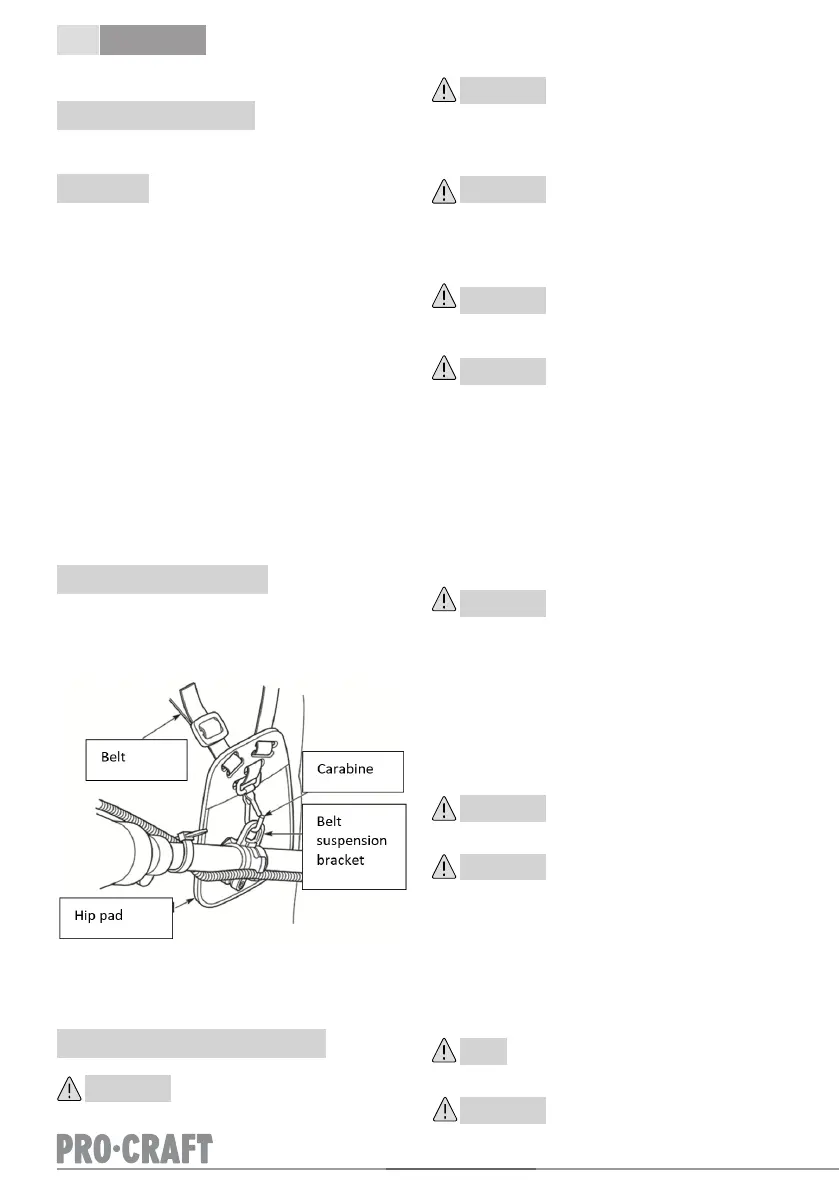
SUSPENSION BELT ADJUSTMENT
1. Put on the belt and adjust it so that the hip pad is placed on your
right hip.
2. Hang the trimmer by the carabine, fixing it on the bracket of the belt
suspension (Pic. 7).
Pic. 7 Adjustment of the suspension belt
3. Holding the handles with both hands, support the trimmer so that
the cutting headset is located parallel to the ground surface.
4. Adjust the length of the belt so that the cutting headset is
positioned and remains parallel to the ground surface at a distance
of 10-30 cm from the ground surface, depending on the mowing
height that you choose.
PREPARATION FOR WORK AND OPERATION
Motor oil
ATTENTION!
The trimmer is supplied from the factory without oil in the engine
crankcase. Before starting up, it is necessary to pour the required amount
of clean motor oil for four-stroke engines.
ATTENTION!
Every time before starting the engine, it is necessary to check the oil level
in the crankcase,
top up if necessary. Motor oil is an important factor affecting the service
life of the engine. It is necessary to replace the oil in the crankcase in a
timely manner.
ATTENTION!
Do not use oil for two-stroke engines. It is recommended to use motor
oil for a four-stroke gasoline engine of category SJ and higher according
to the API classification system. The oil viscosity according to the SAE
classification is selected depending on the ambient temperature at which
the engine will operate.
ATTENTION!
Untimely oil change, work on oil that has spent its life, work at a constantly
lowered oil level, work on oil that does not correspond to the ambient
temperature, will lead to engine failure, which will not be a warranty case.
ATTENTION!
When a new trimmer is put into operation, the first oil change in the engine
is made after 5 hours of operation. The second oil change after 25 hours
of operation of the trimmer. All subsequent oil changes in the engine are
made every 50 hours of operation of the trimmer.
Before starting the engine, check the oil level in the crankcase:
5. Place the trimmer on a flat horizontal surface.
6. Unscrew the oil filler cap and remove the dipstick.
7. Wipe the probe dry and insert it into the neck hole without tighting.
8. Carefully pull out the probe and inspect it. The oil level should
correspond to the upper mark on the dipstick. If the oil level in the
crankcase is insufficient, it is necessary to top up the clean oil to
the upper mark on the dipstick, which corresponds to the lower
edge of the filling hole. After the final check, tighten the probe
cover tightly.
ATTENTION!
Do not allow long-term contact of the skin of the hands with oil. Always
wash your hands thoroughly with clean water and soap. Store the
used oil in a special container. It is forbidden to pour waste oil on the
ground or into the sewer.
Fuel
Use unleaded gasoline with an octane rating of 92. Never use old or
contaminated gasoline or a mixture of oil and gasoline (fuel mixture for
2-stroke engines).
Avoid getting dirt or water into the fuel tank.
ATTENTION!
Engine failure due to the use of low-quality or old fuel, as well as fuel with
an inappropriate octane number is not a warranty case.
ATTENTION!
Store fuel in specially designed containers for this purpose. It is forbidden
to use food-grade plastic cans for storage.
Refueling is carried out with the engine turned off and in places with good
ventilation. When working with fuel, it is forbidden to smoke and use an
open fire. Fuel spillage is not allowed. It is necessary to prevent repeated or
long-term contact of the skin with fuel, as well as inhalation of fuel vapors.
Do not fill the fuel tank completely. Pour gasoline into the fuel tank so as to
leave space for thermal expansion of the fuel.
After refueling the fuel tank, make sure that the fuel tank lid is tightly
closed.
NOTE!
The maximum oil level in the crankcase corresponds to the lower edge of
the oil filler cap
ATTENTION!
 Loading...