EN | ENGLISH
20
After refueling, replacing or checking the oil level with a visual inspection,
check for oil leaks from the crankcase. Check the reliability of the
installation of the oil dipstick cover before each engine start, whether it is
properly covered. Before starting, wipe the fuel tank dry from the outside of
the remaining spilled fuel.
STARTING THE ENGINE
ATTENTION!
Do not use the trimmer without the protective cover of the trimmer head
installed.
ATTENTION!
Before starting, check the presence of a nylon thread in the trimmer head.
Check the serviceability of the protective casing and the sharpness of the
blade of the knife for cutting the nylon thread.
During operation, keep an eye on the serviceability and sharpness of the
knife for cutting the nylon thread. If the casing is removed or faulty, as well
as if the protective cover of the nylon thread cutter is not removed, you
will not be able to control the length of the trimmer head nylon thread and,
accordingly, the load on the engine and clutch parts.
ATTENTION!
Failure of the engine or clutch parts due to overload as a result of working
without a protective casing, with a faulty protective casing and a faulty
nylon thread cutter is not a warranty case.
STARTING A COLD ENGINE
1. Place the trimmer on a flat horizontal surface.
2. Fill the fuel tank with fresh gasoline.
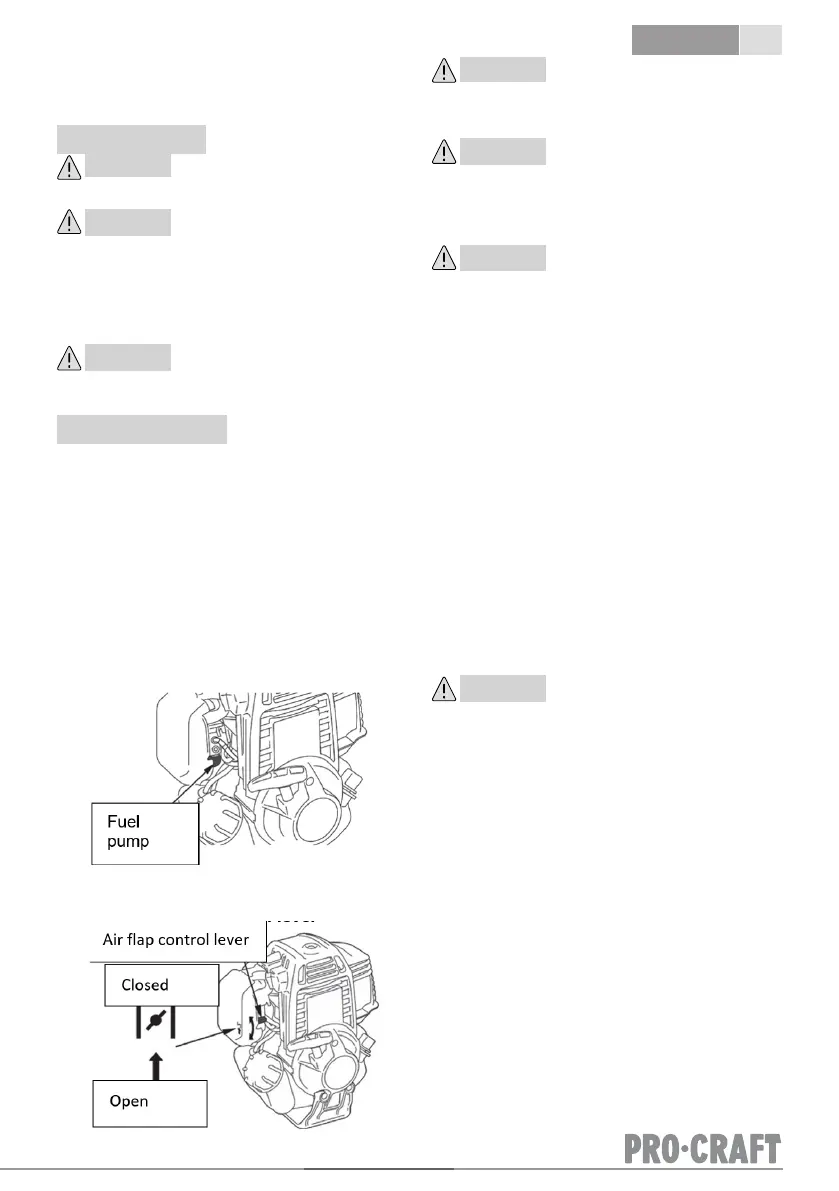
3. Press the manual fuel pump 7-10 times until the fuel appears in it.
The pump is located at the bottom of the carburetor under the air
filter housing.
Pic. 10 Manual fuel pump
4. Close the carburetor air flap. To do this, lift the flap lever up.
Pic. 11 Air flap control lever
5. Turn the engine crankshaft with the manual starter until you feel
resistance, then slowly lower the starter handle down. Pull the
starter handle slowly again until you feel that the starter has
engaged with the flywheel, after which, pull the starter handle
sharply and with effort and start the engine. Repeat if necessary.
After starting the engine, slowly and smoothly return the starter
handle to its place.
6. As the engine warms up, gradually open the air flap. Warming up
the engine, depending on the ambient temperature, takes from 1 to
3 minutes.
ATTENTION!
Depending on the ambient temperature, the engine warm-up time may vary.
It is possible to determine that the engine has warmed up by the following
signs: the engine is running steadily at idle and, when the throttle lever is
pressed, the engine is rapidly gaining momentum without failures.
ATTENTION!
When starting the engine, do not make a sharp jerk on the starter handle.
Always choose the free running of the starter cord when starting. Do not
pull the starter cord all the way when starting. Do not release the starter
handle when it is in the upper position. Failure to comply with these
requirements at startup may lead to damage to the starter parts and is not
subject to repair under warranty.
ATTENTION!
When starting a warmed-up engine, do not close the air flap, the spark plug
will be filled with fuel and the engine will not start.
If the engine does not start, it is possible that you missed the first flash and
the spark plug was flooded with gasoline. In this case, follow these steps:
1. Remove the cylinder cover.
2. Turn out and dry the spark plug.
3. Set the ignition switch to the "O" position.
4. Open the carburetor air flap.
5. Turn the trimmer with the spark plug hole down and, pressing the
gas trigger, pull the starter handle several times intensively to
remove excess fuel from the cylinder.
6. Replace the spark plug.
7. Install the cylinder cover.
8. Without closing the air flap, repeat the start procedure.
9. If the engine does not start after several attempts, refer to the
troubleshooting table or to an authorized service center.
Starting a warmed-up engine
When starting a warmed-up engine, do not close the air flap. The rest of the
startup procedure is the same as when starting a cold engine.
Engine stop
To stop the engine in normal mode, follow these steps:
1. Turn the engine into idle mode, to do this, release the gas trigger.
2. Allow the engine to run without load for 15-20 seconds, then turn off
the engine by setting the ignition switch to the "O" position.
ATTENTION!
Do not turn off the engine immediately after the end of operation, as this
can lead to a sharp increase in temperature inside the engine and, as a
result, to its failure.
Running-in of the trimmer
The first 5 hours of operation of the trimmer are the time during which the
main parts are added to each other. Therefore, for this period, observe the
following requirements:
1. Do not overload the engine with prolonged continuous operation at
maximum RPM.
2. Do not run the engine at idle speed and without load.
3. After running-in, be sure to replace the engine oil. It is best to drain
the oil while the engine has not cooled down after work, in this case
the oil will merge more completely and quickly.
Top up the oil in accordance with the instructions in the sections
"Preparation for work and operation", "Motor oil replacement".
 Loading...