Do you have a question about the PROCEED AVP2 and is the answer not in the manual?
Unpacking the audio video preamplifier and removing accessories from the carton.
Description of the included remote control and options for advanced controls.
Guidance on placing the preamplifier near digital sources for short cable runs.
Instructions for ensuring adequate clearance for heat dissipation and air circulation.
Location of the serial number for future reference and recording.
Encouragement to register the product for warranty and update notifications.
Explains the initial warm-up period for components to reach optimal performance.
Details the advanced DSP engine and hardware components used in the AVP2.
Explains the flash memory for software updates, enabling new features and standards.
Describes the flexibility in audio configurations, including 5.1 and potential for 7.1 channels.
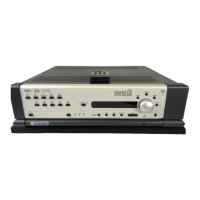
Controls for powering the unit on/off, standby mode, and indicators.
Buttons for selecting A/V sources, simulcasts, and signal path options.
Cycles through various surround sound modes appropriate to the received signal.
Controls for master volume, relative levels, delay, input level, and mute.
Adjusts display intensity, recalls settings, and shows main display information.
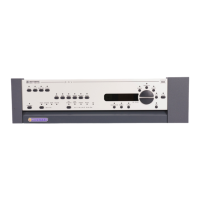
Inputs for balanced and single-ended analog audio signals.
Inputs for AES/EBU, S/PDIF (RCA/BNC), and EIAJ Optical digital audio.
Composite and S-video inputs/outputs for video signal routing.
Ports for RS-232, IR input, DC triggers, and PHASTLink™™ for system integration.
Controls for source selection, volume, mute, and standby.
Buttons for accessing and navigating the on-screen menu system.
Accesses and executes lists of special functions via the 'special' button.
Instructions for entering, exiting, selecting, changing, and saving menu items.
Overview of Operate, Setup, Custom, and About menus for system configuration.
Settings for automatic/manual source migration and simulcast playback.
Controls on-screen display position, status messages, timeout, and text.
Configuration for volume display, speed, mute level, maximum volume, and late night.
Associating buttons with audio/video connectors, naming, and input types.
Setting speaker parameters like crossover, distance, levels, and bass management.
Adjusting analog input levels and setting default surround modes.
Teaching IR commands to remotes, mapping panel buttons, and direct access.
Configuring triggers, IR input, links, and miscellaneous controls for automation.
Lists and allows control of functions like THX, volume, and display settings.
Displays comprehensive system status information for troubleshooting.
Changing master volume or relative speaker volumes for adjustments.
Details on surround off, THX, Dolby Digital, DTS, and other audio processing modes.
Guidelines for optimal seating area, screen size, and ambient light.
Advice on concealing equipment, using IR repeaters, and ensuring ventilation.
Guidance on positioning front, center, and surround speakers for best acoustics.
Further considerations for speaker placement, including screen size and subwoofer positioning.
Fields to record system info, operate menu settings, button defaults, and trigger/link settings.
Fields to record crossover, distance, levels, and bass manager settings.
Addresses problems with bass, aural image consistency, and speaker hum.
Troubleshoots AC problem messages, standby behavior, and video output.
Details the initial limited warranty period and registration benefits.
Explains the extended warranty terms, coverage, and limitations.
| THD | 0.005% |
|---|---|
| Frequency response | 20Hz - 20kHz |
| Total harmonic distortion | 0.005% |
| Signal to Noise Ratio | 85dB (line) |
| Input sensitivity | 200mV (line) |
| Dimensions | 17.5 x 5.25 x 14.25 inches |