© 2014 Proceq SA 5
3. Getting started
Note: When shipped, battery packs are not fully charged. Prior to use, please charge
the battery completely. To prevent the battery from damage, avoid deep-discharging or
storing it long-term when empty. Store the instrument at room temperature and charge
the battery fully at least once a year.
3.1 Charging the Proceq DY-2
A fully charged battery is sufficient for approximately 80 complete load cycles.
The battery status symbol will be displayed when the accumulator is at 10% of its capacity. In this
case it is still possible to make measurements, but it is advisable to recharge the battery by con-
necting the unit to a wall adaptor or a PC via the mini-USB port on the rear of the instrument. A
complete charging cycle will take approximately 3 hours (longer in the case of a deep-discharge).
Note: When charging the battery or when operating on mains supply, the charging circuit
will be disconnected after 5 hours of continuous charging. This is a safety precaution.
The instrument will then turn off after a further 5 minutes.
A reserve battery pack (Part No. 346 10 220) may be purchased and held in reserve.
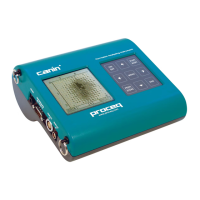
1
2
3
8
6
7
4
5
1 Hand wheel
2 Battery pack complete
3 Seal for battery
compartement
4 Cover plate for batte-
ry compartement
5 USB cover
6 Foot complete
7 Draw spindle
8 Coupling for the draw
bolt
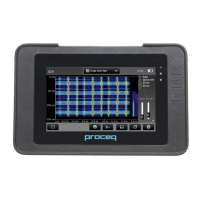
3.2 The Proceq DY-2 Operating Panel
Use the navigation keys to highlight a menu item and press the center key to select it.
Back button – Returns to the previous menu without making
any changes
2nd Function button – Access a 2nd function screen
Power button
The STOP button is used to stop the test at any time. See 5.4.