DMX-512 – CONNESSIONE CON I PROIETTORI
I cavi DMX non devono venire a contatto con altre tipologie di cavo. In tal caso infatti i
proiettori potrebbero funzionare in maniera non corretta o non funzionare affatto.
Per la connessione della centralina con i proiettori e tra un proiettore ed il successivo,
utilizzare solo cavi stereo schermati, con connettori XLR 3 poli.
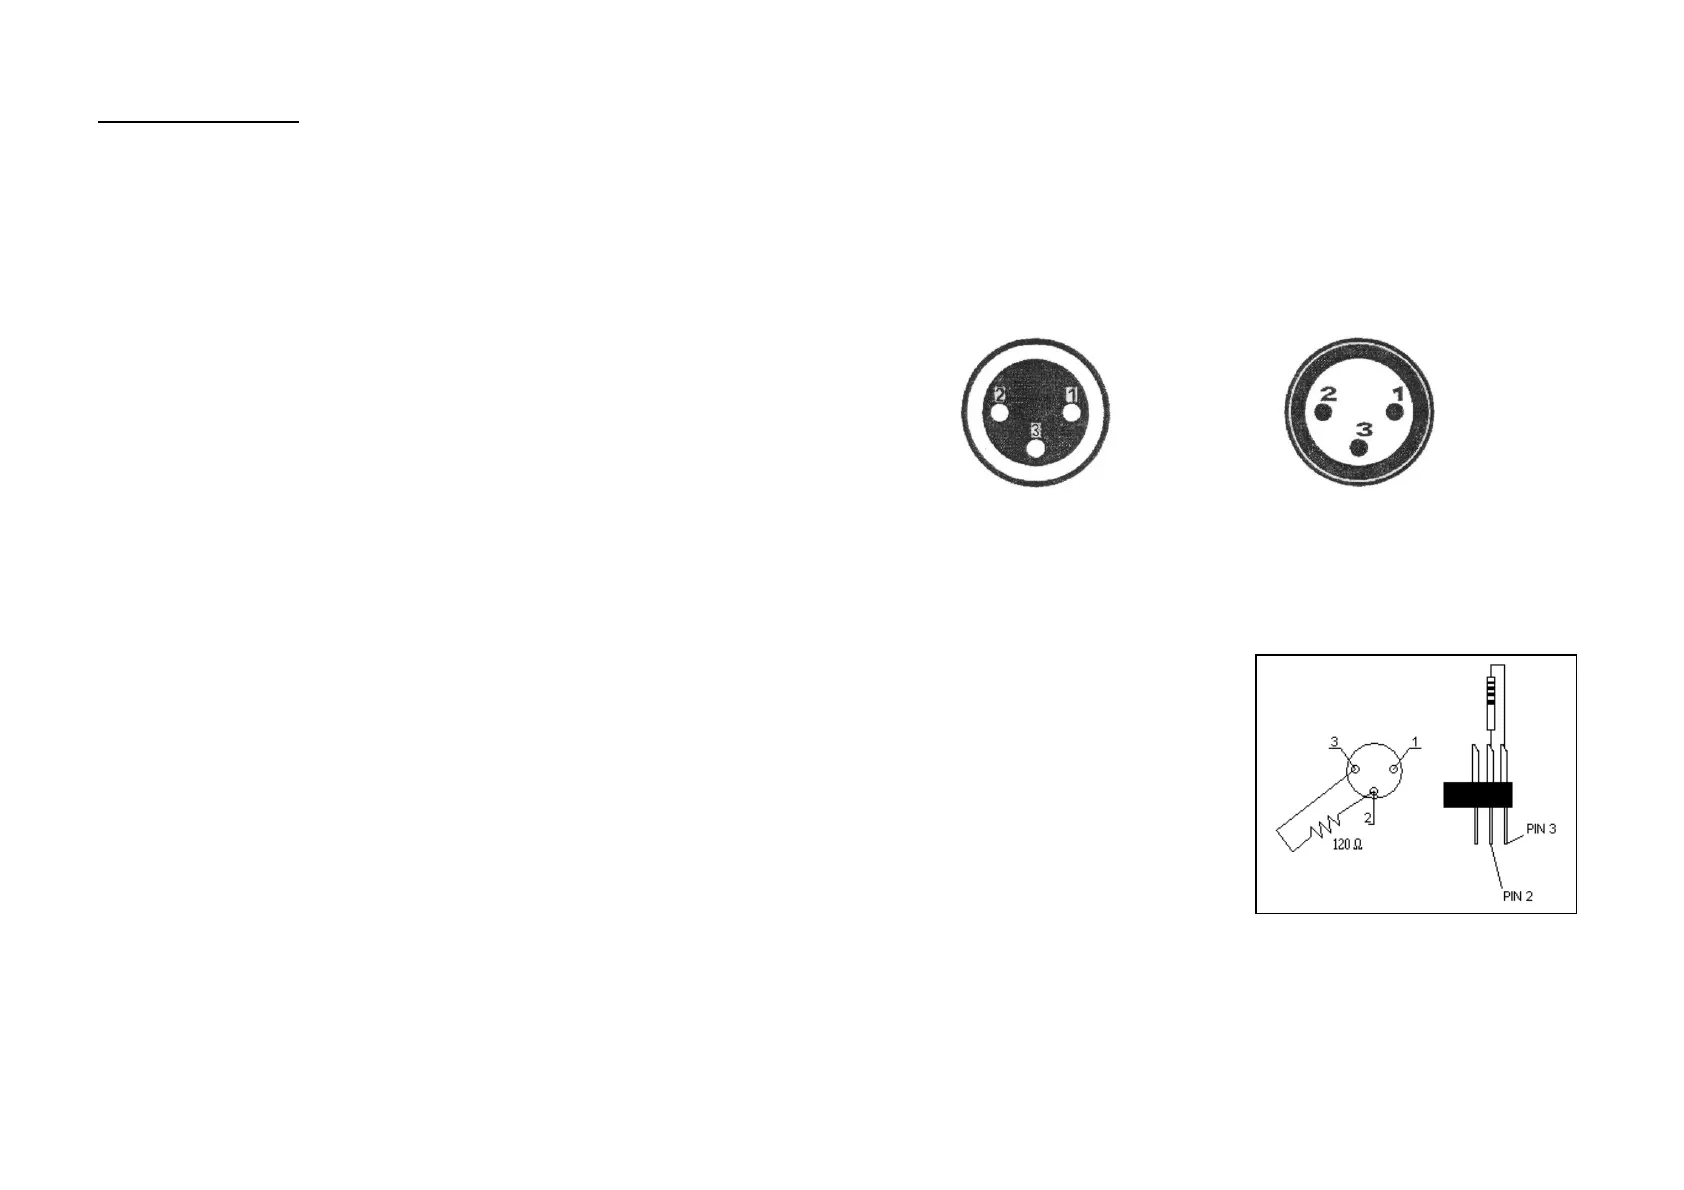
SCHEMA DI CONNESSIONE DEI CAVI DMX:
In caso di necessità, è possibile variare la polarità attraverso il selettore di polarità DMX,
posto sul pannello posteriore.
CREAZIONE DI UNA CATENA DMX:
connettere l’uscita DMX della centralina all’ingrasso del proiettore più vicino. Procedere,
connettendo l’uscita di un proiettore con l’ingresso del successivo, fino a quando la
catena non sia completata.
ATTENZIONE:
Per installazioni in cui il cavo di segnale
deve percorrere lunghe distanze o dove
vi sono disturbi elettrici, per esempio in
discoteca, è consigliato l’uso di una
terminazione DMX. Il terminatore DMX è
semplicemente un connettore XLR con
collegato ad esso una resistenza da
120Ω (Ohm) tra i piedini 2 e 3. La
resistenza viene innestata nella presa
DIGITAL THRU dell’ultimo proiettore
della catena. La connessione è illustrata
a destra.
1: terra
2: segnale (-)
3: segnale (+)
1: terra
2: segnale (-)
3: segnale (+)
DMX-input
spina XLR
DMX-output
presa XLR
INDIRIZZAMENTO DEI PROIETTORI:
la centralina, assegna gli indirizzi DMX di partenza ad intervalli di 20, pertanto bisogna
indirizzare opportunamente ogni proiettore al rispettivo indirizzo di partenza, altrimenti
l’assegnazione potrebbe risultare non corretta.
Tutti i proiettori con lo stessi indirizzo di partenza, lavoreranno in sincrono.
7
Deleting a scene in a chase:
- Press and hold the PROGRAM button for about 2 seconds to enter the
programming mode. The program flash will flash.
- Select the chase in which a scene will be deleted via the CHASE buttons
- Press the DISPLAY button in order to switch the display to step.
- Select the scene to be deleted via the BANK UP/DOWN buttons
- Press AUTO/DEL button to delete the scene All leds on the panel will flash.
DELETE A CHASE:
- Press and hold the PROGRAM button for about 2 seconds to enter the
programming mode. The program flash will flash.
- Select the chase to be deleted via CHASE buttons
- Press and hold AUTO/DEL button and the respective chaser button to delete the
chase. All leds on the panel will flash.
DELETE ALL CHASE:
Caution: when you select this function, all program chase will irrevocably be lost. The
individual scenes and programs are maintained
- Switch off the device
- Press and hold the BANK DOWN + DEL buttons, while switching on the device. All
leds on the panel will flash.
SCENE (Step)
INSERT A SCENE:
- Press and hold the PROGRAM button for about 2 seconds to enter the
programming mode. The program flash will flash.
- Select the desired chase via chase button. The respective led will be lit.
- Press the DISPLAY button in order to switch the display to step. The display will
show the scenes (steps) in the chase.
- Select the scene were the scene will be inserted with BANK UP/DOWN buttons.
E.g. if you want to insert a scene between scene 5 and scene 6, press BANK
UP/DOWN buttons so that the display will show STEP05.
- Press MIDI/REC button to prepare inserting. Now the display will show the next
step (E.g. STEP06)
- Select the bank where the scene will be inserted via the BANK UP/DOWN buttons
- Select the scene you want to copy via SCENES button
- Press MIDI/REC button to insert. All leds on the panel will flash.
COPY A SCENE:
- Press and hold the PROGRAM button for about 2 seconds to enter the
programming mode. The program flash will flash.
- Select the bank where the scene will be copied via BANK UP/DOWN buttons
- Select the scene to be copied by pressing the respective SCENES button
- Press the MIDI/REC button to prepare copying
- Select the bank where you want to copy the scene, via the BANK UP/DOWN
buttons
- Press the desired SCENES button. All leds on the panel will flash.
26
 Loading...