Do you have a question about the Proline Hurricane PLJW and is the answer not in the manual?
Install the adaptor as the first step in connecting the range hood and ductwork using the provided transition piece.
Gently lift the range hood insert into the custom hood or cabinetry, requesting assistance for larger units.
Attach the duct to the adaptor and seal it airtight with aluminum duct tape to prevent exhaust leakage.
Drill the insert into the cabinet using provided screws through the corner holes of the hood.
Reach out via email, phone, or visit the website for assistance and additional resources.
This document serves as an installation guide for Proline range hood inserts, providing step-by-step instructions and contact information for support. It also promotes a photo contest.
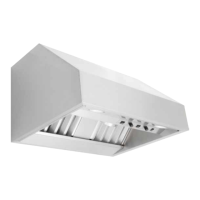
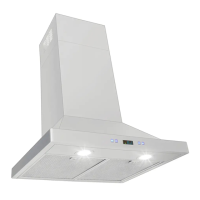
Proline range hood inserts are designed to be integrated seamlessly into custom cabinetry or hoods, providing powerful ventilation to remove smoke, grease, and odors from your kitchen. These inserts are a discreet yet effective solution for maintaining air quality in cooking areas, blending into your kitchen's aesthetic while offering robust performance. The guide specifically mentions several models: the Hurricane PLJW Insert, the Proline PLJW Insert, the PLFL 832, and the PROVL. While most inserts include blowers that connect to ductwork, the PROVL is noted as an exception, implying a different ventilation mechanism or an integrated system. The core function of all these inserts is to facilitate the removal of cooking byproducts, ensuring a cleaner and more pleasant kitchen environment.
The installation process for Proline range hood inserts is broken down into four clear steps, emphasizing ease of setup.
Step 1: Installing the Adaptor: The first step involves installing an airtight transition piece, referred to as an "adaptor." This piece is crucial for connecting the range hood to the ductwork, ensuring a secure and airtight seal. The purpose of this adaptor is to prevent greasy cooking exhaust from escaping back into the kitchen, highlighting a key feature focused on maintaining air quality and cleanliness. This pre-supplied component simplifies the connection process, making it more user-friendly.
Step 2: Lifting the Insert into the Cabinet or Custom Hood: This step requires carefully lifting the range hood insert into its designated custom hood or cabinetry. The guide suggests that for larger inserts, it's advisable to have a friend or two assist with the lifting, indicating that some models might be substantial in size and weight. This recommendation underscores the practical considerations for installation, ensuring safety and ease of maneuverability during the setup.
Step 3: Attaching the Duct: Once the insert is in place, the next step is to attach the duct to the adaptor. This connection must be sealed airtight using aluminum duct tape. The emphasis on an airtight seal is critical for the effective functioning of the range hood, as it prevents the escape of greasy cooking exhaust. This step reinforces the importance of proper sealing for optimal performance and to maintain a clean kitchen environment.
Step 4: Screwing the Insert into the Cabinet: The final installation step involves securing the insert into the cabinet. This is achieved by drilling the insert into the cabinet through one of the four pre-drilled holes located on each corner of the hood, using screws provided by Proline. This method ensures that the insert is firmly mounted and stable, preventing any movement during operation.
The overall design of the installation process aims to be straightforward, with components like the airtight transition piece provided to simplify the connection to ductwork. The instructions are practical, offering advice like seeking assistance for larger inserts, which enhances the user experience by anticipating potential challenges. The focus on airtight seals throughout the installation highlights the commitment to efficient and effective ventilation, a primary usage feature of these range hoods.
While the provided document primarily focuses on installation, it implicitly touches upon maintenance through its emphasis on airtight seals and the prevention of greasy exhaust. The use of an airtight transition piece and the instruction to seal the duct connection with aluminum duct tape are crucial for preventing grease and odors from escaping into the kitchen. This design choice directly contributes to easier maintenance of the kitchen environment, as it minimizes the accumulation of grease on surrounding surfaces. By effectively containing and expelling cooking byproducts, the range hood inserts reduce the frequency and intensity of cleaning required for kitchen cabinets and walls.
The document does not explicitly detail routine cleaning or filter replacement instructions, which are typical maintenance tasks for range hoods. However, the foundational design principles outlined in the installation guide—such as efficient exhaust and containment of grease—suggest that the products are engineered to facilitate a cleaner kitchen, thereby simplifying overall maintenance. A well-installed and sealed range hood will inherently require less intensive cleaning of the kitchen itself, as it performs its primary function of removing contaminants effectively. The absence of specific maintenance steps in this particular guide might indicate that such information is covered in a separate user manual or product-specific documentation. However, the focus on preventing exhaust leakage is a key aspect that contributes to reduced maintenance effort in the long run for the kitchen space.
| Brand | Proline |
|---|---|
| Model | Hurricane PLJW |
| Material | Stainless Steel |
| Lighting | LED |
| Filter Type | Baffle |
| Width | 30 inches |
| CFM (Air Flow) | 900 CFM |
| Number of Fan Speeds | 4 |
| Control Type | Push Button |
| Venting Options | Ducted |
| Installation | Under Cabinet |