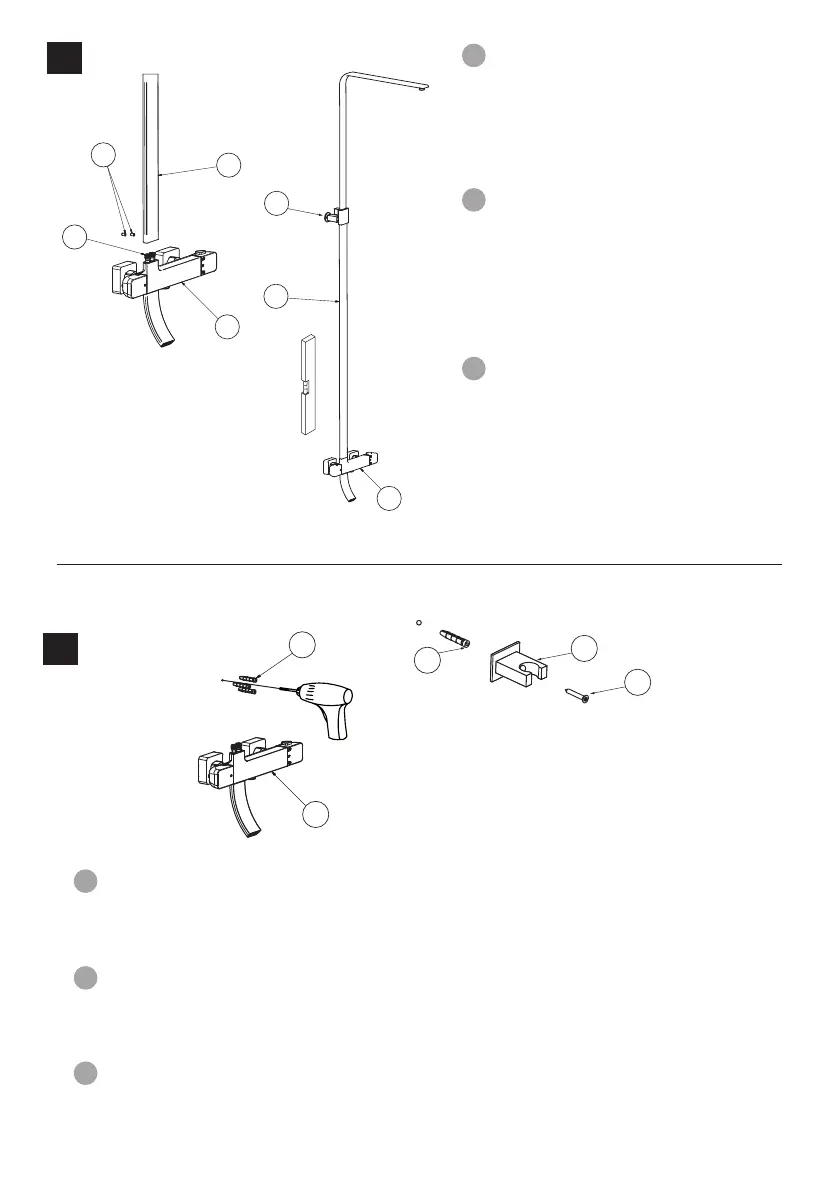
Montare la colonna (2) sul termostatico
(1) inlando il tubo sui due raccordi (11).
Segnare sulla parete con la matita le posizioni
dei fori per il supporto. Smontare la colonna
(2) dal termostatico (1).
Mount the column (2) on the thermosta-
stic valve (1) by inserting the pipe into the two
connectors (11). Using a pencil, mark
on the wall the position of the holes for the
support bracket. Remove the column (2) from
the thermostatic valve (1).
Après l’installation du mitigeur
thermostatique monter le tube (2) sur le
thermostatique (1) en l’insérant sur les deux
raccords (11). Marquer sur le mur à l’aide d’un
crayon la position des trous pour le support
(18). Démonter le tube (2) du thermostatique
(1).
2
N
Stampo
N
Conchiglia
A TERMINI DI LEGGE QUESTO DISEGNO NON PUO' ESSERE RIPRODOTTO E/O DISTRIBUITO SENZA L'AUTORIZZAZIONE DI FROMAC RUBINETTERIE
PO11
Materiale
Firma
Data
Smussi non quot ati Raggi non quotati
Controllato/Approvato
Disegnato
Denominazione
Revisione Data
Scala:
Tolleranze non indica te
Descrizione revision e
Finitura superficiale
Codice:
Disegnato Controllato/Approvato
Mauro Mauro
N/A
Peso Trattamenti termi ci
25/06/2014
1:1
1
02/07/2014
2
1
N
Stampo
N
Conchiglia
A TERMINI DI LEGGE QUESTO DISEGNO NON PUO' ESSERE RIPRODOTTO E/O DISTRIBUITO SENZA L'AUTORIZZAZIONE DI FROMAC RUBINETTERIE
PO11
Materiale
Firma
Data
Smussi non quotati Raggi non quotati
Controllato/Approvato
Disegnato
Denominazione
Revisione Data
Scala:
Tolleranze non indica te
Descrizione revision e
Finitura superficiale
Codice:
Disegnato Controllato/Approvato
Mauro Mauro
N/A
Peso Trattamenti term ici
25/06/2014
1:1
02/07/2014
4C
11
12
2
2
1
1
18
Eseguire il foro per il supporto doccia (20) all’altezza desiderata, inserire il tassello (19),
posizionare il supporto (20) e ssare serrando la vite (21). Eseguire i tre fori nella parete ed inserire i
tre tasselli in gomma (3).
Drill the holes for the hand shower support bracket (20) at the desired hight and then insert the
raw plug (19). Position the bracket (20) and x using the screw (21). Drill the three holes in the wall
and then insert the three rubber plugs (3).
Réaliser le trou pour le support de douche (20) à la hauteur désirée, insérer la cheville (19),
positionner le support (20) et xer en serrant la vis (21). Réaliser les trois trous dans le mur pour le
support (18-Fig. 2) et insérer les trois chevilles (3). Adapter les chevilles au type de mur.
3
A ( 1 : 4 )
A
N
Stampo
N
Conchiglia
A TERMINI DI LEGGE QUESTO DISEGNO NON PUO' ESSERE RIPRODOTTO E/O DISTRIBUITO SENZA L'AUTORIZZAZIONE DI FROMAC RUBINETTERIE
PO11
Materiale
Firma
Data
Smussi non quotat i Raggi non quo tati
Controllato/Approvato
Disegnato
Denominazione
Revisione Data
Scala:
Tolleranze non indicate
Descrizione revi sione
Finitura superf iciale
Codice:
Disegnato Controllato/Appr ovato
Mauro Mauro
N/A
Peso Trattamenti termici
25/06/2014
1:1
2
02/07/2014
1
1
3
20
21
19
I
I
GB
GB
F
F
 Loading...