B ( 1 : 3 )
N
Stampo
N
Conchiglia
A TERMINI DI LEGGE QUESTO DISEGNO NON PUO' ESSERE RIPRODOTTO E/O DISTRIBUITO SENZA L'AUTORIZZAZIONE DI FROMAC RUBINETTERIE
PO11
Materiale
Firma
Data
Smussi non quot ati Raggi non quotati
Controllato/Approvato
Disegnato
Denominazione
Revisione Data
Scala:
Tolleranze non indica te
Descrizione revision e
Finitura superficia le
Codice:
Disegnato Controllato/Approvat o
Mauro Mauro
N/A
Peso Trattamenti termi ci
25/06/2014
1:1
4A
02/07/2014
8
9
10
N
Stampo
N
Conchiglia
A TERMINI DI LEGGE QUESTO DISEGNO NON PUO' ESSERE RIPRODOTTO E/O DISTRIBUITO SENZA L'AUTORIZZAZIONE DI FROMAC RUBINETTERIE
PO11
Materiale
Firma
Data
Smussi non quot ati Raggi non quotati
Controllato/Approvato
Disegnato
Denominazione
Revisione Data
Scala:
Tolleranze non indica te
Descrizione revision e
Finitura superficia le
Codice:
Disegnato Controllato/Approvat o
Mauro Mauro
N/A
Peso Trattamenti termi ci
25/06/2014
1:1
4B
02/07/2014
8
9
10
2
12
11
1
N
Stampo
N
Conchiglia
A TERMINI DI LEGGE QUESTO DISEGNO NON PUO' ESSERE RIPRODOTTO E/O DISTRIBUITO SENZA L'AUTORIZZAZIONE DI FROMAC RUBINETTERIE
PO11
Materiale
Firma
Data
Smussi non quotat i Raggi non quotati
Controllato/Approvato
Disegnato
Denominazione
Revisione Data
Scala:
Tolleranze non indi cate
Descrizione revi sione
Finitura superfici ale
Codice:
Disegnato Controllato/Approv ato
Mauro Mauro
N/A
Peso Trattamenti term ici
25/06/2014
1:1
02/07/2014
4C
2
12
11
1
2
N
Stampo
N
Conchiglia
A TERMINI DI LEGGE QUESTO DISEGNO NON PUO' ESSERE RIPRODOTTO E/O DISTRIBUITO SENZA L'AUTORIZZAZIONE DI FROMAC RUBINETTERIE
PO11
Materiale
Firma
Data
Smussi non quotati Raggi non quotati
Controllato/Approvato
Disegnato
Denominazione
Revisione Data
Scala:
Tolleranze non indicate
Descrizione revisione
Finitura superficiale
Codice:
Disegnato Controllato/Approvato
Mauro Mauro
N/A
Peso Trattamenti termici
25/06/2014
1:1
3
02/07/2014
4
5
6
7
8
9
4
5
6
7
8
9
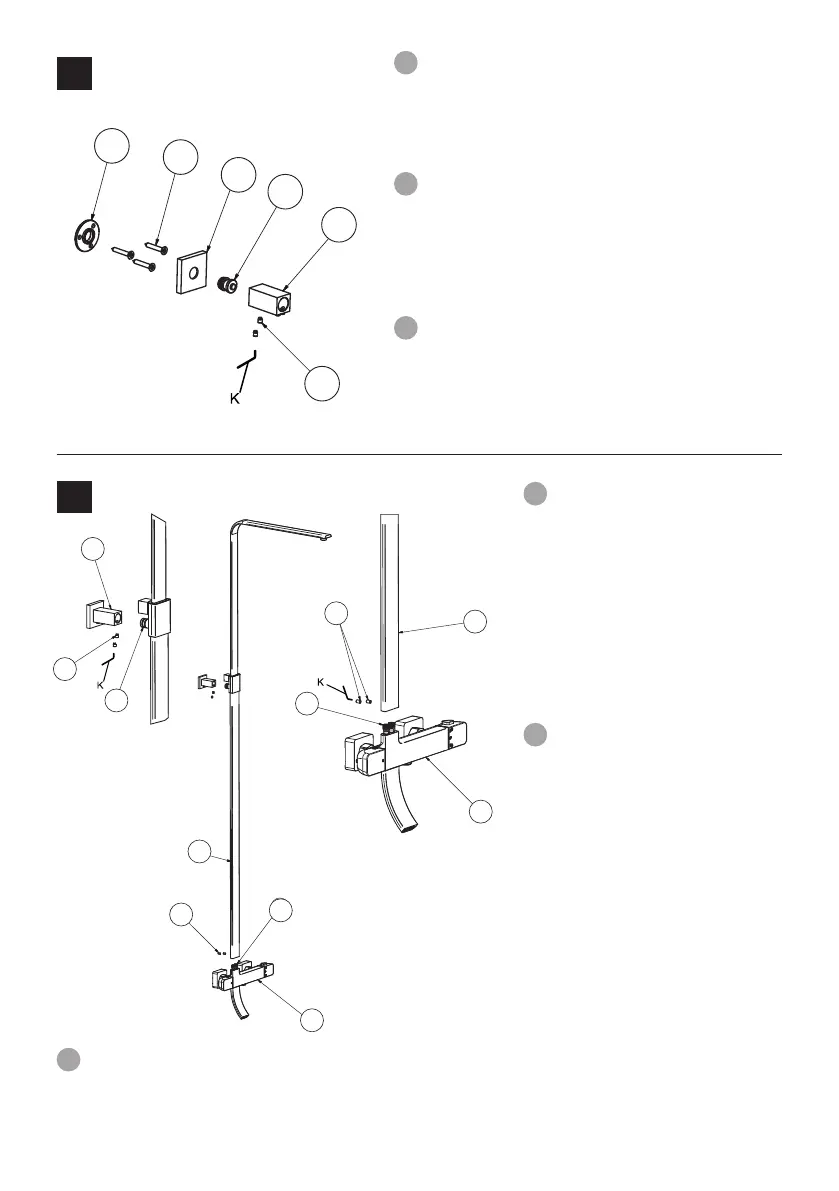
Fissare a muro la angia (4) avvitando le viti (5),
posizionare sulla parete il rosone quadro (6) e bloccarlo
avvitando il perno (7). Inlare il supporto (8) sul perno (7)
e bloccarlo avvitando i due grani (9) con la chiave (K).
Fix ange (4) onto the wall by screwing the screws
(5), Position the square plate (6) on the wall and then x
by tightening bush (7).
Insert support (8) onto the bush (7) and then x with the
two grub screws (9) using key (K).
Fixer au mur la platine (4) en vissant les vis (5),
positionner sur le mur la rosace carrée (6) et la serrer en
vissant l’axe leté (7). Emboiter le support (8) sur l’axe
leté (7) et le bloquer en vissant les deux vis allen (9) à
l’aide d’une clef (K).
4
Montare la colonna (2) sul
termostatico (1) inlando il tubo sui
due raccordi (11) e allo stesso tempo
inlare il perno del supporto della
colonna (10) nel supporto a muro (8).
Fissare la colonna (2) al termostatico
(1) con i due grani (12) poi ssare il
perno della colonna (10) al supporto a
muro (8) con i due grani (9).
Mount the column (2) on the
thermostastic valve (1) by inserting
the pipe into the two connectors (11)
while at the same time
inserting the peg on the shower
support (10) into the wall bracket (8).
Fix the column (2) to the thermostatic
valve (1) with the two grub screws
(12) and then x the peg on the
shower support (10)
to the wall bracket (8) using the two
grub screws (9).
5
Monter le tube (2) sur le thermostatique (1) en l’insérant sur les deux raccords (11) et en
même temps emboîter l’axe du support (10) du tube dans le support mural (8). Fixer le tube (2) au
thermostatique (1) avec deux vis allen (12), puis xer l’axe du tube (10) au support mural (8) avec les
deux vis allen (9).
I
I
GB
GB
F
F
 Loading...