Do you have a question about the PT M570C and is the answer not in the manual?
Indicates an imminently hazardous situation that, if not avoided, WILL result in death or serious injury.
Indicates a potentially hazardous situation that, if not avoided, COULD result in death or serious injury.
Indicates a potentially hazardous situation that, if not avoided, MAY result in minor or moderate injury.
Indicates important information, which if not followed, MAY cause damage to equipment.
Addresses low power issues with probable causes and solutions for the sandblaster operation.
This document outlines the features, operation, and maintenance of a heavy-duty sandblaster kit. It serves as an owner's manual, providing essential information for safe and effective use.
The sandblaster kit is designed for various surface preparation tasks, utilizing abrasive media propelled by compressed air to clean, strip, or etch materials. Its primary function is to remove rust, paint, and other unwanted coatings from surfaces, as well as to prepare surfaces for new finishes or to create decorative effects like glass etching. The tool's design emphasizes ease of use and versatility across different applications, from general-purpose cleaning to fine polishing and heavy rust removal.
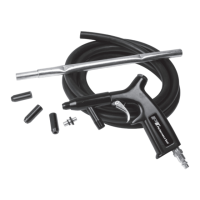
The sandblaster kit includes several key components that facilitate its operation. The main unit features a gun with a trigger for controlling the blast, an air inlet for connecting to an air compressor, and an intake port where a rubber hose is attached. This rubber hose connects to a pick-up tube, which is submerged into a container of abrasive blast media. This setup allows the tool to draw the abrasive material into the airstream for projection onto the target surface.
To operate the sandblaster, users must first ensure the air compressor is situated away from the sandblasting area to minimize dust intake and that the air supply is clean and free of moisture and oil. An adequate air supply from the compressor is crucial for correct tool operation, as insufficient air pressure will hinder performance. Before beginning any work, it is recommended to test the sandblaster on a hidden surface to prevent accidental damage.
The abrasive material used with the sandblaster must be filtered to remove clumps or debris, which could otherwise clog the system. The manual advises against spraying thick liquids or large-grain abrasives. For soft surfaces, users should employ the lowest effective pressure to avoid pitting the material. Once the air hose and rubber hose are connected, and with appropriate safety equipment worn, the sandblaster gun can be aimed at the surface, and the trigger pulled to initiate blasting. If the nozzle needs to be removed, cleaned, or replaced, it's important to clean the threads and replace the o-ring using a brush.
The manual provides a comprehensive guide to selecting the appropriate abrasive media for different applications. For general-purpose tasks like removing light rust and paint from metal or wood, or for glass and stone etching, Sand (20-40) is recommended. For a finer polish finish on antique wood, brass, or silver, or for automotive parts cleaning, Sand (50-100) is suggested. Heavy rust removal and rough surface paint removal benefit from Aluminum oxide. For wood and glass cleaning, Corn cob meal and Walnut or pecan shells (ground) are listed, with Wood and glass cleaning (coarse) also specified for removing flash, burrs, and paint from metal or glass without abrading the work. A crucial note warns against using abrasive media that has not been cleaned and screened, as it can clog the gun nozzle.
Proper maintenance is essential for ensuring the longevity and optimal performance of the sandblaster kit. The manual emphasizes the importance of reading, understanding, and following all instructions and warnings to prevent personal injury, property damage, and to maintain warranty validity.
Before each use, the tool requires lubrication. Four to five drops of a good grade of air tool oil should be placed in the air inlet. This simple step helps maintain the internal mechanisms and ensures smooth operation. In addition to daily lubrication, it is vital to drain water from both the hoses and the compressor tank. Water in the air supply line can lead to gumming and a loss of power, negatively impacting the tool's efficiency. The air filter on the supply line should also be cleaned regularly. If gumming occurs, flushing the tool with gum solvent or a 50/50 mix of air tool oil and kerosene is recommended. In some cases, disassembling the tool for thorough cleaning and re-lubrication may be necessary.
The manual also addresses troubleshooting for common issues, particularly insufficient power. If the tool experiences dirty or clogged air passages, the solution involves flushing and lubricating the tool, and draining the air tank and supply line. For insufficient air supply, increasing line pressure and ensuring the compressor matches the tool's pressure and consumption needs are advised. Air leakage can be remedied by using PTFE tape at all fittings and joints, and by checking for worn or damaged O-rings and seals. If worn or damaged parts are identified, they should be replaced as necessary. Finally, if the tool is not performing adequately, it's important to confirm that it is suited for the specific sanding requirements of the job at hand.
Beyond these specific maintenance tasks, general workplace security and personal safety guidelines are provided. Keeping the work area clean and well-lit, avoiding explosive environments, and keeping children and bystanders away are critical for preventing accidents. Personal safety measures include wearing eye protection and other safety equipment, avoiding accidental starting, maintaining proper footing and balance, and dressing appropriately by avoiding loose clothing or jewelry that could get caught in moving parts. The manual stresses that tools should not be forced and that the right tool should always be used for the intended application. Any tool with a faulty switch that cannot be turned on or off should be repaired immediately. Disconnecting the air source before changing accessories or storing the tool is a preventive safety measure against accidental starting. Tools should be kept away from children and inexperienced operators.
| Model | PT M570C |
|---|---|
| Category | Power Tool |
| Type | Cordless Drill |
| Battery Type | Lithium-Ion (Li-Ion) |
| No Load Speed | 0-1500 RPM |
| Tool Type | Drill/Driver |