This document is the operator's manual for the Pulsar Model#PTG1221 Lawn Mower.
Function Description:
The Pulsar Model#PTG1221 is a gas-powered lawn mower designed for cutting lawn areas in private houses and hobby gardens. It is intended for its prescribed purpose only, and any other use is considered misuse, for which the user/operator will be liable for any damage or injuries. The equipment is not designed for commercial, trade, or industrial applications, and its warranty will be voided if used for such purposes. The lawn mower offers three functions: rear discharging, rear bagging, and mulching, and side discharging. These functions can be converted by changing accessory settings as detailed in the manual.
Important Technical Specifications:
- Engine Type: Single cylinder 4-stroke
- Engine Displacement: 173 CC
- Engine Max. Power: 3.8KW/2800 RPM
- Engine Speed: 2800 RPM
- Cutting Width: 21 Inches/530mm
- Grass Bag Capacity: 16 Gallons/60L
- Ignition: TCL/TORCH
- Fuel Tank Capacity: 0.3 Gallons/1.2L
- Oil Tank Capacity: 0.6 Quarts/0.6L
- Spark Type: RJ9LMC
- Net Weight: 79.3lbs/36KG
- Noise Data:
- Sound pressure level (LPA): 84dB(A)
- Sound power level (LWA): 98dB(A)
- Uncertainty: 3dB(A)
- Vibration Data:
- Measure vibration emission value: 6.1m/s²
- Uncertainty: 1.5m/s²
Usage Features:
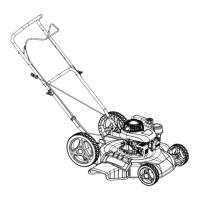
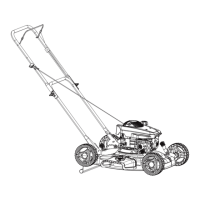
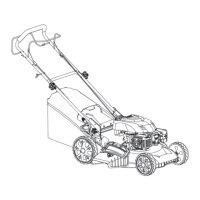
The lawn mower is equipped with a soft grip, upper and lower handles, a brake lever/stop lever, fixing knobs, a grass bag, a fuel tank cap, a primer, front decorative cover, and a height adjusting handle. It also features rear and front wheels, an engine oil cap, side discharge cover, side discharge chute, deck, spark plug boot, pull start, and a rear discharge cover.
Assembly and Setup:
- Handle Assembly: The lower handle is fastened to the device using two bolts and two small knobs on each side. The upper handle is then unfolded and fixed to the lower handle using big knobs and bolts. The rope guide must be on the right handle when standing behind the mower.
- Connection Cord: The connection cord is fixed to the handle with the supplied cord clip.
- Grass Bag Assembly: Plastic clips are secured over the metal frame of the grass bag.
- Grass Bag Onto Mower: The rear discharge cover is lifted, and the grass bag is hooked in. Releasing the cover secures the bag.
- Mulching Plug Assembly: The grass bag is removed, and the plastic mulching plug is pushed into the discharge chute until locked. The flap is then released to cover the plug.
- Side Discharge Chute Assembly: When using the side discharge function, the grass bag and mulching plug must be removed. The side discharge cover is lifted, and the chute is hooked into the side discharge duct. Releasing the cover secures the duct.
- Filling Engine Oil: The engine is shipped without oil or fuel and must be filled before starting. High detergent, premium quality 4-stroke engine oil (SAE30 or equivalent, e.g., SAE 10W/30) is recommended. Additives should not be used. The oil level is checked with a dipstick, ensuring it is between the Min and Max marks. The oil should be changed after the first 5 hours of use.
- Filling Engine Fuel: Clean, fresh unleaded fuel should be used. Fuel should be purchased in quantities that can be used within 30 days, and oil should never be mixed with gasoline. The fuel tank should not be overfilled, allowing for expansion. Refueling must be done outdoors in a well-ventilated area, with the engine stopped, and without smoking or open flames.
Operation:
- Starting the Engine: For a cold engine, the primer is pressed 3-5 times. For a warm engine, the primer is not needed. If the engine stops due to lack of fuel, refill and press the primer 3-5 times. The engine Start/Stop lever is pulled toward the upper handle, and the pull start is sharply pulled 4-6 inches after feeling resistance. If the engine fails to start after three pulls, the process should be repeated. Once running, the starter rope is placed into the rope guide.
- Stopping the Engine: Releasing the engine Start/Stop lever automatically switches off the engine.
- Cleaning a Flooded Engine: If the engine won't start after several pulls, it may be flooded. Release the engine start/stop lever, remove and dry the spark plug, then reinstall it (tighten 1/8 to 1/4 turn after seating). Pull the engine start/stop lever toward the upper handle and operate the pull start.
- Mowing: Select the desired cutting height (adjustable from position 1 to 7 only when the engine is off and the spark plug boot is pulled). Start the engine and set it to the required speed. Maintain a firm grip on the upper handle with the engine stop/start lever and walk with the mower.
- Working Advice: Empty the grass bag when clippings start to trail. Before removing the grass bag, switch off the engine and wait for the blade to stop. Lift the ejector flap with one hand and grab the carry handle with the other. Empty grass debris and refit the bag. Clear any grass residue or blockages in the discharge chute or mower casing using a brush or broom, never by hand or foot.
Maintenance Features:
- General Cleaning: The lawn mower should be thoroughly cleaned after each use. Dried grass and debris can impair operation. Check and remove any residual grass from the chute and underside of the mower deck.
- Spark Plug Maintenance: Once the engine has cooled, pull off the spark plug, remove it with a wrench, and clean it with a wire brush. Set the gap to 0.75mm using a feeler gauge. Install the spark plug carefully by hand to avoid cross-threading, then tighten with a spanner.
- Air Filter Service: Soiled air filters reduce engine output. The air cleaner outside cover (A) is removed, and the air filter (A) is separated from the housing (B). Inspect the filter and clean dirty filters with warm water and mild soap, allowing it to dry thoroughly before re-installation. Pressurized air or solvents should not be used to clean the filter.
- Engine Oil Change: Tilt the lawnmower towards the oil filler, place a container to catch the oil, and remove the dipstick. Once emptied, replace the dipstick and wipe clean any spillages. Refill with 17 oz./500ml SAE30 oil or equivalent. Check the oil level after running the engine briefly and topping up if necessary.
- Blade Replacement: For safety, blade sharpening, balancing, and mounting should be done by an authorized service workshop. The blade should be inspected annually. Before removing the grass bag, stop the engine and wait for the blade to stop completely. Garden gloves and a spanner wrench are needed. Do not invert the mower; tip it slightly towards the oil filler pipe. Handle the blade with care due to sharp edges. Replace the metal blade after 50 hours of mowing or 2 years, whichever comes first. Replace cracked or damaged blades. Hold the blade and unscrew the blade bolt counterclockwise. Fit a new or re-sharpened blade, locating it on the two studs on the blade flange. Replace the washer and bolts, ensuring correct location, and firmly tighten the bolt. The upturn of the blade must project into the motor compartment.
- Maintenance Schedule:
- Air Filter: Clean every 12 hours, clean every 24 hours, replace every 36 hours.
- Spark Plug: Check every 12 hours, clean every 24 hours, replace every 36 hours.
- Engine Oil: Check every 12 hours, replace every 24 hours, check every 36 hours.
- The engine oil should be changed after the first 8 hours of use.
Storing the Lawnmower:
- Short Periods (less than 15 days): Allow the engine to cool, ensure the grass bag is empty, clean all debris from under the mower deck, store on a flat and level surface upright, and in a safe place inaccessible to children.
- Extended Periods (more than 15 days): Perform storage maintenance. Empty the gas tank using a suction pump, then start the engine and let it run until all remaining gasoline is used up. Change the oil at the end of every season. Clean the cooling fins of the cylinder and the housing. Clean the entire machine to protect the paint. Store in a well-ventilated place. Do not empty the fuel tank in enclosed areas, near fire, or when smoking due to explosion and fire risk.
Transport:
Empty the gas tank and run the engine until all gas is used up. Empty the engine oil from a warm engine. Remove the spark plug boot. Clean the cooling fins of the cylinder and housing. Use the original packaging for shipping if possible.
The manual includes various warning symbols:
- General warning to read the instruction manual.
- Precaution/warning/danger symbol for potential accidents, fire, or electrocution.
- Keep bystanders away.
- Beware of sharp blades; remove the spark plug before maintenance.
- Never refuel while the engine is running.
- Risk of injury; do not open or remove safety shields while the engine is running.
- Wear ear and eye protection when operating.
- Hot surfaces will burn fingers or palms.
- Warning about toxic exhaust gas; do not run the engine in closed or poorly ventilated areas.
- Guaranteed sound power level (96 dB LWA).
- Conforms to relevant safety standards (CE mark).
- Waste electrical products should be recycled, not disposed of with household waste.
Additional Safety Guidelines:
- Read instructions carefully and be familiar with controls.
- Never allow children or unfamiliar people to use the lawnmower.
- Never mow while people, children, or pets are nearby.
- Operator is responsible for accidents or hazards.
- Wear substantial footwear and long trousers; do not operate barefoot or in open sandals.
- Inspect the area and remove objects that can be thrown by the machine.
- Gasoline is highly flammable; store in designed containers, refuel outdoors only, and do not smoke.
- Add fuel before starting; never remove the cap or add gas while the engine is running or hot.
- If fuel is spilled, do not start the engine; move the machine away and avoid ignition sources.
- Replace faulty silencers.
- Inspect blades, blade bolts, and cutter assembly for wear or damage before use.
- On multi-bladed machines, be aware that rotating one blade can cause others to rotate.
- Do not operate in confined spaces due to carbon monoxide fumes.
- Mow only in daylight or good artificial light.
- Avoid operating in wet grass.
- Maintain sure footing on slopes; walk, never run.
- Mow across slopes, not up and down.
- Exercise caution when changing direction on slopes.
- Do not mow excessively steep slopes.
- Use extreme caution when reversing or pulling the lawnmower.
- Stop the blade(s) if tilting for transportation or crossing non-grass surfaces.
- Never operate with defective guards or without safety devices.
- Do not change engine governor settings or over speed the engine.
- Disengage all blade and drive clutches before starting.
- Start carefully with feet away from the blade(s).
- Do not tilt the lawnmower more than necessary for starting, and lift only the part away from the operator.
- Do not start the engine when standing in front of the discharge chute.
- Keep hands or feet away from rotating parts and discharge opening.
- Never pick up or carry a lawnmower while the engine is running.
- Stop the engine and disconnect the spark plug wire before clearing blockages, checking, cleaning, working on the lawnmower, or after striking a foreign object.
- If the lawnmower vibrates abnormally, check immediately.
- Reduce throttle setting during engine shut down.
- Go slow when using a trailing seat.
- Keep all nuts, bolts, and screws tight.
- Never store the equipment with gas in the tank inside a building where fumes can reach an open flame or spark.
- Allow the engine to cool before storing.
- Keep the engine, silencer, battery compartment, and petrol storage area free of grass, leaves, or grease.
- Check the grass catcher frequently for wear.
- Replace worn or damaged parts for safety.
- Drain the fuel tank outdoors if necessary.
Troubleshooting:
The manual provides a troubleshooting table for common issues:
- Loud while running, machine vibrates heavily: Check screws, blade fasteners, replace blade if unbalanced.
- Engine does not start: Check if start/stop lever is pressed, spark plug is defective, fuel tank is empty, or engine is flooded. Solutions include replacing the spark plug, calling customer service, refilling fuel, or removing and drying the plug.
- Engine runs unsteadily: Clean the air filter or spark plug if soiled.
- Uneven mowing results: Sharpen the blade or set the correct cutting height if the blade is blunt or cutting height is too low.
- Grass bag is not filled sufficiently: Replace the blade if worn, empty the grass bag if clogged, correct the cutting height, allow the lawn to dry if wet, clean the discharge channel/housing, or clean the underside of the mower deck if clogged.
For issues not listed, contact a specialist company (customer service center at 1-866-591-8921). Improper repairs will invalidate the warranty and may incur additional costs. Only genuine spare parts should be used.
Warranty:
Pulsar Products Inc. offers a 1-year limited warranty from the date of original purchase, covering defects in material and workmanship for all components. Pulsar Products Inc. will repair or replace defective parts at its discretion, using new or rebuilt parts. The warranty period is not extended by repairs. The consumer is responsible for transportation costs and proof of purchase.
Warranty Validity:
The warranty applies to products purchased from an authorized Pulsar Products Inc. dealer in the United States, Canada, or Mexico. It does not cover refurbished, used, demonstration, floor models, or products purchased from online auction websites. Products used for commercial purposes are not covered.
Consumer Responsibilities:
- Read and follow all instructions in the owner's manual.
- Damage due to misuse or abuse is not covered.
- Responsible for transportation costs to an authorized Pulsar Products Inc. Service Center.
- Responsible for labor costs associated with warranted repairs twelve (12) months after purchase.
- Responsible for maintaining the lawn mower as specified in the manual.
- Responsible for presenting problems to a service center as soon as they exist.
What is Covered: Replacement parts and labor. Pulsar Products Inc. reserves the right to repair or replace the product as deemed appropriate.
What is Not Covered:
- Normal wear: Unless original equipment is defective prior to the first replacement interval.
- Maintenance: Routine maintenance, adjustments, or repairs not performed by an authorized facility.
- Misuse: Failure due to abuse, misuse, neglect, improper maintenance, storage, unapproved modifications, or operation contrary to the manual.
- Adverse conditions: Failure due to accident or natural disasters.
- Product Shipment: Damage from shipping, handling, or warehousing.
- Damage to property: Consequential or incidental damages.
- Other exclusions: Products sold "as is" or with removed serial numbers. Refurbished, used, demonstration, or floor models.
How to Obtain Warranty Service:
Take the original receipt and product to the place of purchase or mail them to the address on the website if purchased online. Contact Pulsar Products Inc. at 1-866-591-8921 (Mon-Fri 7:00 AM to 4:00 PM Eastern Standard Time) for service or warranty questions.
Customer Support:
Customer support is available at 1-866-591-8921 for questions and concerns.
- Guidance: Service center provides operational, technical, and maintenance guidance.
- Parts: Self-installable parts are shipped free of charge (ground shipping). Customer pays for rush shipments. If out of warranty, customer pays for parts and shipment costs.
- Service Center: Customers can take products to an authorized service center. Transportation costs are the customer's responsibility. Appointments are required for warranty service.
Pulsar Products Inc.'s obligation is limited to product repair or replacement and is not liable for incidental or consequential damages. This warranty provides specific legal rights, which may vary by state or province.