Do you have a question about the PURPLE LEAF ZY04GHTG1014 and is the answer not in the manual?
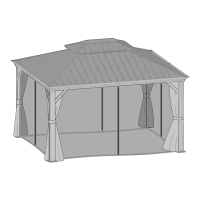
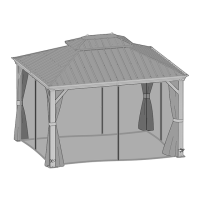
Identifies the 10'x14' Hardtop Gazebo and presents the assembly manual title.
Provides crucial advice on wind management, assembly team size, and safe operation.
Details critical safety warnings, weight capacity, and hazard information.
Lists necessary tools, equipment, and key assembly guidelines before starting.
Presents the mounting blueprint with key dimensions for gazebo placement.
Lists and illustrates main structural frame parts labeled A through F.
Details various support brackets, connectors, and roof-related parts from G to P.
Illustrates parts for the roof structure and netting, labeled P1 through Y1.
Shows different triangular and rectangular roof panel shapes designated V and W.
Illustrates specific roof panel shapes labeled X1 through X4.
Depicts the remaining roof panel shapes, X5 through X8.
Lists all screws, bolts, nuts, and tools required for assembly, identified by numbers.
Shows the initial assembly stage of the main support frame for the gazebo.
Illustrates attaching base plates (L) to the vertical posts (A) using screws (1#).
Shows how to join rail segments (B, C) using connectors (F) with screws (1#).
Details the process of fastening assembled lower rail sections (C-F and B-F) with screws.
Illustrates adding inner rail supports (C1, B1) to the main rails (C, B) with screws (1#).
Shows how to join upper rail segments (E, D) using connectors (F) with screws (1#).
Details fastening assembled upper rail sections (E-F and D-F) with screws.
Illustrates adding inner rail supports (E1, D1) to the upper rails (E, D) with screws (1#).
Shows connecting the assembled lower and upper rails (B, C, D, E) to the main posts (A).
Details attaching corner brackets (J1, J2) to the frame using screws (1#).
Illustrates attaching decorative corner pieces (G) to the frame with screws (9#).
Shows the initial stage of building the upper roof framework.
Details the assembly of roof support beams (K, K1) using screws (1#).
Illustrates attaching roof truss components (M, N) to the frame with screws (1#).
Shows how to securely attach roof trusses (M, N) to the main gazebo frame.
Details the installation of more roof truss components (M) to the structure.
Illustrates the final attachment of roof trusses (N) to the gazebo frame.
Advises checking the frame for a rectangular shape, not parallelogram, for proper assembly.
Details attaching the roof support beams (N) to the frame with screws.
Illustrates attaching roof edge support parts (P, Q, R) to the structure.
Shows how to install the roof vent covers (P1, Q1, Q2) using screws.
Details securing roof vent covers (Q1, Q2) and advises on velcro placement for netting.
Illustrates attaching roof panel overlay pieces (T1, T2, R) to the roof structure.
Shows the completed roof structure ready for panel installation.
Details attaching fasteners (Z, Z1, Z2, Z3, Z4) to various roof panel shapes (V, W).
Shows how to install the prepared roof panels (V1-V5) onto the gazebo frame.
Instructs to fully fasten the screws (1#) in the roof supports (K, K1) for stability.
Details installing connector pieces (U1-U4) to the roof frame using screws (1#).
Shows attaching fasteners (Z, Z3, Z4) to more roof panel shapes (W1-W6).
Details attaching fasteners (Z, Z1, Z2) to the last set of roof panel shapes (X1-X8).
Provides instructions on installing middle and edge roof panels (X, W) onto the frame rails.
Illustrates securing roof panels using brackets (S) and screws (5#, 10#).
Details securing roof panels with brackets (S) using screws (6#, 7#).
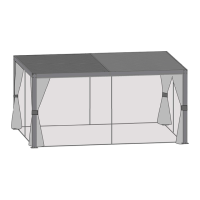
Shows the gazebo structure with curtains and netting ready for installation.
Illustrates attaching curtain support rails (C2, B2) to the frame with screws (1#).
Details attaching upper curtain support rails (E2, D2) to the frame with screws (1#).
Shows how to secure the curtain rails (B, C) to the frame using fasteners (4#).
Details securing the upper curtain rails (D, E) to the frame using fasteners (4#).
Illustrates attaching netting support brackets (H, H1) with screws (8#, 9#).
Shows applying sealant (H2) to specific roof joints for weatherproofing.
Details how to hang the netting (Y) and curtains (Y1) onto the support rails.
Illustrates securing the curtains (Y1) to the frame using fasteners (4#).
Details securing the netting (Y) to the frame using fasteners (4#).
Shows final connections of curtain rails (B, C, D, E) to the frame and curtains (Y1).
Details final connections of netting rails (B, C, D, E) to the frame and netting (Y).
Presents the fully assembled gazebo with all components installed.
Another view of the completed gazebo, showing the final assembly state.
Provides guidance on washing, drying, and general maintenance of the gazebo.
Outlines the warranty terms for frames, bolts, nuts, curtains, and netting.
Provides company contact details, address, and copyright information.
| Product Type | Gazebo |
|---|---|
| UV Protection | Yes |
| Water Resistance | Yes |
| Assembly Required | Yes |
| Category | Outdoor Furnishing |
| Material | Steel |