User Manual
R3/SR
L3/SL
HOME
MACRO
TURBO
L2/LT
L1/LB
R1/RB
/A
/B
/Y
/X
R2/RT
SHARE/
OPTIONS/
使 用マニュアル
R3/SR
L3/SL
HOME
MACRO
TURBO
L2/LT
L1/LB
R1/RB
/A
/B
/Y
/X
R2/RT
SHARE/
OPTIONS/
Benutzerhandbuch
R3/SR
L3/SL
HOME
MACRO
TURBO
L2/LT
L1/LB
R1/RB
/A
/B
/Y
/X
R2/RT
SHARE/
OPTIONS/
PS3 Connection
Step 1 Plug the USB of Joystick into the PS3 USB interface, power on
the console.
PC Connection
Step 1 Plug the USB of Joystick into the computer USB interface.
Step 2 At the first connection, your computer will find new hardware and
install the driver automatically.
• Testing
It Can test function buttons and stick through computer game controller on PC.
The specific methods show below:
WIN XP/7/10: enter Control Panle → Devices and Printers → controlller icon → right
click with your mouse → Game controller settings, choose Properties test.
Open the test interface as below, you can test the axes and buttons.
Controller (Fight Stick) properties
Setting
Test the game controller. If the controller is not functioning properly, it may
need to be calibrated. To calibrate it, go to the Settingings page.
Axes
Buttons
Point of View Hat
Z Axis
X Rotation
Y Rotation
X Axis / Y Axis
Test
OK Cancel Apply
1 2
9 10
3 4 5 6 7 8
09-English
Step 2 After connection, the console will allocate a channel to Joystick
and the compared indicator light on. You can start to play gameor set
functions of console.
PS4 Connection
Step 1 Power off the original controller of PS4.
Step 2 Connect the Joystick with PS4 controller by Micro USB cable.
Step 3 Plug the USB of Joystick into PS4 USB interface.
Step 4 Press the button of "HOME" . After that the Joystick can start to
play game and setting.
Diagram of PS3 Connection
Diagram of PS4 Connection
PS3
10-English
PS4
PS4
XBOX ONE /XBOX SERIES X&S Connection
Step 1 Power off the original controller of Xbox One /Xbox Series X&S.
Step 2 Connect the Joystick with console controller by Micro USB cable.
Step 3 Plug the USB of Joystick into console USB interface.
Step 4 Press the button of "HOME" . After that the Joystick can start to
play game and setting.
SWITCH Connection
*Enter System settings Controllers and Sensors, Select Pro Controller
Wired Communication. The option state is ON.
- Connect With Switch Console
Step 1 Connect the TYPE-C OTG with the
USB of Arcade Fightstick.
Step 2 Connect the USB main cable of the
Arcade Fightstick to Switch Console.
Step 3 Power on switch console to play.
Diagram of XBOX ONE Connection
XBOX ONE
XBOX ONE
OTG Adapter
11-English
Attentions
• Avoid fierce vibration. Don’t take apart, revise and mend by yourself.
• Don’t let water or other liquid entering inside of the gamepad to make any
damages.
• Don’t store in places of high humidity, temperature, heavy oil or smoke.
• Don’t drop the gamepad into fire or explosion danger may be caused by
built-in battery.
• Children should be under the custody of adults to use this product.
Step 2 Press Sourcing Buttons what you want to set, after setting, press
MACRO and exit, green LED light off.
Step 3 Press well-setting button with MACRO function, it will act macro
action after releasing, green LED flash to indicate.
• MACRO Cancel
Step 1 Press MACRO, green LED light on, press well-setting buttons of
MACRO, green LED flash.
Step 2 Press MACRO again, green LED light off, cleared.
Step 3 Re-plug Arcade fight stick or power off and reconnection, MACRO
function will be cleared automatically.
• The maximum times of setting MARCO function buttons at a time is 15
times. Pressing several buttons meanwhile means 1 time, After 15 times,
it will save and exit this setting automatically.
• SHARE and OPTIONS buttons are used as separating key for dividing
two identical action keys or delay functions.
13-English
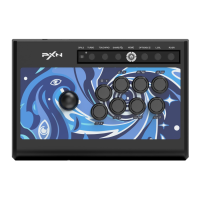
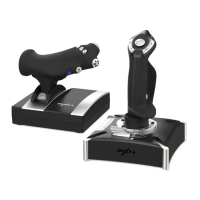
Product Overview
System Requirements
Support Platform PC /PS3 /PS4 /SWITCH /Xbox One /Xbox Series X&S
08-English
TURBO
1 2 3 4
MACRO HOME
L2/LT
L1/LB
R2/RT
R1/RB
/X
/Y
/A
/B
L3/SL R3/SR
SHARE/ OPTIONS/
Indicator of
TURBO and MACRO
Action
Button
Exchange the
Joystick and D-pad
D-pad
Original Controller
(PS4 /Xbox One /
Xbox Series X&S)
USB Port
USB Cable
Joystick MODE Change
Turn the switch to the icon of “D-pad ”, the joystick is D-pad function on
different console application.
Turn the switch to the icon of “Controller Joystick ” the joystick is
Controller joystick function on different console application.
TURBO Function
• Available Buttons: A、 B、 X、 Y、 LB、 RB、 LT、 RT.
• TURBO Set: Press TURBO and Available Buttons, indicator LED flash.
• TURBO Clear: Press TURBO and Well-Setting Buttons, indicator LED
lights off.
MACRO Function
MACRO Function: L3、 R3.
MACRO Sourcing Buttons: A, B, X, Y, LB, LT, L3, RB, RT, R3, Joystick UP/
DOWN/LEFT/RIGHT.
• MACRO Setting
Step 1 Press MACRO, Green LED lights on, press L3 or R3, Green LED flash.
- Connect With Switch dock
Step 1 Place the Switch dock and ensure successful connection.
Step 2 Plug the USB of Arcade Fightstick into Switch dock and power on
Switch console.
USB Port of SWITCH Dock
12-English
Product Specifications
14-English
Connection
Model
Working Current
Packaging Size
Product Size
Unit Weight
Usage Temperature
Usage Humidity
10-40 ℃
20~80 %
Appr. 250 * 175 * 105 mm
PXN-0082
USB Cable
Appr. 720 g
< 25mA
Appr. 268 * 195 * 114 mm
Step 2 接続成功したら対応のLEDが点灯します。そしてゲーム開始の指令ができ、
本体の機能を設定することもできます。
PS4の接続方法
Step 1 USBケーブルでPS4コントロ ーラーを本 品 のUSB端子に接続してください。
(コントローラーはオフの状態は必要でご注意してください)
Step 2 本品のUSBプラグをPS4本体のUSB端子に接続してからPS4本体をオン
にしてください 。
Step 3 本品のホームボタンを押して、接続成功したらLEDは点 灯します。
PS3
17-日本語
PS4
PS4
XBOX ONE/XBOX SERIES X&Sの接続方法
Step 1 USBケーブルでXbox One / Xbox Series X&Sコントロ ーラーを本 品 のUSB
端子に接続してください。(コントローラーはオフの状態は必要でご注意してください)
Step 2 本品のUSBプラグをXbox One / Xbox Series X&S本体のUSB端子に接
続してから Xbox One / Xbox Series X&S本 体 を オン にしてください 。
Step 3 本品のホームボタンを押して、接続成功したらLEDは点 灯します。
SWITCHの接続方法
* HOMEメニューの「設定」 → 「コントローラーとセンサー」 → 「Proコントロ
ーラーの有線通信」をONにしてください 。
- Switch 本体との接続方法
Step 1 本品のUSBのプラグをType-Cに転換する
の ア ダ プ ター に 接 続してください 。
Step 2 Type-Cに転換するアダプターを Switch
本体に接続してください。
Step 3 Switch 本体をオンにして、 接続成功した
らLEDは点灯します。
XBOX ONE
XBOX ONE
OTG転 換 ヘッド
18-日本語
レバーのモードは切り替え可能
本品のスイッチを十字キーのところに設置すると本品のレバーは十字キーとして
効きます。
本品のスイッチをレバーのところに設置すると本品のレバーはコントローラーの
左レバーとして効きます。
TURBO機能の設定
• TURBO機能を設定できるボタンは A, B, X, Y, LB, RB, LT, RTとなっています。
• TURBOの設定: 当機能設定させたいのボタンと TURBOボタンを同時に押して、
赤いLEDが点 滅します。TURBO機能設定完了です。
• TURBOのキャンセル: 当機能設定 されましたボタンとTURBOボタンを同時に
押すことで TURBO 機 能 をキャンセルことはできます。
MACRO機能の設定(必殺技)
MACRO 機能を設定: L3、 R3。
MACRO に設定: A、 B、 X、 Y、 LB、 LT、 L3、 RB、 RT、 R3、 摇杆上/下/左/右。
- Switchドックとの接続方法
Step 1 Switch本体をSwitchドックに差し込み、そしてドックと TVの接続を確
認してください 。
Step 2 本品のUSBケーブルのUSBプラグをSwitchド ックの USB 端子に接続
してください 。
SwitchベースのUSBポート
19-日本語
注意事項
• 強い振動を避け、 自分で分解、 改装、 修理することができません。
• 破損しないように、 水や他の液体が製品内部に入ることを避けます。
• 多湿、高温、 油煙などの場所に保管することを避けます。
• 設備を接続して除去する際には、 力が適切になるように注意してください。
• 子供たちは大人の監視下で本製品を使用しなければなりません。
• MACRO の設定
Step 1 MACROボタンを押すと緑のLEDが点灯します。 設定ボタンL3或いは
R3を押すと緑のLEDが 点 滅します。
Step 2 MACROを設定させたいの組み合わせボタンを押せば設定完了です。
設定完了したら、MACROボ タ ン を 押 し て 終 了 さ せ て 、緑 の LEDが 消 灯します。
Step 3 MACRO機能に設定されましたボタン( L3或いは R3 )を押して必殺技
を直接起動できます。起動しながら緑のLEDが点 滅します。
• MACROの設定は、一度に最大 15 回の設定できます。複数のボタンが同時に押
すは一 回 にします。15 回に至ったら自動的に保存され、 終了します。
• SHARE と OPTIONSは同じボタンを分 離して、 もしくは間隔の延長として効き
ます。
• MACRO のキャンセル
Step 1 MACROボタンを押すと緑のLEDが 点 灯 し ま す 。 MACROを設定されま
し た ボ タ ン( L3或いはR3 )を 押 す と 緑 の LEDが 点 滅します。
Step 2 MACROボタンをもう一度押すと、緑のLEDが 消 灯 し 、 MACROの設定
がキャンセルことは完 了します。
20-日本語
製品規格
21-日本語
接続方式
製品型番
作業電流
包装サイズ
製品寸法
本体重量
使用温度
使用湿度
10-40 ℃
20~80 %
約 250 * 175 * 105 mm
PXN-0082
USBケーブル
約 720 g
< 25mA
約 268 * 195 * 114 mm
製品の外観
対応機種
サポートプラットフォーム PC /PS3 /PS4 /SWITCH /Xbox One /Xbox Series X&S
15-日本語
TURBO
1 2 3 4
MACRO HOME
L2/LT
L1/LB
R2/RT
R1/RB
/X
/Y
/A
/B
L3/SL R3/SR
SHARE/ OPTIONS/
TURBOおよび
MACROインジケーターライト
アクションキー
ジョイスティックと
矢印キーを切り替えます
8方向
ジョイスティック
PS4 /Xbox One /
Xbox Series X&S
ゲームパッド
接続ポート
USBポート
PS3の接続方法
Step 1 本品のUSBケーブルのプラグをPS3本体のUSB端子に接続してからPS3
本 体 を オン にしてください 。
PCとの接続方法
Step 1 本品のUSBケーブルのプラグをPCのUSB端子に接続してください。
Step 2 初めてPCに接続すると、新しいハードウェアを検出され、 自動的にインス
トールことはできます。
PC のゲームコントローラーを開き、自己テストを実行できます。
操作方法は下記のとおりです:
XP シ ス テ ム : コ ントロ ー ル パ ネ ル → ゲームコントローラー 属性テスト。
WIN7 の シ ス テ ム : コ ントロ ー ル パ ネ ル → デバイスとプリンタ → マ ウスで ゲ ー ムコ ントロ
ー ラ ー の アイコ ン を 右 クリック → ゲームコントローラー設定の属性テスト。
右通りのテスト画面に至ったら、各軸とボタンのテストができます。
16-日本語
Controller (Fight Stick) properties
Setting
Test the game controller. If the controller is not functioning properly, it may
need to be calibrated. To calibrate it, go to the Settingings page.
Axes
Buttons
Point of View Hat
Z Axis
X Rotation
Y Rotation
X Axis / Y Axis
Test
OK Cancel Apply
1 2
9 10
3 4 5 6 7 8
Schritt 2 Nach dem Verbindungsaufbau teilt die Konsole dem Joystick einen
Kanal zu, die Anzeigeleuchte geht an. Nun kann ein Spiel begonnen oder
weitere Einstellungen in der Konsole vorgenommen werden.
Verbindung zur PS4
Schritt 1 Den Originalkontroller der PS4 ausschalten.
Schritt 2 Mithilfe des Mikro-USB-Kabels den Joystick mit dem PS4-
Controller verbinden.
Schritt 3 Joystick und PS4 mit Hilfe des USB-Kabels verbinden.
Schritt 4 “HOME”- Button betätigen . Der Joystick ist nun einsatzbereit.
Verbindung mit PS3
Verbindung mit PS4
PS3
24-Deutsch
PS4
PS4
Verbindung zur XBOX ONE /XBOX SERIES X&S
Schritt 1 Originalcontroller der Xbox One /Xbox Series X&S ausschalten.
Schritt 2 Mithilfe des Mirko-USB-Kabels den Joystick mit dem XBOX-
Controller verbinden.
Schritt 3 Joystick und XBOX mit Hilfe des USB-Kabels verbinden.
Schritt 4 HOME”- Button betätigen . Der Joystick ist nun einsatzbereit.
Verbindung zur SWITCH
*Systemeinstellungen Kontroller und Sensoren öffnen, Pro-Kontroller
-Kabelverbindung auswählen. Die Option muss ausgewählt sein.
- Mit der Switch-Konsole verbinden
Schritt 1 TYPE-C OTG mit dem USB des Arcade
Fightstick verbinden.
Schritt 2 USB-Hauptkabel des Arcade Fightsticks
mit Switch-Konsole verbinden.
Schritt 3 Zum Spielen Konsole anschalten.
Verbindung mit XBOX ONE
XBOX ONE
XBOX ONE
OTG-Adapter
25-Deutsch
Achtung!
• Starke Vibrationen vermeiden. Gerät nicht selbstständig
auseinanderbauen, abändern oder reparieren.
• Von Wasser und anderen Flüssigkeiten fernhalten, um Beschädigungen
zu verhindern.
• Gamepad nicht in feuchten, heißen, öligen oder Umgebungen mit viel
Rauch lagern.
• MACRO einstellen
Schritt 1 MACRO drücken, die grüne LED geht an; L3 oder R3 drücken, die
grüne LED blinkt.
Schritt 2 Quellenknöpfe nach Belieben drücken und nach Einstellung
MACRO drücken und verlassen, das LED licht geht aus. Wird der Quellknopf
mit der MACRO-Einstellung gedrückt wird eine MACRO-Funktion ausgeführt,
die LED blinkt dann grün.
• MACRO zurücksetzen
Schritt 1 MACRO drücken, die grüne LED blinkt. Eingestellten Knopf
drücken, die grüne LED blinkt erneut.
Schritt 2 MACRO erneut drücken, die LED geht aus, Bei erneutem
Anschließen oder Abschalten des.
Schritt 3 Arcade Fire Sticks wird die MACRO-Funktion automatisch
zurückgesetzt.
• Es können nur 15 MACRO-Funktonsknöpfe auf einmal eingestellt werden.
Dabei gilt das Drücken mehrerer Knöpfe für ein Mal. Nach 15 Malen speichert
das Gerät automatisch und verlässt diese Einstellung.
• Die Knöpfe SHARE und OPTIONS werden dazu genutzt, um zwei identische
Aktionstasten voneinander zu trennen und um Funktionen zu verzögern.
27-Deutsch
Produktübersicht
Systemvoraussetzungen
Unterstützte Plattformen PC /PS3 /PS4 /SWITCH /Xbox One /Xbox Series X&S
22-Deutsch
TURBO
1 2 3 4
MACRO HOME
L2/LT
L1/LB
R2/RT
R1/RB
/X
/Y
/A
/B
L3/SL R3/SR
SHARE/ OPTIONS/
Anzeigeeleuchte
TUBO/MACRO
Aktins
knopf
Schalter von
Joystick zu D-Pad
D-pad
USB-Anschluss
für Original-kontroller
(PS4 /
Xbox One /
Xbox Series X&S
USB-Kabel
Modus des Joystick
Schalter auf das Icon des D-Pad stellen. Der Joystick hat nun unter
bestimmten Konsolenanwendungen die D-Pad-Funktion.
Schalter auf das Icon des Joysticks stellen. Der Joystick hat nun unter
bestimmten Konsolenanwendungen die Joystick-Funktion.
Funktion TURBO
• Verfügbare Knöpfe: A、 B、 X、 Y、 LB、 RB、 LT、 RT.
• TURBO einstellen: TURBO und die verfügbaren Knöpfe drücken. Die
Anzeige-LED leuchtet nun.
• TURBO zurücksetzen: TURBO und Einstellungsknöpfe drücken, die
LED-Anzeige geht aus.
Funktion MACRO
Verfügbare Knöpfe: L3、 R3.
MACRO Quellenknöpfe: A, B, X, Y, LB, LT, L3, RB, RT, R3, Joystick UP/
DOWN / LEFT/ RIGHT.
- Mit Switch-Dock verbinden
Schritt 1 Switch-Dock aufstellen und sichere Verbindung herstellen.
Schritt 2 USB des Arcade Fightsticks in das Switch-Dock stecken und
Konsole anschalten.
USB-Anschluss am Dock der Switch
26-Deutsch
• Das Gerät nicht in ein Feuer oder eine Explosion geben. Die eingebaute
Batterie kann große Schäden verursachen.
• Kinder sollten dieses Gerät nur in der Anwesenheit von Erwachsenen
benutzen.
28-Deutsch
Produktmerkmale
Anschlusstyp
Modell
Verbindung
Verpackungsgröße
Produktgröße
Nettogewicht
Anwendungstemperatur
Anwendungsfeuchte
10-40 ℃
20~80 %
ca. 250 * 175 * 105 mm
PXN-0082
USB-Kabel
ca. 720 g
< 25mA
ca. 268 * 195 * 114 mm
Verbindung zur PS3
Schritt 1 Den USB des Joysticks in die Schnittstelle der PS3 stecken.
Konsole anschalten.
Verbindung zum PC
Schritt 1 Den USB des Joysticks in die Schnittstelle des Computers stecken.
Schritt 2 Bei der ersten Verbindung findet der Computer neue Hardware und
installiert den Treiber automatisch.
• Funktionstest
Die Knöpfe und der Joystick können im Controllertest des PCs getestet werden.
Der Test kann folgendermaßen gefunden werden:
WIN XP/7/10: Systemsteuerung → Geräte und Drucker → Controlller-Icon →
Rechtsklick Gamecontrolle-Einstellungen → Funktionstest.
Mit der unten dargestellten Testansicht können Achen und Knöpfe getestet werden.
23-Deutsch
Controller (Fight Stick) properties
Setting
Test the game controller. If the controller is not functioning properly, it may
need to be calibrated. To calibrate it, go to the Settingings page.
Axes
Buttons
Point of View Hat
Z Axis
X Rotation
Y Rotation
X Axis / Y Axis
Test
OK Cancel Apply
1 2
9 10
3 4 5 6 7 8
“ ” is a registered trademark of ShenZhen PXN Electronics Technology Co., Ltd
PS4/PS3 is a registered trademark of Sony Computer Entertainment Inc.
Xbox is a registered trademark of Microsoft Corporation.
SWITCH is a registered trademark of Nintendo Co., Ltd.
All trademarks are the property of their respective owner. Technical specifications are subject
to change. Information contained herein is subject to change without prior notice. ShenZhen
PXN Electronics Technology Co., Ltd. shall not be made liable for any errors that may appear.
Please keep this information for later reference.