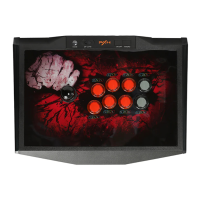
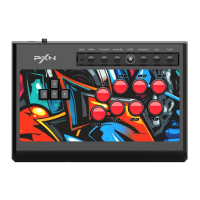
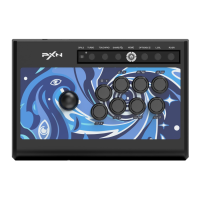
The PXN-X9 Arcade Fight Stick is a versatile gaming peripheral designed for a wide range of platforms, including PC, PS3, PS4, Xbox One, Switch, and Android. It functions as an arcade-style controller, providing a traditional arcade experience for fighting games and other genres.
Function Description:
The arcade fight stick features a joystick and a set of action buttons, replicating the layout of classic arcade cabinets. It includes a button for switching between D-pad and Joystick modes, allowing users to choose the input method that best suits their game or preference. A backlight switch controls the LED lighting of the 8 action buttons, which are illuminated when connected to a device. The device also incorporates a MACRO function, enabling users to program custom button combinations for enhanced gameplay.
For connectivity, the PXN-X9 utilizes a USB Type-C port and includes a USB port specifically for connecting original PS4 and Xbox One controllers, which is necessary for guidance when playing on those consoles. It also supports audio communication on Xbox One and PS4 platforms, with a dedicated headphone connection diagram provided.
Important Technical Specifications:
- Product Model: PXN-X9
- Connection: USB Cable
- Input: 5V 80mA
- Product Size: Approximately 403296123mm
- Product Weight: Approximately 3320g
- Packing Size: Approximately 460335152mm
- Application Temperature: 0-40°C
- Application Humidity: 20-80%
- Compatible Platforms: PC, PS3, PS4, Xbox One, Switch, Android
Usage Features:
- Platform Compatibility: The PXN-X9 is highly versatile, supporting PC, PS3, PS4, Xbox One, Switch, and Android devices. For PS4 and Xbox One, an original gamepad is required for initial guidance.
- PC Connection: To connect to a PC, simply plug the arcade stick into the computer. Drivers are automatically installed upon first connection. Users can test the axes and buttons through the game controller settings in the control panel (for XP, WIN7, and above systems).
- PS3 Connection: Plug the arcade stick into the PS3 console and power it on. Once connected, games can be launched, and settings can be adjusted.
- PS4 Connection: Connect an original, power-off PS4 controller to the arcade stick via USB cable. Then, plug the arcade stick into the PS4 console and power it on. After about 15 seconds, when the PS4 controller's LED indicator stays ON, press the HOME button on the arcade stick to play.
- Xbox One Connection: Similar to PS4, connect an original, power-off Xbox One controller to the arcade stick via USB cable. Plug the arcade stick into the Xbox One console and power it on. After approximately 15 seconds, when the Xbox One controller's LED indicator stays ON, press the HOME button on the arcade stick to play.
- Switch Connection (Console): Plug a Type-C OTG adapter into the USB interface of the arcade stick, then plug the OTG adapter into the Switch console. Power on the Switch console. Once connected, games can be launched, and settings can be adjusted.
- Switch Connection (Dock): Place the Switch console into the Switch dock. Plug the arcade stick into the Switch dock and power on the Switch console. A screenshot can be taken by pressing "+" and "-" simultaneously.
- Android Connection (Cellphone): Plug an OTG adapter (Micro OTG or Type-C) into the USB interface of the arcade stick, then into the cellphone. Note that some cellphones may require enabling the OTG function in their settings.
- Android Connection (TV Box/TV): Plug the arcade stick into the Android TV box or TV. Once connected, games can be launched.
- D-Pad/Joystick Switching: A dedicated button allows users to switch between D-pad, Left Stick (LS), and Right Stick (RS) functions for the joystick, providing flexibility in control.
- LED Light Switch: The 8 action buttons feature LED backlighting, which can be turned ON or OFF using a dedicated switch.
- MACRO Function: This feature allows users to set custom button combinations for "L1/LB/L" and "L2/LT/ZL." The original function of these buttons will be overwritten. Available buttons for MACRO include various face buttons (A, B, X, Y), shoulder buttons (R1/RB/R, R2/RT/ZR, L1/LB/L, L2/LT/ZL), and joystick directions (UP, DOWN, LEFT, RIGHT).
- Setting MACRO: Press the MACRO button (indicator ON green), then press "L1/LB/L" or "L2/LT/ZL" (indicator flashes green). Press the desired button combination, then press MACRO again to finish (indicator OFF).
- Releasing MACRO: Press the well-set MACRO button (indicator flashes green).
- Clearing MACRO: Press the MACRO button (indicator ON green), press the well-set MACRO button ("L1/LB/L" or "L2/LT/ZL") (indicator flashes green), then press MACRO again (indicator OFF).
- Limitations: A maximum of 15 actions can be set per MACRO. Simultaneous button presses count as one action. The "SHARE" and "OPTIONS" keys can be used as separators for identical actions or delays.
- Replaceable Action Buttons: The manual provides instructions on how to replace the action buttons, indicating a modular design for maintenance or customization.
- Audio Communication: The device supports audio communication on Xbox One and PS4 platforms via a headphone connection.
Maintenance Features:
- Troubleshooting: The manual provides guidance for common issues such as the backlight being on but the stick not working (re-plug, check controller), console screen freezing (restart console, reconnect stick), or improper operation in-game (unplug, reconnect stick). It also notes that a high-quality USB cable is required when connecting an original controller.
- Attentions:
- Avoid strong vibration.
- Do not disassemble, modify, or repair the device yourself.
- Prevent water or other liquids from entering the stick to avoid damage.
- Avoid storing in humid, high-temperature, oily smoke, or other adverse environments.
- Handle gently when connecting or removing the arcade stick.
- Children should be supervised by adults when using the product.
- Replaceable Buttons: The design allows for the replacement of action buttons, which can aid in maintenance and extend the product's lifespan.