EasyManua.ls Logo

QDI Legend-III P6I440LX/AV User Manual

Default Icon
75 pages
To Next Page IconTo Next Page
Page #1 background imageLoading...
Page #1 background image
PENTIUM
II
P6I440LX/AV
Legend-III
Question and Answer IconNeed help?

Do you have a question about the QDI Legend-III P6I440LX/AV and is the answer not in the manual?

QDI Legend-III P6I440LX/AV Specifications

General IconGeneral
BrandQDI
ModelLegend-III P6I440LX/AV
CategoryMotherboard
LanguageEnglish

Summary

SpeedEasy Quick Setup

Procedures

Step-by-step guide for quick setup.

SpeedEasy CPU Setup Menu

Visual representation of the CPU setup menu.

SpeedEasy CPU Setup Menu

Figure -1 SpeedEasy CPU Setup Menu

Illustrates the CPU setup menu interface.

Warning

Caution about setting CPU frequency too high.

Note

Instructions for system not booting due to CPU settings.

Introduction

Overview

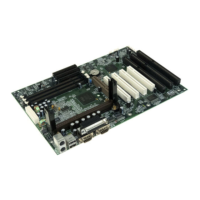
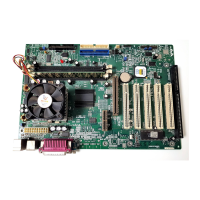
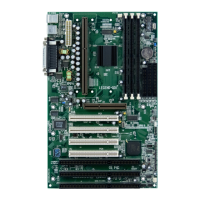
General description of the motherboard features.

Key Features

Highlights of the motherboard's capabilities.

Pentium®II

Details on Pentium II processor support.

Chipset

Information on the motherboard's chipset.

System memory

Specifications for system memory configuration.

On-board IDE

Green function

On-board I/O

On-board AGP

VGA

On-board Audio

Advanced Feature

BIOS

Expansion slots

Board size

Connector Configuration

Green LED

Pinout and function of the Green LED connector.

Power Switch (POWER)

Instructions for connecting and using the power switch.

Hard Disk LED Connector (HD.LED)

Speaker connector (SPEAKER)

LED Connector (LED)

Reset Switch (Reset)

Hardware Green Connector (SLEEP)

Keylock/Power LED Connector (PW.LED)

Infrared Header (IrDA)

Controlled Fan Connector (CPU FAN, BAKE FAN)

Standard Fan Connector (CHASSIS FAN)

USB(USB1, USB2) Connector

I/O Port Description

Memory Configuration

Clear CMOS

AWARD BIOS Description

Entering Setup

Steps to enter the BIOS setup utility.

Figure-1 Main Menu

Illustration of the main BIOS menu.

Load Setup Defaults

Explanation of loading default BIOS settings.

Standard CMOS Setup

Hard Disk

Video

Error Halt

Base Memory

Extended Memory

Other Memory

SpeedEasy CPU Setup

Figure-3 SpeedEasy CPU Setup

BIOS Features Setup

Virus Warning

Boot Sequence

Swap Floppy Drive

Security Option

Assign IRQ for VGA

Chipset Features Setup

Auto Configuration

DRAM Timing

MA WAIT State

EDO RAS# TO CAS#

DRAM Speed Selection

AGP Aperture Size (MB)

SDRAM RAS-TO-CAS Delay

SDRAM RAS

Power Management Setup

Power Management

Video Off Method

Doze mode

Standby Mode

Suspend Mode

Resume by LAN/Ring

Parallel Port

PNP/PCI Configuration Setup

IRQ-3~IRQ-15 assigned to

DMA-0~DMA-7 assigned to

PCI IDE IRQ Map To

Integrated Peripherals

IDE HDD Block Mod

Onboard Serial Port 1

Onboard Parallel Port

IDE Primary/Secondary Master/Slave PIO (UDMA)

Onboard Serial Port 1/2

Serial Port 2 Mode

Parallel Port Mode

System Monitor Setup

MB Temperature

Fan Speed (CPUFAN)

Chassis status

Supervisor/User Password

IDE HDD Auto Detection

Setup Changes

Auto detect

Boot with BIOS defaults

VGA and TV-out Description

Preparing your computer

Steps to prepare the computer for VGA and TV-out.

Note

Instruction on disabling onboard VGA for add-on cards.

Install Enhanced Driver for Windows 95

I. If Windows 95 prompts you to insert a disk from the hardware manufacturer

Procedure for driver installation when prompted for disks.

II. If Windows 95 does not prompt you to insert a disk

Procedure for driver installation via desktop properties.

Display Properties

Install From Disk

Procedure for installing drivers from disk.

Advanced Display Properties

TV Adjustment Window

Window for adjusting TV output settings.

Install Enhanced Driver for Windows NT 4.0

Crystal Audio Description

Features

Overview of the Crystal Audio system features.

3D Sound

Explanation of the 3D Sound feature.

Software Wavetable

Description of software wavetable synthesis.

Wave Audio

Details on wave audio capabilities.

Layout of audio system

Software Drivers Installation

I. Installation of Windows 95 driver

Step-by-step guide for Windows 95 driver installation.

System Properties

II. Installation of Windows NT driver

III. How to take effect of 3D sound

IV. Install AudioStation

AudioStation Application

Operating

How to operate the AudioStation application.

Mixer Module

Function of the mixer module in AudioStation.

CD Module

Function of the CD module in AudioStation.

DAT Module

Function of the DAT module in AudioStation.

Recording Files

Prepare

Preparation steps for audio recording.

Editing Files

V. Software Wavetable Synthesis

Function

Description of wavetable synthesizer function.

Installation Instructions (in Windows 95)

Steps for installing wavetable synthesis in Windows 95.

Add New Hardware Wizard

Selecting the crystal software synthesizer as your default MIDI device

Appendix A. About Utility Diskette

Command as following

Command for BIOS upgrade utility.

Warning

Warning regarding BIOS upgrades.

Retention Mechanism & Pentium® II Processor Installation Procedures

3. Install HSSBASE (Heatsink Support Base) on motherboard, then insert the two plastic pins through the HSSBASE to secure it to the motherboard.

4. Insert Pentium® II Processor in Slot1.

5. Clip Plastic Bar onto the HSSBASE through the fins on the processors' heatsink.

6. The Retention Mechnism installation procedure is finished as below shown.

Remark

Appendix C. Boot Logo

Related product manuals