Do you have a question about the QIDI i-mate s and is the answer not in the manual?
Details voltage settings for different regions and provides crucial safety warnings regarding power supply configuration.
Provides email addresses, Skype contact, and CEO contact for customer inquiries and support.
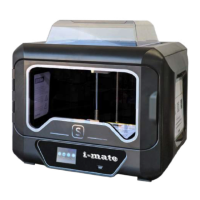
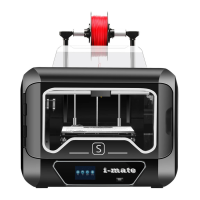
Identifies and labels the main external components of the 3D printer.
Identifies and labels the key components of the extruder assembly.
Guides opening the box, removing foam, and safely extracting the printer with assistance.
Details removing external protective film and cutting cable ties securing the printer's axes.
Instructs on removing belt fixing clips from the X and Y axes of the printer.
Guides removing internal foam padding from the printer's internal compartments.
Details the process of taking out the top cover of the 3D printer.
Instructs on removing the 0.2mm extruder, accessories, and side panels from the packaging.
Explains language, sound, and LED light settings accessible via the system menu.
Details manual axis control, home positioning, and fan status checks within the tool menu.
Guides selecting the leveling function and performing initial adjustments at the front corners of the build platform.
Details adjusting the build platform at the back center and explains how knob turns affect distance.
Instructs on using up/down buttons for final distance adjustment and confirming settings, with a note on optimal friction.
Details pulling the rod, threading filament through the spool holder, and tightening the retainer ring.
Guides threading filament into the extruder, completing installation, and installing top cover and side windows.
Provides step-by-step instructions for loading filament via the printer's interface, including temperature setting and filament feed.
Outlines the steps to unload filament using the printer's interface, including stopping the process and pulling the filament.
Guides the user to select the test file, initiate printing, and monitor the progress on the printer's display.
The QIDI TECH i-mate s is a 3D printer designed for various printing needs, offering a user-friendly experience with several features for both novice and experienced users. This guide specifically applies to the i-mate s 3D printer and provides essential information for its operation, maintenance, and troubleshooting.
The i-mate s 3D printer is capable of creating three-dimensional objects from digital designs using filament. It features an extruder that melts and deposits filament layer by layer onto a build platform, forming the desired object. The printer is equipped with a display screen for easy navigation and control, allowing users to manage printing tasks, adjust settings, and monitor progress. It supports various filament types, including PLA, ABS, and TPU, each with specific handling instructions to ensure optimal print quality and prevent issues like filament bounce-off. The printer also includes a USB port for loading print files, making it convenient to transfer designs from a computer.
Before starting any operation, it is crucial to set the power supply correctly. The printer's power supply can be switched between 115V (for USA, Canada, Japan) and 230V (for Europe). Incorrect power supply settings can damage the printer's electronics. The power supply switch is located at the back of the machine.
Unpacking the printer involves several steps to ensure safe setup. Users need to open the box, remove instructions and foam, and carefully lift the printer out with two people. Protective films and cable ties on the X and Y axes must be removed. Foam inserts inside the printer, particularly around the nozzle area, also need to be taken out. After unpacking, the top cover should be removed, and the power cord plugged into the lower right corner at the back of the printer.
The display screen operator interface is intuitive, featuring icons for "Print," "System," "Tool," and "Service."
Adjusting the build platform, also known as leveling, is a critical step for successful printing. This process involves using a black level paper to set the correct distance between the nozzle and the build plate.
Filament installation is straightforward.
Loading filament involves preheating the extruder.
Unloading filament is also done through the "Filament" function.
For the first print, after leveling the build platform and loading filament, users can print the test file "xiaogao.gcode."
When printing large models, the thermal barrier shrinkage can cause the build plate to warp. In such cases, it is recommended to use clips to secure the build plate.
The electronic version of the user manual is provided on the USB flash drive that comes with the printer, offering comprehensive guidance for maintenance and troubleshooting.
For optimal printing quality, it is advised to take down the top cover and open the front door to ensure good airflow.
Caution regarding high temperatures: The extruder and build bed generate high temperatures during printing. Users should never reach inside the printer during operation. After printing, wait for the model to cool down before removing it from the magnetic bed sticker.
Safety is paramount: Loose clothes, jewelry, and long hair can get caught in moving parts. Keep them away from the printer during operation.
Customer service support is available for any problems or suggestions. QIDI Technology aims to reply within 12 hours. As compensation for issues, the company may offer 2 nozzles and 2 blue platform stickers for free. Contact can be made via email (mateb@qd3dprinter.com, matec@qd3dprinter.com, 616038502@qq.com) or Skype (mateb@qd3dprinter.com). The CEO, Diqiang Xue, also provides an email for direct contact, with a reply expected within 24 hours. Due to time differences, a slight delay in response should be understood.
| Layer Resolution | 0.05-0.4 mm |
|---|---|
| Filament Diameter | 1.75 mm |
| Nozzle Diameter | 0.4 mm |
| Connectivity | USB, SD Card |
| Extruder Type | Single Extruder |
| Frame | Metal Frame |
| Print Technology | FDM (Fused Deposition Modeling) |
| Heated Bed | Yes |
| Nozzle Temperature | Up to 250°C |
| Machine Weight | 15 kg |
| Supported Materials | PLA, ABS, TPU |
| Power Supply | 110V / 220V |