Do you have a question about the QIDI I-mate and is the answer not in the manual?
Key precautions for printer operation, including nozzle handling and airflow for optimal printing quality.
Critical safety notices about high temperatures and moving parts to prevent injury during printing.
Locates the electronic user manual for the slicer software on the provided USB flash drive.
Instructions for selecting the correct voltage (115V/230V) and warnings about incorrect power supply settings.
Provides contact details (email, Skype) for technical assistance and information on company compensation policies.
Lists all components included in the 3D printer package, such as filament holder, cable, screwdriver, and USB drive.
Identifies key printer parts like the display screen, nozzle, filament holder, and ports via a labeled diagram.
Guides on placing the box, removing foam, extracting the printer, and cutting cable ties on the Y-axis.
Instructions for removing belt fixing clips from the X and Y axes and clearing internal foam.
Covers plugging in the power cord, turning on the printer, and interacting with the screen for initial setup.
Details functions within the 'System' menu: language selection, sound adjustment, and LED light control.
Explains 'Manual' axis control, homing, and checking the model fan status via the 'Tool' menu.
Guides on selecting 'Leveling' in the 'Tool' menu and using leveling paper for initial nozzle-to-plate distance.
Details adjusting the platform at the back center using leveling paper and notes on optimal distance thickness.
Instructs on fine-tuning distance with up/down buttons and confirming the setting for proper build plate leveling.
Covers pulling the rod, placing the filament roll on the spool holder, and tightening the retainer ring.
Details threading filament into the extruder and provides important attentions regarding filament path for different materials.
Guides on selecting 'Tool' then 'Filament', preheating, and waiting for filament to flow from the extruder.
Details the steps to unload filament: selecting 'Tool', 'Filament', 'Stop', and pulling out the filament.
Instructs on selecting the 'Print' icon, finding the 'xiaogao.gcode' test file, and starting the printing process.
Advises using clips when printing large models to prevent build plate warping caused by thermal shrinkage.
The QIDI Technology i-mate is a 3D printer designed for ease of use and reliable performance. This guide provides essential information for setting up, operating, and maintaining the i-mate 3D printer, ensuring optimal printing quality and user safety.
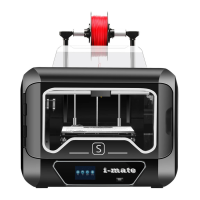
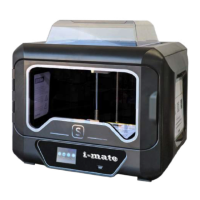
The i-mate 3D printer is designed to create three-dimensional objects from digital designs using filament. It features a display screen for user interaction, a magnetic bed sticker for easy model removal, and a build platform where objects are printed. The printer utilizes an extruder to melt and deposit filament layer by layer, forming the desired object. It also includes a USB port for file transfer and a power switch for controlling the device.
The i-mate 3D printer offers several features to enhance the user experience.
Unpacking and Setup: The unpacking process involves carefully removing the printer from its packaging, taking out instructions and foam, and removing protective films and cable ties securing moving parts. Two people are recommended to lift the printer from the box. Foam inserts around the X and Y axes, as well as under the platform, need to be removed to free the nozzle and allow the platform to rise. After unpacking, the power cord is plugged in, and the printer is turned on. The accessories, including solid glue and a USB disk, are found in the foam at the bottom of the platform.
Power Supply Setting: Before operation, it's crucial to ensure the power supply is set correctly. The printer's voltage switch is pre-set to 115V for USA, Canada, and Japan, and 230V for Europe. Users in other countries must check their local voltage and adjust the switch accordingly. Failure to set the correct voltage can damage the printer's electronics.
Display Screen Operator Interface: The printer features an intuitive display screen with various icons for different functions.
Adjusting the Build Platform (Leveling): Proper build platform leveling is essential for successful prints.
Filament Installation:
Unloading Filament:
First Printing:
Large Model Printing: When printing large models, the thermal barrier shrinkage of the model may cause the build plate to warp. To prevent this, it is recommended to use clips to secure the build plate.
While the manual primarily focuses on initial setup and operation, it implicitly suggests some maintenance practices:
The manual highlights several safety precautions:
QIDI Technology provides comprehensive customer service. Users experiencing problems can contact support via email (mateb@qd3dprinter.com, matec@qd3dprinter.com) or Skype (mateb@qd3dprinter.com). Replies are typically provided within 12 hours. As compensation for issues, the company offers 2 nozzles and 2 blue platform stickers. For suggestions or complaints, users can contact CEO Diqiang Xue at 616038502@qq.com, with replies expected within 24 hours. The company acknowledges potential delays due to time differences.
| Nozzle Diameter | 0.4 mm |
|---|---|
| Filament Diameter | 1.75 mm |
| Supported Filaments | PLA, ABS, TPU |
| Bed Leveling | Manual |
| Extruder Type | Single Extruder |
| Print Technology | FDM (Fused Deposition Modeling) |
| Heated Bed | Yes |
| Nozzle Temperature | Up to 250°C |
| Layer Resolution | 0.05 - 0.3 mm |
| Print Speed | 30-150 mm/s |
| Connectivity | USB, Wi-Fi |
| Frame Material | Metal |