This document is an assembly, operation, and maintenance manual for the Qualcast 450W Grass Trimmer, model GGT450A1. It provides comprehensive instructions to ensure the correct and safe use of the device.
The Qualcast 450W Grass Trimmer is designed for cutting weeds, grass, or similar soft vegetation in hard-to-reach areas such as under bushes, on slopes, and along edges. It is intended for private domestic use only and should not be used for commercial trade or for cutting unusually thick, dry, or wet grass, or for shredding leaves. The trimmer features a 450W motor and is designed for efficient and safe operation when used according to the instructions.
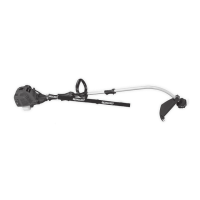
Assembly Features:
The assembly process is straightforward and involves a few key steps. Users are advised to read the instructions fully before starting assembly and to check all parts for damage. If any components are damaged, the trimmer should not be assembled.
- Fitting the Guard: The safety guard is a crucial component for safe operation. It attaches to the trimmer head by sliding into designated slots. Once aligned, the guard is secured with a screw. A warning emphasizes the sharp cutting edge of the guard and the importance of never operating the tool without it properly in place, as this can cause the motor to overheat and void the warranty.
- Fitting the Edger Wheel: The edger wheel is designed to assist in edging tasks. It slides onto a metal plate on the side of the trimmer head and locks into place with an audible click. To remove the wheel, a release button must be pressed while pulling the wheel upward.
Usage Features:
The manual details several features and steps for operating the grass trimmer effectively and safely.
- Adjusting Auxiliary Handle: The auxiliary handle can be adjusted to the most comfortable and balanced position for the user. This is done by pressing a locking knob, rotating the handle, and then releasing the knob to secure it.
- Removing the Blade Protect Label: Before initial use, a blade protect label must be removed.
- Adjusting the Height: The trimmer's height can be adjusted to suit the user's comfort. This involves unscrewing a height adjustment locking collar, extending or retracting the aluminum tube, and then tightening the collar to lock the desired length.
- Adjusting the Cutting Angle: The cutting angle of the trimmer head can be adjusted to switch between trimming and edging modes. To adjust the main handle angle downwards or convert to edging mode, the user places one foot on the motor housing portion of the trimmer head, grips the main handle, and applies force downwards. To adjust the main handle angle upwards, the foot is placed on the safety guard area, and force is applied to the main handle. This adjustment allows for versatile use in different cutting scenarios. Users are warned to disconnect the trimmer before making adjustments.
- Mains Supply Cable Strain Relief: To prevent accidental disconnection or damage to the power cable, the main supply cable should be doubled about a foot from the end, looped through a hole on the rear handle, and hooked over the upper cable holder. This ensures a firm attachment at the handle.
- Adjusting Flower Guard: The flower guard can be lifted for edging and lowered for trimming. It must be locked firmly in position before operation.
- Starting and Stopping: To start the machine, the user presses and holds the switch. Releasing the switch stops the machine.
- Trimming: When trimming, users are advised to wear eye protection and heavy clothing, hold the front handle with one hand and the auxiliary handle with the other, and keep the unit below waist level. Working from right to left ensures debris is thrown away from the user. The line should be kept near and parallel to the ground (perpendicular when edging) and not crowded into the material being cut. It is crucial to ensure the line is fed out and the motor reaches full speed before trimming. The manual warns against cutting wet grass, moving the trimmer too fast, or pressing it against the ground.
- Edging: To switch to edging mode, the cutting angle is adjusted to the lowest horizontal setting, and the handle rotation locking button is pushed down to rotate the main handle 90 degrees clockwise. The edger wheel is then positioned on the ground. The guard has two white line guides to indicate the cutting line position, which should be aligned with the lawn edge. Only the tip of the line should make contact with the area being worked, and the line should not be forced. The edging wheels help protect the unit and prevent contact with the ground. Caution is advised as objects can be thrown from the trimmer line during edging.
- Automatic Line Feed System: When the trimmer is initially switched on, a small length of line is fed out, accompanied by a "clattering" noise as the lines hit the line cutter. This is normal. After about 5 seconds, the line is cut to the correct length, and the noise reduces as the motor reaches full speed. If more line is needed, the trimmer should be allowed to stop completely, then restarted to allow the motor to reach full speed. This procedure can be repeated up to 6 times.
- Manual Line Feed: If manual feeding is required, the user presses and releases the manual line feed button while gently pulling out the lines until they reach the line cutter. If too much line is fed out, the spool cap should be removed, and the spool clicked anti-clockwise until the desired length is achieved.
Maintenance Features:
Regular maintenance is essential for the longevity and safe operation of the grass trimmer.
- General Maintenance: The power tool requires no additional lubrication. There are no user-serviceable parts other than those described. Water or chemical cleaners should not be used; instead, the tool should be wiped clean with a dry cloth. It should be stored in a dry place, and motor ventilation slots should be kept clean. If the supply cord is damaged, it must be replaced by an authorized repairer.
- Replacing the Spool/Spool Line:
- Removing the Spool: To remove the cap, two latches must be pressed and held while pulling the cap away from the spool holder. The spring should not be lost during this process.
- Fitting a New Spool and Line: The old spool is removed, and a new one is placed into the cutting head. One line is released from its cleat and fed through the eyelet, then the process is repeated for the second line. The cap is then refitted.
- Replacing the Cutting Line: The trimmer is designed to use line with a maximum diameter of 1.65 mm. When winding new line, it is crucial to wind it onto the upper section of the spool first. Approximately 3 meters of line are needed. 15 mm of line is inserted into one of the holes in the upper section of the spool, and the line is wound in the direction of the arrows on the spool. Approximately 100 mm of line should be left unwound and placed into a cleat. This process is repeated for the lower section of the spool. Care must be taken to ensure the line is neatly coiled to maintain the efficiency of the automatic line feed.
- Inserting the Line Spool: When refitting the spool cap, all areas of the cap and spool holder must be clean. The cap is pressed firmly down towards the spool holder to ensure it is fully located. Its correct fitment is checked by attempting to remove it without depressing the two latches.
Troubleshooting:
The manual includes a troubleshooting chart that lists common problems, possible causes, and corrective actions. This helps users diagnose and resolve minor issues before contacting customer support. Examples include:
- Trimmer not operating: Check power, mains socket, extension cord, and fuse.
- Trimmer operating intermittently: Check extension cord and internal wiring.
- Trimmer labours: Grass may be too high, requiring cutting in stages.
- Trimmer not cutting: Line may be too short or broken, requiring manual feeding.
- Line can't be fed: Spool may be empty or line entangled, requiring replacement or rewinding.
- Line keeps breaking: Line may be entangled or trimmer used incorrectly (e.g., hitting stones or walls).
Overall, the Qualcast 450W Grass Trimmer manual provides a detailed guide for safe and effective use, emphasizing user safety, proper assembly, operational techniques, and essential maintenance procedures.