EasyManua.ls Logo

Quickplay SPOT User Manual

Quickplay SPOT
4 pages
To Next Page IconTo Next Page
Page #1 background imageLoading...
Page #1 background image
For choosing the Q SPOT UICKPLAY
Rebounder. We hope you enjoy and
get years of use out of this product.
If you have any issues, please do not
return this product to the store.
Instead contact us directly:
info@quickplaysport.com
We promise to resolve it
.or your money back
THANK YOU!
At Quick Play Sport we think sport is all about taking part. We develop innovative
products that help athletes and coaches at all levels of sport, perform to the best of
their ability. If you have any queries or suggestions about how we can improve our
products, wed love to hear them. Please feel free to get in touch.
info@quickplaysport.com
SPOT
INSTRUCTIONS
© 202 Quick Play Sport Limited. All Rights Reserved. 1 Designed in the UK and made in China to EU standards & USA USA & .
1.5 x 1M
5 x 3FT
Question and Answer IconNeed help?

Do you have a question about the Quickplay SPOT and is the answer not in the manual?

Quickplay SPOT Specifications

General IconGeneral
BrandQuickplay
ModelSPOT
CategorySports & Outdoors
LanguageEnglish

Summary

Warnings

Assembly by Adult Required

Assembly requires adult supervision for safe setup and use.

Child Safety Warning

Product is not for children under 3; small parts pose choking/strangulation risks.

Surface Requirements

Only use on a flat, stable surface to ensure product stability.

Frame and Net Security Check

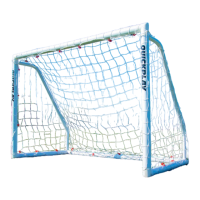
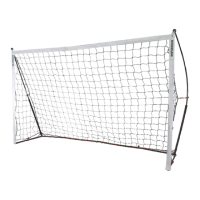
Verify the frame is fully assembled and securely attached to the net before use.

Ground Securing Check

Ensure the frame is firmly secured to the ground before starting.

Storage and Weather Protection

Disassemble after use and store indoors to protect from adverse weather.

Drying Before Storage

Ensure the product is thoroughly dried before storing to prevent damage.

Structural Integrity Warning

Do not climb or hang on the rebounder structure to avoid damage or injury.

Regular Wear and Tear Inspection

Inspect for damage; stop use if any part breaks to prevent injury.

Heat Source Avoidance

Keep away from heat sources and hot vehicles to prevent damage.

Wind Condition Advisory

Not suitable for use in high winds; avoid use during strong winds.

1 Year Parts Warranty

Warranty Maintenance Requirement

Disassemble and store dry to maintain warranty validity.

Warranty Registration

Register your 1-year warranty online within 15 days of purchase.

Setting Up

Connect Base Poles and Side Bars

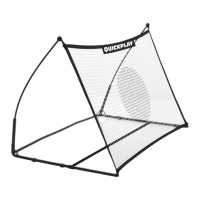
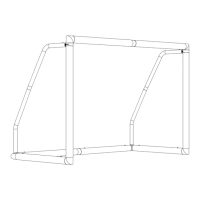
Connect pre-linked base poles and insert weighted side bars into frame corners.

Attach Support Bar

Slide the support bar onto the base frame up to the stopper rivet.

Attach Uprights

Attach uprights and insert them into the base frame corner joints.

Attach Net Corners

Attach the net to both the top and bottom corners (x4).

Related product manuals