Do you have a question about the Quickplay KICKSTER and is the answer not in the manual?
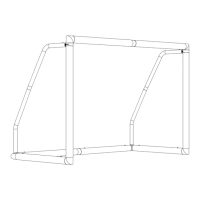
Assemble the initial frame sections, ensuring the basebar has an air gap above the ground.
Connect the upright poles to the base frame using the provided spring pins.
Attach the net to the frame, securing it properly to the poles and base.
Fasten the net to the poles using the green securing clips or similar attachments.
Ensure the entire goal frame is stable and correctly assembled.
Secure the goal to the ground, likely using stakes or anchors (implied by context).
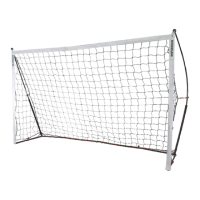
The QuickPlay Kickster is a portable soccer goal designed for quick and easy setup and takedown. It is intended for recreational use and is suitable for various outdoor settings, provided the ground is flat and weather conditions are favorable.
The primary function of the QuickPlay Kickster is to provide a portable and easily deployable soccer goal for practice, games, or casual play. Its design emphasizes portability, allowing users to transport and set it up efficiently. The goal features a flexible frame that includes bends, ensuring stability and proper structure when assembled. The basebar is designed to be above the ground, creating an air gap that contributes to the goal's overall stability and performance. The net is attached to the frame using a system of clips and bungees, which facilitates quick assembly and secure attachment. The goal is designed to be used on a flat surface to ensure optimal performance and safety.
The QuickPlay Kickster is designed with several features to enhance its usability. It is explicitly stated that the product must be assembled by an adult, ensuring proper setup and safety. The goal is not suitable for children under 3 years of age, highlighting a safety consideration for young children. Users are instructed to only use the goal on a flat surface to prevent instability and potential hazards. Before use, it is crucial to check that the product is fully assembled and that the frame is secured to the ground. This ensures the goal's stability during play and prevents it from moving or collapsing. The design incorporates spring pins and rivets for securing the frame components, making the assembly process straightforward. The net attachment system, involving clips and bungees, allows for quick and secure fastening of the net to the frame. The goal's portability is a key feature, as it is designed to be packed away into a provided carry bag after use. This makes it convenient for transport and storage, allowing users to take it to different locations. A QR code and a website link are provided for a setup video, offering visual guidance for assembly, which simplifies the process for users.
Proper maintenance is crucial for extending the lifespan of the QuickPlay Kickster. Users are advised to disassemble the goal after each use and not leave it outdoors in adverse weather conditions. This prevents damage from prolonged exposure to elements like rain, wind, or sun. Storing the goal in a cool, dry place is recommended to maintain its condition. If the product gets wet after use, it is essential to ensure it is properly dried before storage to prevent mold, mildew, or rust on metal components. Users are explicitly warned not to climb or hang on the goal, as this can cause damage to the frame and net, and potentially lead to injury. Regular checks for wear and tear are advised, and users should stop using the goal if any part breaks, as continued use of a damaged goal may result in injury. The goal should be kept away from heat sources and not left in a hot vehicle, as extreme temperatures can damage the materials. The product is also not suitable for use in high winds, which could cause damage or instability. A 1-year parts warranty is provided, covering manufacturing defects and workmanship, but it excludes nets, bungees, and general wear and tear. Non-compliance with the usage guidelines will invalidate the warranty, emphasizing the importance of following maintenance instructions. Users are encouraged to register their warranty within 15 days of purchase, and a website and QR code are provided for warranty registration and terms. In case of an issue, users are advised to contact customer support directly rather than returning the product to the store, streamlining the troubleshooting and support process.
| Category | Sports & Outdoors |
|---|---|
| Net Material | Polyester |
| Type | Soccer Goal |
| Frame Material | Steel |
| Anchoring | Ground Stakes |
| Use | Training |
| Assembly Time | 2-5 minutes |
| Setup | Quick Setup |