EasyManua.ls Logo

Quickplay Q-FOLD User Manual

Quickplay Q-FOLD
16 pages
To Next Page IconTo Next Page
Page #1 background imageLoading...
Page #1 background image
Item No.
2
Quantity
12-1
12-2
12-3
12-4
12-5
M1
M2
M3
M4
M5
M6
NET
Ground
stakes
2
2
3
4
2
4
6
27
4
24
4
1
12-6 3
M7
2
QUICKPL
AY
TM
Q-FOLD
PLEASE REGISTER WARRANTY @ WWW.QUICKPLAYSPORT.COM
FOLDING, SOCCER GOAL
ALL WEATHER UPVC
SCAN ME
TO SEE THE Q-FOLD SET UP VIDEO
12x6'
(366 cm x 183 cm)
M2
M1
A
C
A
R
R
T
E
X
W
E
H
E
E
K
N
A
T
U
:
S
G
I
N
N
I
G
N
G
R
R
A
O
W
U
N
D
S
T
A
K
E
S
GROUND
STAKES
M3
M4
M5
M6
M7
12-6
12-1
12-6
12-3
12-4
M2
12-6
M2
M1
M1
M5
M3
M3
M6
12-2
12-3
12-3
12-1
12-5
12-5
M2
12-4
M7
M-7
12-4
12-4
M2
M5
M5
M2
M5
M1
12-2
S1
8
S1
Question and Answer IconNeed help?

Do you have a question about the Quickplay Q-FOLD and is the answer not in the manual?

Quickplay Q-FOLD Specifications

General IconGeneral
CategorySports & Outdoors
BrandQuickplay
ModelQ-FOLD
ColorBlack
MaterialSteel frame, Fabric seat

Summary

Q-Fold Soccer Goal Components

Part Identification and Quantity List

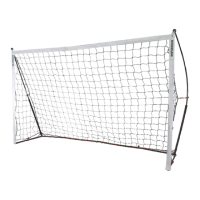
Lists all numbered and lettered parts required for assembly, along with their respective quantities.

Tube Labelling for Assembly

Explains how to identify correct tubes using printed labels for accurate assembly.

Soccer Goal Assembly Steps

Step A: Add Metal Spring Clips

Instruction to insert part S1 into connectors M5 and M3 for secure connections.

Step B: Add Plastic Push Buttons

Instruction to insert M6 parts into M1, M2, and M7 connectors for snap-fit assembly.

Step C: Assemble Crossbar

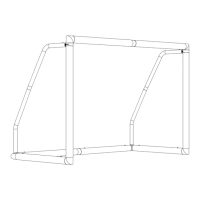
Attaching 12-6 tubes to M7, M2, and M5 connectors to form the crossbar.

Step D: Attach Posts to Crossbar

Connecting 12-2 and 12-5 tubes to the M2 connectors of the crossbar.

Step E: Assemble Back Basebar

Attaching 12-3 tubes to M1, M2, and M5 connectors to form the back basebar.

Step F: Attach Base Posts to Basebar

Connecting 12-1 tubes to the M2 connectors of the assembled basebar.

Step G: Connect Crossbar to Base Frame

Attaching the assembled crossbar and posts to the base frame using M2 connectors.

Step H: Connect Diagonal Brace

Attaching 12-4 tubes to M3 connectors to form diagonal braces.

Step I: Brace to Goal Frame

Connecting diagonal braces to M5 connectors at the corners of the goal frame.

Step J: Attaching Net

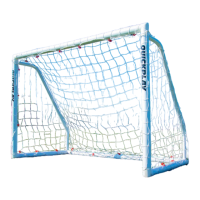
Securing the net to the assembled frame using M4 net clips, starting at the top left corner.

Folding the Q-Fold Soccer Goal

Soccer Goal Storage and Longevity

Soccer Goal Safety and Important Usage

Warning Against Hanging or Climbing

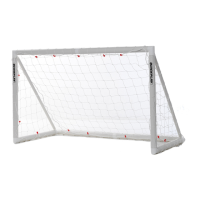
Advises users not to hang, climb, or jump on the back of the soccer goal.

General Product Warnings and Support Information

Includes general warnings, manufacturer details, and customer support contact information.

Related product manuals