EasyManua.ls Logo

RACK IT PRO 01906 - User Manual

RACK IT PRO 01906
2 pages
Print Icon
To Next Page IconTo Next Page
Loading...
D
E
C
A
B
AUSTRALIA: RACK-IT.COM.AU NEW ZEALAND: RACK-IT.CO.NZ
MADE IN CHINA | DISTRIBUTED BY:
Zenexus (AUS) Ph. 1300 734 714 Zenexus (NZ) Ph. 0800 443 058
TOOLS REQUIRED: WRENCH &
SCREWDRIVER (NOT INCLUDED)
WARNING: HANDLE CUT METAL
EDGES CAREFULLY
You’ve got this. We know because you take pride in your passions. Take care of your stu. That’s why you purchased this Rack It PRO
Deep Single Drawer. You’re particular. And we like that. Because we know you’ll take the time to check o all the Parts listed below
and to read through these Assembly Instructions before you start. Cue Farnsey (or Beyoncé – whatever lifts you).
L
e
t
s
d
o
t
h
i
s
.
YOUR HEADACHE-FREE GUIDE TO RACK IT LIKE A BOSS
DEEP SINGLE DRAWER
ASSEMBLY INSTRUCTIONS
ITEM CODE: 01906
RACK IT
When assembling or installing this product
wear protective gloves and eyewear
SAFETY TIP
+
PLEASE NOTE: If using an electric screwdriver only loosely tighten screws, finish tightening with hand screwdriver to avoid damage.
HOUSING PARTS:
DRAWER PARTS:
PART A - BOTTOM PANEL x 1
PART B - RIGHT SIDE PANEL x 1 PART C - LEFT SIDE PANEL x 1
PART D - BACK PANEL x 1
PART E - TOP PANEL x 1
PART F - M6 SCREW x 32
PART G
DRAWER BOTTOM x 1
PART J - DRAWER BACK x 1
PART K - DRAWER FRONT x 1
PART L
DRAWER RUNNERS x 4
PART H
DRAWER LEFT PANEL x 1
PART I
DRAWER RIGHT PANEL x 1
PART M - M4 SCREW x 20
(for Drawer Assembly)
Front
Edge
STEP 1 STEP 2
STEP 3
STAGE 1: BOX IT
Your Drawer starts here.
With Bottom Panel (A).
Like the foundations of a house.
So when you’re fixing on Side Panels (B & C),
think: do I want to rush the foundations?
The answer is, of course, no way.
Hot tips:
1. Make sure the pre-punched screw holes on Bottom Panel (A) are to the back.
2. Make sure the narrowest gap between the boxy ridges on the interior and the front
edge of each Side Panel is to the front.
3. Make sure the Square Slots points for the Drawer Runners line up. You’ll thank us later.
Grab your 4x Drawer Runner (L)s, and
gently pull the Inner Runner out to full
extension. Push down on the black toggle
and keep gently pulling until you feel the
catch release and each Runner will separate
into 2 parts.
Congratulations, you’ve unlocked the secret to your Runners’ assembly success:
each Runner has an Inner bit and an Outer bit.
1.The 4x Outer Runners fix to the inside of your Drawer Unit walls.
2.The 4x Inner Runners fix to the outside of your Drawers.
Screw holes at the back of Bottom Panel A
Fix the Outer Runners to the Square Slots
you diligently lined up back in Stage 1.
Slide the back Tab into back Square Slot,
then hook the front Tab over over the top
of the front Slot so it hangs like a, um, hanger.
Hot tips:
1. You can tell the Right Hand Outer Runners from the Left by the way they hang o
the Slots (if they don’t hang in place they’re meant for the other side).
2. Once all 4 Outer Runners are in place, check the Inner Runners slide in and
out easily (like a Sunday morning).
Fix o your Back Panel (D), followed by your Top panel (E). You’ve boxed It.
Cue roof shout! And let’s move onto Stage 2…
PART L – RUNNER (OUTER)
STEP 4
Question and Answer IconNeed help?

Do you have a question about the RACK IT PRO 01906 and is the answer not in the manual?

Summary

Stage 1: Box It Assembly

Step 1: Assemble Bottom and Side Panels

Attach side panels to the bottom panel, ensuring correct alignment of screw holes and panel edges.

Step 2: Separate Drawer Runners

Disassemble drawer runners into inner and outer parts by pressing a toggle and pulling gently.

Step 3: Install Outer Drawer Runners

Fix the outer runners to the inside walls of the drawer unit, aligning them with square slots.

Step 4: Attach Back and Top Panels

Secure the back panel and then the top panel to complete the main box structure of the drawer.

Stage 2: Drawer Assembly

Step 1: Construct Drawer Box

Assemble the drawer by attaching the back, side, and front panels to the drawer bottom.

Step 1: Attach Inner Drawer Runners

Fix the inner runners to each side of the assembled drawer, ensuring correct orientation.

Stage 3: Rack It Installation

Step 1: Secure Drawer to Shelf

Screw the assembled drawer unit to a Rack It MDF Shelf using self-tapping screws.

Step 2: Insert Drawer into Unit

Align the drawer runners and gently push the drawer into the main unit until it closes.

Overview

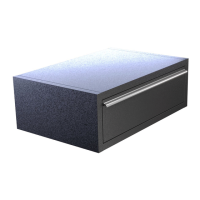
The Rack It PRO Deep Single Drawer is a storage solution designed for organizing and storing various items. It is part of the Rack It PRO system, suggesting compatibility and integration with other Rack It PRO components, particularly Rack It MDF Shelves. The product is identified by item code 01906.

Function Description:

The primary function of this device is to provide a single, deep drawer for organized storage. It is intended to be assembled and then either used as a standalone unit or integrated into a larger shelving system, such as a Rack It MDF Shelf. The drawer operates on a runner system, allowing it to slide in and out smoothly for easy access to its contents. The design emphasizes durability and ease of assembly, aiming to provide a reliable storage option for users who value organization.

Important Technical Specifications:

The manual provides a detailed list of parts, which gives insight into the construction and materials.

  • Housing Parts:
    • PART A - BOTTOM PANEL x 1
    • PART B - RIGHT SIDE PANEL x 1
    • PART C - LEFT SIDE PANEL x 1
    • PART D - BACK PANEL x 1
    • PART E - TOP PANEL x 1
    • PART F - M6 SCREW x 32 (for housing assembly)
  • Drawer Parts:
    • PART G - DRAWER BOTTOM x 1
    • PART H - DRAWER LEFT PANEL x 1
    • PART I - DRAWER RIGHT PANEL x 1
    • PART J - DRAWER BACK x 1
    • PART K - DRAWER FRONT x 1
    • PART L - DRAWER RUNNERS x 4 (These are crucial for the drawer's functionality and are designed to separate into "Inner" and "Outer" bits.)
    • PART M - M4 SCREW x 20 (for drawer assembly)
  • Compatibility: The drawer is designed to be screw-fitted to a "Rack It 15mm MDF Shelf," indicating a specific thickness requirement for integration.
  • Tools Required: Wrench & Screwdriver (not included).
  • Fasteners: The assembly primarily uses M6 and M4 screws, with a note about using self-tapping screws (no longer than 15mm) for fixing the unit to an MDF shelf.

Usage Features:

The manual outlines a multi-stage assembly process, broken down into "BOX IT," "DRAWER IT," and "RACK IT," each with detailed steps and "Hot tips" to guide the user.

  • Assembly Process:

    • Stage 1: BOX IT (Housing Assembly)
      • Step 1: Involves fixing the Side Panels (B & C) to the Bottom Panel (A). Key tips include ensuring screw holes on the bottom panel are to the back, the narrowest gap between boxy ridges on side panels is to the front, and square slots for drawer runners line up.
      • Step 2: Focuses on separating the Drawer Runners (L) into their "Inner" and "Outer" components. This is highlighted as a critical step for successful runner assembly. The Outer Runners attach to the drawer unit walls, while the Inner Runners attach to the drawer itself.
      • Step 3: Details fixing the Outer Runners to the square slots on the side panels. The method involves sliding a back tab into a square slot and hooking a front tab over the front slot. Hot tips help differentiate left from right runners and emphasize checking smooth operation.
      • Step 4: Involves fixing the Back Panel (D) and Top Panel (E) to complete the main housing.
    • Stage 2: DRAWER IT (Drawer Assembly)
      • Step 1: Guides the assembly of the drawer itself. This includes placing the Drawer Bottom (G) with threaded holes to the back, screw-fixing the Drawer Back Panel (J) first, then the Side Panels (H & I), and finally the Small Front Panel (N). Crucially, it instructs attaching the two Inner Runners to each side of the assembled drawer, with specific attention to their correct orientation (front attachment hook facing upwards).
    • Stage 3: RACK IT (Integration/Finalization)
      • Step 1: Describes how to fix the assembled drawer unit to a Rack It MDF Shelf. This involves using two self-tapping screws (max 15mm) through the two screw holes in the bottom panel of the drawer unit.
      • Step 2: The final step involves sliding the assembled drawer into the housing. It emphasizes carefully lining up the Inner and Outer Runners and gently pushing the drawer closed. It notes that this can be a "fiddly" step, suggesting patience and potentially a second person for assistance.
  • User-Friendly Instructions: The manual uses encouraging language ("You've got this," "Rack It Like A Boss") and relatable analogies ("foundations of a house," "like a Sunday morning") to make the assembly process less intimidating. "Hot tips" are provided at various stages to prevent common mistakes and ensure correct assembly.

  • Safety Warnings: Includes warnings about handling cut metal edges carefully and a safety tip to wear protective gloves and eyewear during assembly or installation.

Maintenance Features:

The manual does not explicitly detail ongoing maintenance features. However, the design implies:

  • Durability: The use of panels and screws suggests a sturdy construction, designed for long-term use.
  • Smooth Operation: The emphasis on correctly assembling the drawer runners indicates that smooth sliding action is a key performance aspect, which would contribute to the longevity and user satisfaction of the drawer. If the runners are properly installed, they should require minimal maintenance.
  • Cleaning: As a storage unit, regular cleaning of the drawer and its housing would be expected, though specific instructions are not provided.

The Rack It PRO Deep Single Drawer is presented as a robust, user-assemblable storage solution, designed with clear instructions and tips to ensure a successful build and integration into a broader Rack It PRO shelving system.

RACK IT PRO 01906 Specifications

General IconGeneral
BrandRACK IT PRO
Model01906
CategoryIndoor Furnishing
LanguageEnglish