Amplified
AM/FM Antenna
15-1859
What’s Included
Thank you for buying the RadioShack
Amplified AM/FM Antenna. It provides
excellent AM and FM radio reception so
you can listen to your favorite stations
through your home stereo or A/V receiver.
The built-in gain control boosts weak
signals and reduces feedback from strong
signals.
Connections
1. If your FM receiver has an F-connector,
connect the antenna's F-connector to your
receiver's FM antenna input terminal.
If your FM receiver has a 300-ohm twin-lead
connector, connect the supplied matching
transformer to the antenna's F-connector.
Then, connect the matching transformer's
twin leads to your receiver's FM terminals.
If your FM receiver has pushbutton terminals,
connect the supplied matching transformer to
the antenna's F-connector. Cut off the transformer leads, and strip
1
/
4
-
inch (0.635cm) of insulation from each wire's end. Insert both wire ends
into the FM receiver's push-button terminals. Make sure both wires are
firmly secured.
2. Connect the antenna's AM wire to your receiver's positive AM antenna
input terminal.
3. Connect the supplied AC adapter's mini plug to the small jack on the
antenna's F-connector. Connect the AC adapter's other end to a
standard AC outlet. The blue LED lights.
FM wire
AC
Adapter
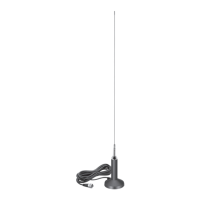
Positioning the Antenna
For best performance, place the antenna
indoors, as high as possible. Do not mount
the antenna near metal surfaces or other
obstructions, such as a refrigerator, a door
or wall, or a water pipe hidden behind a
wall.
Before mounting the antenna, you need to
determine where the clearest reception is
received.
1. Turn on your FM receiver, and tune it
to a station near 98 MHz.
2. Position the antenna as high as
possible at the desired mounting
location.
3. Slowly move the antenna until you
receive the clearest sound. Note the
location.
4. Tune your FM receiver to a station
near 88 MHz. Repeat Step 3 until you
receive the clearest sound. Note the
location.
5. Tune your FM receiver to a station
near 108 MHz. Repeat Step 3 until
you receive the clearest sound. Note
the location.
6. Use the locations noted in steps 2-5 to
mount your antenna at the location
with the best reception.
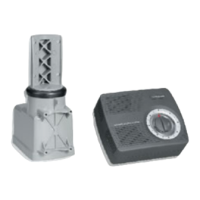
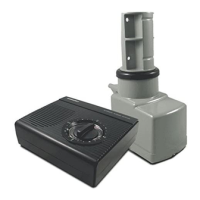
Introduction
Step One
• AM/FM Antenna
• AC Adapter
•Stand
AC Adapter
Matching Transformer
• Mounting Screws
(2)
• Matching
Transformer
Step Two
75-ohm Coaxial Cable (FM wire)
with F-Connector
AM wire
Blue LED lights
when power is on
CAUTION
You must use an adapter that supplies 12V DC
and delivers at least 100mA. Its center tip must
be set to positive and its plug must fit this
antenna's small jack at the bottom of antenna's
F-connector box. The supplied adapter meets
these specifications. Using an adapter that doe
not meet these specifications could damage th
antenna or adapter.
MAX — Adjust as needed to
improve FM reception.
Mounting Screws (2)
F-connector