Do you have a question about the Radio Shack 32-2054 and is the answer not in the manual?
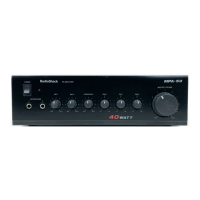
Thank you for purchasing the RadioShack 40W AC/DC PA Amplifier and overview of its capabilities.
Explanation of icons used in the manual for pertinent information.
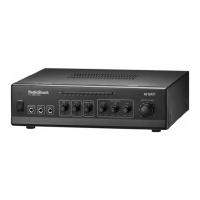
Controls power to the amplifier and indicates when it is turned on.
Adjusts the input level for microphones.
Monitors and indicates the amplifier's output power level.
Adjusts the overall sound output level of the amplifier.
Adjusts the volume for turntable or auxiliary sound sources.
Connects up to two dynamic microphones to the amplifier.
Allows private listening by connecting headphones to the amplifier.
Adjusts treble, midrange, and bass frequencies for audio sources.
Connects speakers to the amplifier with various impedance options and 70V output.
Connects the amplifier to an AC power source.
Allows powering the amplifier from a 12V vehicle battery.
Connects the ground wire to prevent low-frequency hum.
Connects a turntable to the amplifier.
Selects between turntable (PHONO) and auxiliary CD sound sources.
Connects various audio input sources like CD players or tuners.
Connects an additional amplifier for expanded audio sources.
Guidelines for positioning the amplifier to ensure adequate ventilation and prevent overheating.
Recommendations for optimal speaker positioning to achieve the best sound quality.
Instructions for setting initial controls to avoid loud sounds or overdriving channels.
Recommended control settings for turntables, tape decks, CD players, and receivers.
Instructions for setting amplifier controls to prevent hearing loss and ensure safe operation.
How to connect dynamic microphones using 1/4-inch plugs to MIC 1 and MIC 2 jacks.
Steps to connect a turntable to the PHONO jacks and set the selector switch.
How to connect CD players, tape decks, or tuners to the AUX/CD jack.
How to connect another amplifier via the MIX BUS jack for expanded system size.
Guide to calculating the correct total speaker impedance for safe amplifier operation.
Ensures best results by using speakers with the same impedance when connecting in series or parallel.
Recommendations on speaker wire length when connecting speakers without transformers.
Important impedance limits (4-16 ohms) for series/parallel connections to prevent amplifier damage.
Procedure for connecting two speakers in series, including calculating total impedance.
Explains how to calculate total impedance for four speakers in a combined series/parallel setup.
Advantages of using transformers, such as connecting different impedances and reducing signal loss.
Step-by-step instructions for connecting speakers using line transformers and their taps.
Important safety warning regarding total wattage and avoiding multiple connections to 70V/COM terminals.
Guidance on selecting wattage taps on transformers for individual speaker volume adjustment.
Instructions for powering the amplifier using a vehicle's 12V battery source.
Procedure for checking and replacing the fuse in the DC power cord plug.
How to use headphones to monitor and adjust sound sources for balance.
Guidelines and warnings to protect hearing while using the amplifier.
Information on obtaining assistance for amplifier malfunctions and warranty service.
| Type | Stereo Amplifier |
|---|---|
| Frequency Response | 20 Hz - 20 kHz |
| Output Impedance | 8 Ohms |
| Input Sensitivity | 200 mV |
| Output | Speaker terminals |
| Input Impedance | 47k Ohms |