EasyManua.ls Logo

Rainfresh RO450 User Manual

Rainfresh RO450
24 pages
To Next Page IconTo Next Page
Page #1 background imageLoading...
Page #1 background image
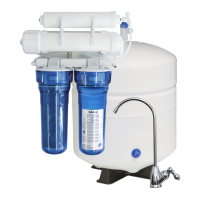
REVERSE OSMOSIS DRINKING WATER SYSTEM
(MODEL RO450)
INSTALLATION AND USER MANUAL
Thank you for purchasing a Rainfresh Water Filter.
We are committed to ensuring that you are totally satisfied.
If you have any problems, don’t go back to the store – please contact us !
Most issues can be resolved over the phone
QUESTIONS
Canada Toll Free
1800 667 8072
Toronto and Area
(905) 884 9388
(Mon to Fri
8:30 AM to 5:00 PM EST)
Tested and Certified by CSA Group to CSA Standard B483.1, to
NSF/ANSI Standard 58 for reduction of Total Dissolved Solids (TDS)
and Sodium, and to NSF/ANSI 372 for lead-free requirements
Additional testing and verification for reduction of Barium, Cadmium, Chromium, Copper,
Cysts (e.g. Cryptosporidium & Giardia), Fluoride, Lead, Mercury, Nitrates and Chlorine
performed by independent laboratory. Claims not performance certified by CSA Group.
CONTENTS
A. Introduction .................................................... 3
B. Safety Instructions .......................................... 3
C. Technical specifications .................................. 3
D. Water Quality Parameters .............................. 4
E. Installation ...................................................... 4
a. Install air-gap faucet .......................... 6
b. Make drain connection...................... 6
c. Mounting the main unit .................... 6
d. Install RO Membrane......................... 7
e. Install supply valve ............................ 7
f. Connect storage tank ........................ 8
g. Start-up .............................................. 8
F. Maintenance ………………………………… .............. 9
G. Troubleshooting ............................................ 11
H. Parts list .......................................................... 12
I. Warranty ........................................................ 12

Other manuals for Rainfresh RO450

Questions and Answers:

Rainfresh RO450 Specifications

General IconGeneral
TypeReverse Osmosis
Stages4
Storage Tank Capacity3.2 gallons
InstallationUnder Sink
MembraneThin Film Composite
Production Rate50 GPD
Filter Life6-12 months (pre-filters), 2-3 years (membrane)
Gallons Per Day50

Summary

Introduction

Water Pressure Requirements

Ensure water pressure does not exceed 100 psi; use regulator if needed.

Freezing Temperature Precautions

Protect unit from freezing; drain if not in use during winter.

Water Temperature and Type

Use only cold water; do not install on hot water lines.

Cartridge Compatibility

Only Rainfresh replacement cartridges are compatible with the system.

Lubrication Guidelines

Use only food-grade silicone lubricant on O-rings.

Cleaning Instructions

Clean unit with warm soapy water only; avoid cleaning sprays.

Pre-Filter Operation Requirement

Never operate the system without pre-filters installed to prevent membrane damage.

Tubing Installation Check

Ensure tubing has no kinks to avoid restricting water flow.

Plumbing Code Compliance

Installation must comply with all applicable plumbing codes and regulations.

Technical Specifications

Water Quality Parameters

Raw Water Supply Requirements

Specifies minimum criteria for water supply, pressure, temperature, pH, and turbidity.

Chemical Parameter Limits

Lists maximum acceptable levels for hardness, iron, manganese, and hydrogen sulphide.

Installation Guide

Basement Installation Options

Details how to install the RO system in a basement location.

Installation Steps Overview

Outlines the sequence of installation steps and compliance requirements.

Air-Gap Faucet Connection

Detailed instructions for installing the air-gap faucet and connecting tubing.

Make Drain Connection

Step-by-step guide for connecting the drain saddle and tubing.

Mount the Main Unit

Instructions for mounting the RO system unit under the sink.

Install Pre-Filters and Membrane

Guides on installing the sediment and carbon pre-filters and the RO membrane.

Install Supply Valve

Instructions for connecting the self-piercing supply valve to the water pipe.

Storage Tank Connections

Connects the filtered water storage tank to the system via tubing.

Start-Up Procedure

Guides on turning on the system, checking for leaks, and initial flushing.

Maintenance

Winterizing and Storage

Instructions for draining the unit and storing it during winter.

O-Ring Lubrication

Apply food-grade silicone lubricant to O-rings during maintenance.

Sump Replacement Recommendation

Recommends replacing filter sumps every 5 years to prevent issues.

Housing Cleaning Precautions

Avoid using organic solvents for cleaning housings to prevent damage.

Cartridge Replacement Schedule

Provides a schedule for replacing pre-filters, post-filters, and the RO membrane.

Pre-filter Replacement Procedure

Step-by-step guide for replacing sediment and carbon pre-filters.

Post-Filter Replacement

Instructions for removing and installing the post-filter.

RO Membrane Replacement

Guides on identifying membrane end-of-life and replacing it.

System Sanitization Procedure

Instructions for sanitizing the RO system annually or during filter changes.

Troubleshooting

Faucet Gurgling Noise

Explains that gurgling is normal during storage tank filling.

No Water from Faucet

Troubleshoots issues like closed valves, plugged filters, or defective components.

Water Flow in a Trickle

Addresses low flow issues related to tank pressure, valves, or filters.

Pressure Tank Issues

Diagnoses problems with the storage tank losing pressure or becoming defective.

Sour Water Taste

Identifies an exhausted post-filter as the cause of a sour taste.

Continuous Drain Flow

Troubleshoots drain lines that do not stop, often due to kinks or blockages.

Drain Issues

Addresses problems with the drain tube or drain restrictor being blocked.

Air Bubbles in Faucet

Explains that air bubbles are normal after installation or cartridge changes.

Sump Removal Difficulty

Provides solutions for stuck sumps, including checking pressure and lubrication.

Leak at Head Seal

Troubleshoots leaks at the head seal due to damage, dirt, or improper seating.

Leak at Vent Button

Addresses leaks from the vent button, usually due to a dry or dirty O-ring.

Parts List

Warranty Information