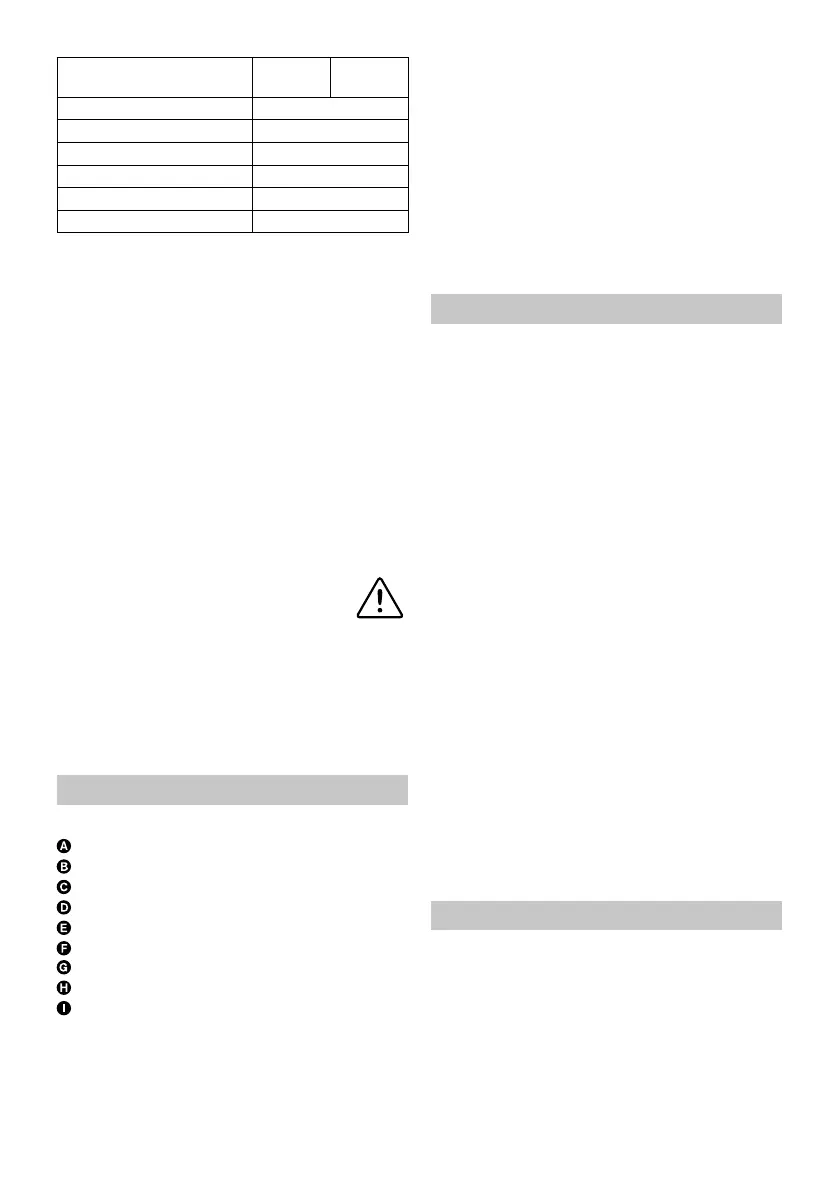
8
Magazine capacity staple,
max
157 pcs 90 pcs
Brad type, length Rapid T8, 15mm
Magazine capacity brad, max 90 pcs
Tool weight 0.94 kg
Voltage 220~240 V, 50Hz
Current 2A, fuse minimum 10A
Speed, maximum continuous 20 shots/min
NOISE EMISSION
A-weighted sound pressure level LpA=91.7 dB(A),
uncertainty K=3 dB(A)
A-weighted sound power level LwA=102,7 dB(A), uncer-
tainty K=3 dB(A)
Recommendation for the operator to wear hearing
protection.
VIBRATION
Vibration total value=6,7 m/s2, uncertainty K=1.5 m/s2
The declared vibration total value has been measured
in accordance with a standard test method and may be
used for comparing one tool with another.
The declared vibration total value may also be used in a
preliminary assessment of exposure.
WARNING
The vibration emission during actual use of the
power tool can differ from the declared total
value depending on the ways in which the tool
is used.
It’s needed to identify safety measures to protect the
operator that are based on an estimation of exposure in
the actual conditions of use (taking account of all parts
of the operating cycle such as the times when the tool is
switched off and when it is running idle in addition to the
trigger time).
ASSEMBLY
DEFINITIONS FIGURE 1 AND 2
Power Cord
On/Off power switch
Trigger Switch
Trigger Safety Lock
Feeder unit
Magazine Latch
Staple output
Work piece
Specifi cation label
LOAD STAPLES/BRADS INTO THE MAGAZINE
1. Turn off the power switch and unplug the tacker
2. Hold tool upside down, squeeze latch and slide maga-
zine open. Fig 3-4
3. Put staples or brads in magazine, legs facing upward
and close magazine. Ensure brad strip stays upright in
magazine. Fig 5 or 6
Use only recommended staples or brads
4. Close magazine and make sure it is securely locked.
Fig 7
REMOVE STAPLES/BRADS FROM THE MAGAZINE
1. Turn off the power switch and unplug the tacker
2. Hold tool upside down, squeeze latch and pull out
magazine.
3. Remove the staples / brads from the magazine
4. Close magazine.
OPERATION
STAPLING/NAILING
1. Plug stapler into a 220-240V, 50Hz power outlet.
2. Turn on the power switch.
3. Make sure the tool is in good working condition.
4. Hold the tacker fi rmly with the staple output fl at
against the work piece. Fig 8
5. Squeeze Trigger Safety Lock and Trigger to fi re the
tacker. Fig 9-10.
6. Unplug tacker, turn off Power switch and set Trigger
Safety Lock after use
NOTE: For better performance press the tool against
the work piece Fig 10
NOTE: In case of jammed staple or brad, read the
maintenance section. DO NOT re-fi re the tool in order
to clear the jam as this may damage the tool.
NOTE: During operation, the tool may feel warm. This
is normal but if the tool starts to feel hot use shall be
discontinued until it cools down.
NOTE: The tacker should be used only for the inten-
ded purposes. It is designed for use on wood or similar
materials in indoor environment
GUIDELINES FOR USING EXTENSION CORDS
Recommended Minimum Wire Area (mm
2
) for Exten-
sion Cords
Up to 10m: 1,5 mm
2
Up to-25m: 2,5mm
2
Over 25m: not suitable
MAINTENANCE
STANDARD MAINTENANCE
1. Unplug tacker before any maintenance
2. Inspect all screws and tighten if necessary.
3. Keep all vents free from dust and dirt
4. Clean tool by a dry or damp cloth. NEVER use any
solvent.
5. Keep the magazine channel clean.
6. Lubricate staple output area with ONE drip of oil. Fig
12.