Security Console & Scan Engine Appliance Guide: Setting Up Your Appliance
Refer to the illustration on page 2 for Appliance components labeled by numerals.
If you want to mount the Appliance on a rack, assemble each side rail, and attach it to the rack using the screws in the rail kit.
Then, attach the appliance to the rails. You can load the Appliance onto the rack either before or after you complete the following
steps.
Continued on page 5
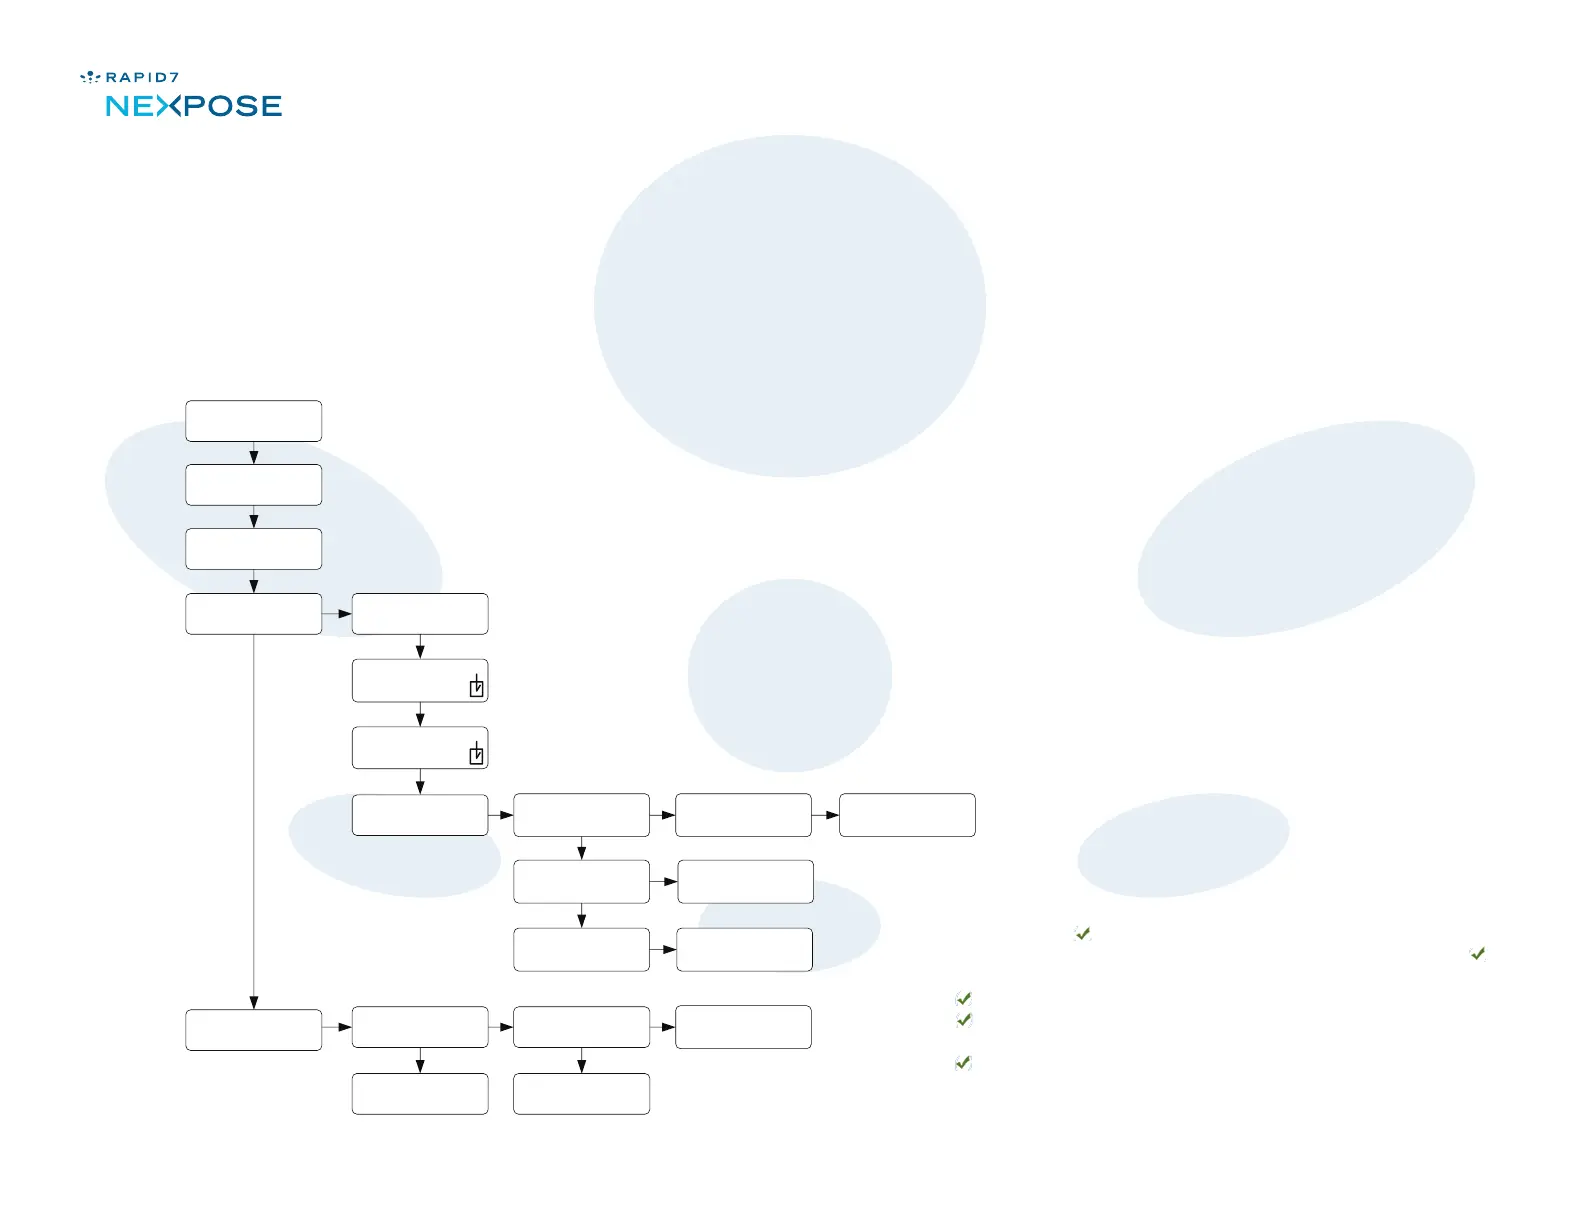
This diagram shows the sequence for manually conguring
network settings on the Appliance. See Step 6 on page 5.
Note that NIC 1 in the conguration menu corresponds to
the ETH0 physical port on the back of the appliance.
NIC 2 in the conguration menu corresponds to the
ETH1 physical port on the back of appliance.
Conguring network settings
IP Address, Net Mask, and Gateway are sequential. If you make changes to IP Address, the
conguration script proceeds to Net Mask, and then to Gateway. To conrm the changes
for each setting, press the Select ( ) button. For example, to congure IP Address, use the
Up arrow ( ) and Down arrow ( ) buttons as described on page 3. Then press the Select ( )
button. The script automatically proceeds to Net Mask. You can change that setting or simply
press the Select ( ) button to move on to Gateway, where the same options apply. After you
press the Select ( ) button to exit from the Gateway screen, press the Cancel/Escape ( )
button repeatedly until you see a message asking you to save your network setting changes.
Press the Select ( ) button to save changes or the
Cancel/Escape button ( ) to cancel them.
page 4 of 8
© 2009 Rapid7 LLC, Boston, MA | Rapid7 LLC Sales: +1 617-247-1717, Technical Support: +1 857-288-7400, Toll Free (USA): 1-866-390-8113
Step 1
Congure
Press X to congure
Networ k
> NICs
NICs
> NIC 1 Link
Congure
> Network
NIC1 (or NIC2)
Enabled NIC
NIC1 (or NIC2)
Auto (DHCP )
NeXpose
> Congure
NIC1 (or NIC2)
> Manual
Manual
> IP Address
Manual
> Netmask
Manual
> Gateway
Save Settings?
> OK
IP Address
000
.000.000.000
Netmask
000
.000.000.000
Gateway
000
.000.000.000
Networ k
> Other Settings
Other Settings
> Nameserver
Other Settings
> Domain
Nameserver
000
.000.000.000
Domain
server
.example.co m
Save Settings?
> OK
for each setting, press the Select ( ) button. For example, to congure IP Address, use the
Press the Select ( ) button to save changes or the Press the Select ( ) button to save changes or the
Up arrow ( ) and Down arrow ( ) buttons as described on page 3. Then press the Select ( ) Up arrow ( ) and Down arrow ( ) buttons as described on page 3. Then press the Select ( )
press the Select ( ) button to move on to Gateway, where the same options apply. After you press the Select ( ) button to move on to Gateway, where the same options apply. After you
press the Select ( ) button to exit from the Gateway screen, press the Cancel/Escape ( ) press the Select ( ) button to exit from the Gateway screen, press the Cancel/Escape ( )
 Loading...