EasyManua.ls Logo

Raritan Elegance - User Manual

Raritan Elegance
20 pages
Print Icon
To Next Page IconTo Next Page
Loading...
Toilet
Installation and Maintenance Instructions
1-800-352-5630
www.raritaneng. com
Desription:
Marine elegance toilet is available in 12V or 24V
DC. Bowls are available in four models: standard with
angled back, standard with straight back, tall with
angled back and tall with straight back.Fresh water
model utilizes onboard freshwater, the Sea water
model utilizes a remote pump installed between raw
water source and bowl. Sea/Fresh model can switch
between fresh and raw water source.
Three different control options are available:
1. Smart flush control: provides timed operation
and independant control of water and discharge
2. ME toilet control: provides momentary opera-
tion and independant momentary control of water
and discharge
3. Push button switch: providing only the ability to
flush with no independant control of water or
Marine
EleganceElegance
EleganceElegance
Elegance
THE FOLLOWING ARE CAUTIONARY STATEMENTS THAT MUST BE READ AND
FOLLOWED DURING BOTH INSTALLATION AND OPERATION.
WARNING: Raritan Engineering Company, Inc. recommends that a qualified person or electrician install
this product. Equipment damage, injury to personnel or death could result from improper
installation. Raritan Engineering Company, Inc. accepts no responsibility or liability for
damage to equipment, injury or death to personnel that may result from improper installation
or operation of this product.
WARNING: HAZARD OF SHOCK OR FIRE
Always use recommended fuse, circuit breaker and wire size.
Motors used with this product are “Ignition Protected”. They are not however, explosion-
proof as defined in 46CFR 110.15-65(e), Subchapter J-Electrical Engineering.
DO NOT run continuously for more than 30 seconds.
Pressurized
Freshwater Model
Sea Water Model
(Remote Pump)
Question and Answer IconNeed help?

Do you have a question about the Raritan Elegance and is the answer not in the manual?

Summary

Installation and Maintenance Instructions

General Cautionary Statements

Important cautionary statements for installation and operation.

Toilet Model Description

Details on available models and control options.

Safety Information

Important Safety Warnings

Key safety warnings regarding flooding and child supervision.

Recommended Visual Inspection

List of recommended visual checks for safe operation.

Toilet Operation

Push Button Switch Operation

Instructions for operating the push button flush control.

ME Toilet Control Operation

Instructions for operating the ME toilet control.

Multifunction Smart Switch Operation

Instructions for operating the multifunction smart switch.

Toilet Flush Control Programming

Normal Flush Cycle Timing

How to program normal flush cycle timing parameters.

Water Only Button Disable Feature

Instructions to disable Water Only and Empty buttons.

Holding Tank Full Lockout Feature

Instructions to enable or disable holding tank lockout.

Winterizing and Recommissioning

Winterizing Procedures

Steps for winterizing integral, remote, and pressurized models.

Recommissioning Procedures

Steps to recommission the toilet after winterizing.

System Start-Up Checks

Essential checks before starting the system.

Specifications and Wiring

Plumbing Specifications

Maximum suction, discharge height, and water source requirements.

Wiring Notes and Recommendations

Important notes and recommendations for wiring.

Wire and Fuse;Circuit Breaker Sizing

Recommended wire and fuse/breaker sizes for models.

Parts and Hose Lengths

Included and Required Parts

Lists of parts included and additional parts required.

Discharge Hose Length Recommendations

Chart for maximum recommended discharge hose length.

Toilet Bowl Size Chart

Table detailing bowl dimensions for different models.

Toilet Mounting Procedures

Mounting Preparation

Steps for preparing the mounting location and marking.

Securing the Bracket Assembly

Instructions for securing the mounting bracket to the deck.

Drilling Mounting Holes

Details on drilling holes for discharge, inlet, and wires.

Plumbing Installation

Plumbing Warnings and Best Practices

Warnings and important considerations for plumbing.

Discharge Line Connections

Instructions for connecting discharge lines.

Inlet Line Connections

Instructions for connecting inlet lines.

Intake Line Details

Pressurized Freshwater Intake Lines

Instructions for connecting intake lines on freshwater models.

Remote Sea Water Intake Lines

Instructions for connecting intake lines on sea water models.

Intake Pump Fitting Installation

Guidance on installing intake pump fittings and avoiding damage.

Control Mounting

Remote Pump Mounting

Instructions for locating and securing the remote pump.

Push Button Switch Mounting

Steps for mounting the push button control switch.

ME Toilet and Smart Flush Control Mounting

Instructions for mounting ME and Smart Flush controls.

Wiring Procedures

General Wiring Warnings

Warnings regarding shock and fire hazards during wiring.

Wire Size and Component Selection

Determining wire size and selecting fuse/breaker.

Connecting Control and Battery

Instructions for wiring controls to the toilet and battery.

Push Button Switch Wiring Diagrams

Freshwater Model Wiring

Wiring diagram for Push Button Switch freshwater model.

Remote Pump Model Wiring

Wiring diagram for Push Button Switch remote pump model.

Smart Switch Wiring Diagrams

Smart Switch Freshwater Model Wiring

Wiring diagram for Smart Switch freshwater model.

Smart Switch Remote Pump Model Wiring

Wiring diagram for Smart Switch remote pump model.

ME Toilet Control Wiring Diagrams

ME Toilet Freshwater Model Wiring

Wiring diagram for ME Toilet Control freshwater model.

ME Toilet Remote Pump Model Wiring

Wiring diagram for ME Toilet Control remote pump model.

Final Installation Steps

Connecting Hoses and Wiring

Instructions for connecting hoses and wiring to the toilet.

Mounting the Toilet Unit

Steps for mounting the toilet bowl, seat, and hardware.

Troubleshooting Common Issues

Troubleshooting Warnings

Safety warnings before troubleshooting electrical or plumbing issues.

Pumpout and Water Flow Problems

Solutions for poor pumpout and water flow issues.

Odor and Leakage Problems

Solutions for foul odors and water leaks.

Exploded Parts List

Main Toilet Assembly Parts

List of parts for the main toilet bowl and discharge pump.

Control and Accessory Parts

List of parts for controls, wiring, and accessories.

Repair Kits and Optional Parts

List of available repair kits and optional parts.

Exploded Parts Diagram

Toilet Assembly Diagram

Visual diagram of the toilet assembly with part numbers.

Pump and Strainer Diagram

Visual diagram of the pump and strainer components.

Limited Warranty Information

Obtaining Warranty Service

How to obtain warranty service and required documentation.

Warranty Coverage Exclusions

Details on what is not covered by the warranty.

Warranty Limitations and Legal Rights

Limitations on implied warranties and consumer legal rights.

Overview

The Raritan Elegance Toilet is a marine toilet designed for use in boats, offering various models and control options to suit different needs. This manual provides comprehensive instructions for installation, operation, maintenance, and troubleshooting, ensuring safe and efficient use of the product.

Function Description

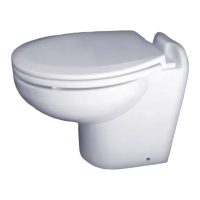
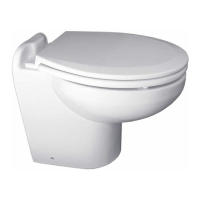
The Marine Elegance toilet is available in 12V or 24V DC power options. It comes in four bowl models: standard with an angled back, standard with a straight back, tall with an angled back, and tall with a straight back. The toilet system can be configured as a freshwater model, which uses onboard freshwater, or a seawater model, which utilizes a remote pump installed between the raw water source and the bowl. A Sea/Fresh model is also available, allowing users to switch between fresh and raw water sources.

Usage Features

The Raritan Elegance Toilet offers three different control options, each providing varying levels of functionality:

  • Push Button Switch: This is the simplest control option, providing only the ability to flush the toilet. To operate, press and hold the push-button switch until all waste is cleared from the toilet bowl. This control does not offer independent control of water or discharge.

  • ME Toilet Control: This control offers more flexibility.

    • To add water to the bowl, press and hold the "Water Only" button.
    • To evacuate the bowl, press and hold the "Empty" button.
    • To bring water in while the bowl is evacuating (a flush cycle), press and hold the "Flush" button.
  • Multifunction Smart Switch: This is the most advanced control option, providing timed operation and independent control of water and discharge.

    • Empty Only: Press and hold the "Empty Only" button to evacuate the bowl. The discharge pump runs as long as the button is held.
    • Water Only: Press and hold the "Water Only" switch to add water to the bowl. The inlet water solenoid/pump runs for a maximum of seven seconds. After this limit, the "Water Only" button is disabled to prevent overflow. To re-enable it, the "Empty Only" button must be pressed.
    • Normal: Press the "Normal" button once to initiate a timed flushing cycle.
    • Water Saver: Press this button to activate a water saver cycle.
    • Holding Tank Full Light: This light will only illuminate if a tank sensor has been added to the control system.

Programming the Smart Flush Control:

The flush control is factory-set, but adjustments to water levels and timings can be made.

  • Entering Program Mode: Hold "WATER ONLY" and "EMPTY" buttons for three seconds. The "Holding Tank Full" LED will flash three times.
  • Setting T1 (Initial Fill Time): After entering program mode, push "Normal Flush" the desired number of times (one push = one second). The "Tank LED" will flash once per push. Push "EMPTY" to store the value.
  • Setting T2 (Discharge Pump Time): After entering program mode, push "EMPTY" the desired number of times (one push = one second). The "Tank LED" will flash once per push. Push "NORMAL" to store the value.
  • Setting T3 (Water Retention Fill Time): After entering program mode, push "WATER ONLY" the desired number of times (one push = one second). The "Tank LED" will flash once per push. Push "NORMAL" to store the value.
  • Programming WATER ONLY Disable Features:
    1. Hold "WATER ONLY" and "EMPTY" buttons for three seconds.
    2. Push "WATER SAVER". "WATER ONLY" and "EMPTY" buttons can now be disabled/enabled.
    3. Push "WATER ONLY" to disable both buttons. The "Holding Tank Full" LED will flash three times. Repeat steps 1-3 to re-enable.
  • Setting WATER ONLY to work only after EMPTY button is pushed:
    1. Repeat steps 1 and 2 above.
    2. Push "EMPTY" to enable this feature. The "Holding Tank Full" LED will flash three times. Repeat steps 1 and 2 to disable.
  • Programming Holding Tank Full Lockout Disable Features:
    1. Hold "WATER ONLY" and "EMPTY" buttons for three seconds.
    2. Push "WATER SAVER".
    3. Push "WATER SAVER" again. The "Holding Tank Full" LED will flash three times. Repeat steps 1-3 to re-enable.

Installation Considerations:

The manual provides detailed instructions for mounting the toilet, installing plumbing, connecting controls and wiring, and securing hoses. Key points include:

  • Mounting surface must be flat and solid, allowing the seat to open more than 90 degrees.
  • Drill holes for discharge, inlet hose, and wires according to specified dimensions.
  • Toilets mounted at or below the waterline require a vented loop in the discharge line, with the top of the loop at least 4 inches (10 cm) above the waterline at the boat's greatest angle of heel.
  • Sea Water Models also require a vented loop between the intake pump and the toilet bowl.
  • All below-waterline hose fittings must be double-clamped and checked frequently for integrity.
  • Fittings and 90-degree bends should be minimized in plumbing.
  • An in-line strainer is recommended for both freshwater and seawater models to prevent clogs.
  • Use only quality reinforced hoses, such as Raritan SH.
  • Ensure proper wire size, connectors, and fuse/circuit breaker are used as per the specifications chart to prevent shock or fire hazards.
  • Motors are "Ignition Protected" but not explosion-proof. Do not run continuously for more than 30 seconds.

Maintenance Features

Regular visual inspection is recommended to ensure the toilet system functions correctly and to prevent potential issues.

  • Leaks: Check for leaks at the toilet and all hose connections.
  • Hose Clamps: Inspect hose clamps for tightness and corrosion.
  • Hoses: Check the condition of all hoses for cracks, kinks, or signs of wear.
  • Seacocks: Ensure seacocks are in good working order.
  • Wires and Connections: Inspect wires and connections for corrosion or damage.
  • In-Line Strainer: If installed, check the in-line strainer for debris and clean as necessary.

Winterizing:

Proper winterization is crucial to prevent damage.

  • Close Seacocks: Close the intake and discharge seacocks.
  • Turn Off Power: Disconnect power to the unit.
  • Drain Hoses: Disconnect and drain the intake and discharge hoses.
  • Connect Short Hoses: Connect short hoses to the toilet's intake and discharge.
  • Antifreeze: Place one bucket under the discharge hose and pour nontoxic antifreeze into another bucket. Place the intake hose into the bucket with antifreeze.
  • Flush Antifreeze: Turn on power and flush the toilet until antifreeze is discharged.
  • Disconnect Power: Disconnect power from the toilet.
  • Holding Tanks: Winterize holding tanks, plumbing, and treatment systems independently.
  • Pressurized Freshwater Models: Shut off intake water at the source, drain discharge hose, disconnect intake hoses from the water solenoid, and pour antifreeze into the bowl. Flush until antifreeze is removed and water is drained from the solenoid and hose.

Recommissioning:

  • Flush Antifreeze: Flush antifreeze out of the toilet using clean fresh water.
  • Reconnect Hoses: Reconnect intake and discharge hoses, open seacocks, and water source valve.
  • Check for Leaks: Perform several test flushes and check all connections for leaks.

System Start-Up:

  • Open Seacocks: Open seacock(s) (and water source valve for freshwater models).
  • Turn On Power: Turn on power to the toilet.
  • Flush Toilet: Flush the toilet according to operation instructions.
  • Check for Leaks: Inspect for any leaks.

Troubleshooting:

The manual includes a troubleshooting guide for common issues such as poor pumpout, poor water flow, foul odors, bowl filling while underway, and water leaks. It provides possible causes and solutions, emphasizing safety warnings regarding electric shock and flooding. If the toilet does not flush properly or water does not enter the bowl within 10 seconds, refer to the troubleshooting section. For complex issues, contact Raritan Technical Support.

Safety Warnings:

  • Qualified Installation: Raritan recommends installation by a qualified person or electrician to prevent equipment damage, injury, or death.
  • Shock/Fire Hazard: Always use recommended fuse, circuit breaker, and wire size. Motors are "Ignition Protected" but not explosion-proof.
  • Continuous Operation: Do not run continuously for more than 30 seconds.
  • Flooding Hazard: Always shut off seacock(s) before leaving the boat unattended. Double clamp all below-waterline hose fittings and check frequently.
  • Children Safety: Young children should not be left unsupervised around the toilet due to drowning risk in retained water and potential injury from closing seats/lids.
  • Replacement Parts: Always replace circuit breakers and fuses with the same rating, using Raritan parts to maintain ignition protection requirements.
  • Foreign Objects: Do not throw hard objects or stringy substances (e.g., paper towels, feminine hygiene products, filter cigarettes) into the toilet, as this will cause damage.
  • Sewage Discharge: Discharging untreated sewage is forbidden in all U.S. waters within the three-mile limit.

Raritan Elegance Specifications

General IconGeneral
ModelElegance
ManufacturerRaritan Engineering
Power Supply12V or 24V DC
Flush MechanismElectric
Water SourcePressurized fresh water
Bowl StyleElongated
CertificationUSCG

Related product manuals