4949
RISERVATO AL PERSONALE AUTORIZZATO ALL'INSTALLAZIONE - ONLY FOR INSTALLATION-AUTHORIZED STAFF
IST DEM ZUR INSTALLATION AUTORISIERTEN PERSONAL VORBEHALTEN - SEULEMENT POUR LE PERSONNEL AUTORISE A L'INSTALLATION - RESERVADO AL PERSONAL ENCARGADO DE LA INSTALACION
0579-M030-2
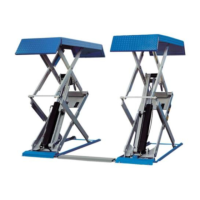
4.18 Fissaggio coperture e centralina -
RAV 516 NL - RAV 518 NL - RAV518 Q
Rif. Fig. 22 - Posizionare le coperture 2-3 e la centralina 1.
Utilizzando i fori esistenti come dime, forare con punta da 9 mm.,
profondità 50 mm. Fissare con tasselli in dotazione e rimontare
il mobile sulla centralina.
4.18 Fastening the covers and control unit -
RAV 516 NL - RAV 518 NL - RAV518 Q
Ref. Fig. 22 - Position the covers 2-3 and the control unit 1. Using
the existing holes as templates, drill with a 9 mm bit to a depth
of 50 mm. Fasten with the plugs supplied and refit the unit on the
control unit.
4.18 Befestigung der Abdeckungen, des Schaltschrankes
RAV 516 NL - RAV 518 NL - RAV518 Q
Zu Abb. 22. Die Abdeckungen 2-3 und den Schaltschrank 1
positionieren. Die bestehenden Bohrungen als Schablonen
verwenden und mit einem 9 mm Bohrer 50 mm tief bohren. Mit
den mitgelieferten Dübeln befestigen und das Gehäuse wieder
auf den Schaltschrank montieren.
4.18 Fixation des couvertures et de la centrale
RAV 516 NL - RAV 518 NL - RAV518 Q
Réf. Fig. 22. Positionner les protections 2 et 3 et le boîtier de
commande 1. Utiliser les trous existants comme gabarit et
percer avec une pointe de 9 mm, à une profondeur de 50 mm.
Fixer avec les chevilles en dotation et remonter le coffret sur le
boîtier de commande.
4.18 Fijación coberturas y central -
RAV 516 NL - RAV 518 NL - RAV518 Q
Ref. Fig. 22. Colocar las tapas 2-3 y la centralita 1. Utilizando
los orificios existentes como plantillas, agujerear con un taladro
de 9 mm., a una profundidad de 50 mm.
Sujetar con los tacos en dotación y volver a montar el mueble
en la centralita.
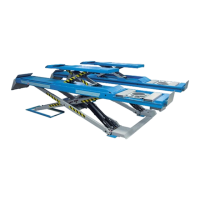
Solo per RAV516NL - RAV518NL - Rif.Fig.23
- Montare le coperture 1 e 2 utilizzando gli appositi distanziali
3 e le viti e rondelle in dotazione.
Solo per RAV51Q - Rif.Fig.23
- Allentare i tasselli "A" della base;
- posizionare il passatubo"B" sotto alla rondella del tassello
interno;
- infilare la"forchetta C" del carter "D" sotto la rondella del
tassello esterno appoggiando il piattino di riscontro "G" del
carter al passatubo "B".
- Ripetere poi la procedura per il carter lato di protezione zona
valvole.
Only for RAV516NL - RAV518NL - Rif.Fig.23
- Fit covers 1 and 2 using the special spacers 3 and the screws
and washers supplied.
Only for RAV518Q - Ref.Fig.23
- Loosen base blocks “A”;
- set tube guide “B” under internal block washer;
-
Slide part “C” of guard “D” under the external block washer,
and set the guard plate “G” against tube guide “B”.
- Repeat the same procedure for the guard on valve area side.
Nur bei RAV516NL - RAV518NL - Bez. Abb. 23
- Die Abdeckungen 1 und 2 unter Anwendung der
entsprechenden Distanzstücke 3, Schrauben und
Unterlegscheiben aus dem Lieferumfang befestigen.
Nur für RAV518Q - Bez. Abb. 23
- Die Dübel “A” des Sockels lockern.
- Die Leitungsführung „B“ unter der Unterlegscheibe des
internen Dübels ausrichten.
- Das Teil C“ der Abdeckung „D“ unter die Unterlegscheibe
des externen Dübels einschieben, dabei den Anschlag „G“
der Abdeckung an der Leitungsführung B“ anlegen.
- Diesen Arbeitsschritt an der Schutzabdeckung des
Ventilbereichs wiederholen.
Seulement pour RAV516NL - RAV518NL - Réf. Fig. 23
- Monter les couvertures 1 et 2 en utilisant les entretoises
spéciales 3, les vis et les rondelles standard.
Seulement pour RAV518Q - Réf.Fig.23
- Desserrer les chevilles «A» de la base;
- positionner le passe-tuyau»B» sous la rondelle de la cheville
interne ;
- enfiler le»composant C» du carter «D» sous la rondelle de
la cheville externe, en appuyant la platine de butée «G» du
carter contre le passe-tuyau «B».
- Ensuite, répéter la procédure pour le carter de protection du
côté, zone vannes.
Sólo para RAV516NL - RAV518NL - Ref. Fig. 23
- Montar las cubiertas 1 y 2 utilizando los separadores
específicos 3 junto con los tornillos y arandelas provistos con
el equipamiento.
Solo RAV518Q - Ref.Fig.23
- aflojar los tornillos «A» de la base;
- colocar el pasatubo «B» debajo de la arandela del tornillo
interno;
- introducir la pieza «C» de la protección «D» debajo de la
arandela del tornillo externo, apoyando el plato de contacto
«G» de la protección contra el pasatubo «B».
-
Luego repetir el procedimiento para la protección lado zona
válvulas.