EasyManua.ls Logo

Razor RIPRIDER 360 Lightshow User Manual

Razor RIPRIDER 360 Lightshow
35 pages
To Next Page IconTo Next Page
Page #1 background imageLoading...
Page #1 background image
EN
Read and understand this guide before using product.
FR
Lire et assimiler ce manuel avant d’utiliser le produit.
ES
Es imprescindible leer y comprender esta guía antes de usar el producto.
DE
Lesen Sie diesen Leitfaden vor Benutzung des Produktes aufmerksam.
IT
Leggere e comprendere tutti i punti del presente manuale prima di utilizzare questo prodotto.
NL
Lees deze instructies goed door voordat je het product gaat gebruiken.
PT
Leia e compreenda este guia antes de utilizar o produto.
PL
Przed użyciem produktu należy przeczytać ze zrozumieniem niniejszą instrukcję.
HU
A terk használata előtt olvasd el és értsd meg ezt a használati útmutatót.
RU
Необходимо прочесть и понять эту инструкцию перед использованием продукции.
SV
Läs och förstå denna bruksanvisning innan du använder produkten.
NO
Les og forstå denne veiledningen før du bruker dette produktet.
DA
Læs og forstå hele denne vejledning før du lader nogen bruge produktet.
FI
Lue nämä ohjeet huolellisesti ennen tuotteen käyttöönottoa.
RO
Consultaţi acest ghid înainte de a utiliza produsul.
SK
Pre používaním tohto výrobku si prítajte a pochopte tento návod.
CS
Před poitím tohoto výrobku si řádně prostudujte návod k použití.
BG
Прочетете и разберете това ръководство преди да използвате продукта.
TR
Ürünü kullanmadan önce kılavuzu okuyup anlayız.
UK
Необхідно прочитати й зрозуміти цю інструкцію перед використанням продукції.
KO
제품을 사하시기 전에 이 안내서를 읽고 이해하십시오.
ZH
請在使用產品之前細心閱讀和瞭解此使用指南。
ZH
使用产前请阅读并理解本指南
AR
EL
Διαβάστε και κατανοήστε τον εσώκλειστο οδηγό χρήσης πριν από τη χρήση.
RIPRIDER
®
360 Lightshow
www.razor.com
9-331-8
Question and Answer IconNeed help?

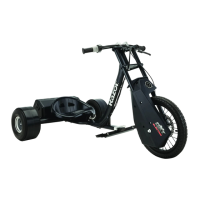
Do you have a question about the Razor RIPRIDER 360 Lightshow and is the answer not in the manual?

Razor RIPRIDER 360 Lightshow Specifications

General IconGeneral
BrandRazor
ModelRIPRIDER 360 Lightshow
CategoryBicycle
LanguageEnglish

Summary

Assembly Instructions - Part 1

Step 1: Initial Frame Assembly

Assemble the main frame components using the specified 5mm tool and fasteners.

Step 2: Handlebar Stem Attachment

Attach the handlebar stem to the frame using the 5mm tool and bolts.

Assembly Instructions - Part 2

Step 3: Handlebar and Steering Column

Assemble the handlebar and steering column components using 5mm and 13mm tools.

Assembly Instructions - Part 3

Step 4: Frame Connection

Connect frame sections using the 5mm tool and bolts.

Step 5: Handlebar Final Assembly

Finalize handlebar attachment and securing with 5mm and 13mm tools.

Assembly Instructions - Part 4

Step 6: Wheel Mechanism Assembly

Assemble wheel mechanisms using 5mm and 10mm tools and provided hardware.

Assembly Instructions - Part 5

Step 7: Visual Inspection

Visually inspect wheel orientation and alignment before proceeding.

Step 8: Wheel Attachment - Part 1

Attach the rear wheel assembly using 5mm tool and bolts.

Step 9: Wheel Attachment - Part 2

Secure the rear wheel using 5mm and 10mm tools and fasteners.

Assembly Instructions - Part 6

Step 10: Wheel Attachment - Part 3

Attach wheel components using bolts, nuts, and washers with 5mm tool.

Step 11: Wheel Attachment - Part 4

Finalize rear wheel attachment using 5mm and 10mm tools.

Step 12: Seat Attachment

Attach the seat to the frame using the 5mm tool and bolts.

Assembly Instructions - Part 7

Step 12: Seat Attachment Continued

Complete seat attachment to the frame using the 5mm tool.

Step 13: Seat Securing

Secure the seat by tightening bolts with the 5mm tool.

Assembly Instructions - Part 8

Step 14: Battery Installation

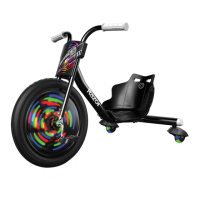
Install AAA batteries into the light housing for product illumination.

General Safety and Operation Warnings

Serious Injury Prevention

Follow adult supervision, wear protective gear, and ride safely on level ground.

Age and Weight Limitations

Product is for ages 5+ and maximum rider weight of 73 kg.

Protective Equipment

Always wear a helmet, elbow pads, and knee pads.

Maintenance and Battery Information

Product Maintenance

Regularly inspect parts, keep clean, and use authorized replacement parts.

Battery Handling

Adults should change batteries; keep loose batteries away from children.

Limited Warranty Information

Product Warranty Details

Product is warranted against manufacturing defects for 6 months from purchase.

Related product manuals