Follow below picture to connect audio cable and device.
1. Press the button to turn off power of your projector before connection.
2. Use audio cable to connect follow below figure.
3. After connect and turn on both units. Your projector sound from external
device now.
4. After using , turn off both unit
Important Note:
If there is no sound from the stereo audio output when playing media
contents from a set top box, BD/DVD or streaming players connecting to the
HDMI input, please check the set top box or the player's digital audio
settings and make sure it is set to "PCM Stereo" mode.
Connect Audio Output ( Aux Out / Line Out / Earphones)
Install USB Device And Micro Sd Card “TF”
Follow below picture to install USB and TF card
Turn off the unit before install USB / TF card.
13
AV CABLE
STATION AMPLIFIER
AV
T
F CARD
H
DMI 1 H DMI 2
DC I
N
USB
TF
US B
TF
AV
T
F CARD
H
DMI 1 HDMI 2
DC I
N
USB
Connect VGA
Show The Image On Projector Screen
Please refer to the following table to adjust the output signal from computer
NOTE: In order to get the sound from the unit, please connect AV IN cable when
you connect VGA input.
Type R
Frequency Field Frequency
PC
VGA 640x480
31.5 60
34.7 70
37.9 72
37.5 75
SVGA 800x600
31.4 50
35.1 56
37.9 60
46.6 70
48.1 72
46.9 75
XGA 1024x768
40.3 50
48.4 60
56.5 70
12
Follow below picture to connect VGA cable and device.
1. Turn off the unit before connect VGA cable.
2. Press the button to turn off power of your projector before connection.
3. After connect, press the button to turn on unit and power indicator will
light GREEN
4. Press the button to select VGA mode and the video of
VGA device will show on projector screen
5. Press the button to turn off unit power.
To VGA PORT
NOTE BOOK
DECK TOP
OR
COMPUTER CABLE
COMPUTER CABLE
VGA
I
R
1. When photo playback, press the
show on lower (figure 1).
2. U
Install USB / TF device:
1. Turn off the unit before install USB / TF card.
2. Install the USB device into USB port / Install the TF device into TF slot.
3.
.
4. P
.
5.
6. U
7. U
.
8. P
9. P .
10.
.
Using TF Card And USB Playback
(Media Player)
Sub-Menu on Photo screen
Figure 1.
Sub-Menu on Music screen
Figure 2.
Sub-Menu on Movie screen
Figure 3.
14
Sub-Menu on Text screen
Figure 4.
OK
OK
OK
OK
OK
OK
OK
OK
OK
OK
1. When music playback, press the
show on lower (figure 2).
2. U
OK
OK
1. When movie playback, press the
show on lower (figure 3).
2. U
OK
OK
1. When text playback, press the
show on lower (figure 4).
2. U
OK
OK
OK
NOTE:
Pause F B F F P r ev . N ex t S t op R _ A ll R _ O FF
Set A Play... I nf o Sl o w... Step.. . G ot o. ..
Pa us e F B F F P r ev . N e x t St op R _ A ll Set A
R_OFF I n fo Goto .. .M UT E Play...
Pause Pr ev. N ex t Stop R_ All
Ro t a. ..
Zoom...
Mov...
Slid...
Zoom...
I nfo
R_ O FF Play...
Ro t a. ..
R
R
R
MUSIC
Pr ev. ..
Next...
P r ev .
N e x t
S t o p
Pla y . ..
I n f o
MUSIC
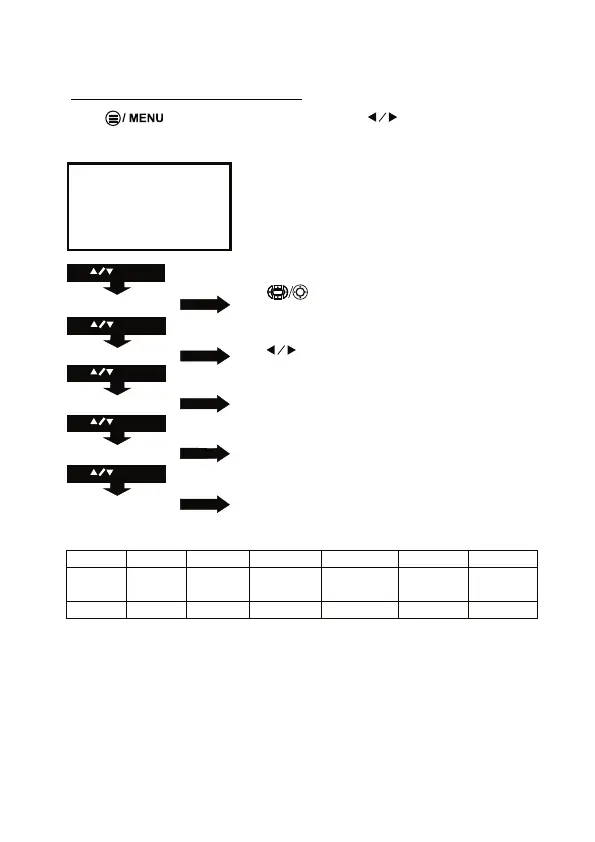
Using Bluetooth Playback
15
Balance 0
Auto Volume Off
Sound Mode Standard
Bluetooth Speaker Off
Pairing is the term used when two Bluetooth devices are connected wirelessly
for the first time. This allows the devices to see each other and sets up a one to
one communication channel between both devices.
1. Press the button to turn on unit.
2. Press the / MENU button to enter the menu screen.
3. Use the button to select right side menu.
4. Use the button to select Bluetooth speaker column.
5. Press the button to select “Bluetooth Speaker On”
6. Turn on your External Bluetooth Speaker and select to Bluetooth
pairing mode
7. A few seconds, near the BT logo will show the connected External
Bluetooth Speaker name in the main function page.
8. After connection completed, the unit sound to External Bluetooth
speaker.
Disconnect the Bluetooth
1. Press the / MENU button to enter the menu screen.
2. Use the button to select above menu.
3. Use the button to select Bluetooth speaker column.
4. Press the button to select “Bluetooth Speaker Off” that the
Bluetooth disconnect.
Bluetooth
Connection
OK
OK
Using Projector Menu 1.0
Press button to enter projector menu.
This Picture menu showed on right upper of
view screen.
16
Color Temperature
Customer define Parameter
RED 0-100
GREEN 0-100
BLUE 0-100
Picture Mode
Customer define Parameter
Contrast 0-100
Brightness 0-100
Color 0-100
Sharpness 0-100
Aspect Ratio
4:3 The signal in a 4:3 aspect ratio projection image
16:9 The signal in a 16:9 aspect ratio projection image
Use to select different picture effect to Standard /
Soft / User / Vidid. Use or to select
Contrast / Brightness / Color / Sharpness digit If chose
User item. Follow below figure.
Use buttons to select different color temperature
to Cool / Medium / Warm / User. Use or to
select Red / Green / Blue digit If chose User item.
Follow below figure.
Use buttons to select screen ratio AUTO / 4:3 /
16:9. Follow below figure.
Use buttons to select Off / Low / Middle / High
/ Default.
Use buttons to select 75% - 100%
USE
TO SELECT
USE
TO SELECT
USE
TO SELECT
USE
TO SELECT
PRESS OK
PRESS OK
PRESS OK
PRESS OK
Picture Mode Standard
Color Temperature Medium
Aspect Ratio Auto
USE
TO SELECT
PRESS OK
PRESS OK
Noise Reduction Middle
Reduce Display 100%
Picture Mode Standard
Color Temperature
Aspect Ratio Auto
Noise Reduction
PC Setting
Reduce Display 100%
Use to select different sound effect Standard /
Music / Movie / Sports / User.
Use or to select Treble and Bass digit if
chose User item. Follow below figure to set digit.
Use buttons to select Balance level to -50 to +50.
To select On / Off
To select On / Off
Press button to enter projector menu, press buttons to select
SOUND menu.
Using Projector Menu 2.0
17
Sound Mode - User Parameter
001-0 elberT
001-0 ssaB
This SOUND menu showed on right upper of view screen.
Sound Mode Standard
Balance 0
Auto Volume Off
ffO rekaepS htooteulB
USE
TO SELECT
PRESS OK
PRESS OK
USE
TO SELECT
PRESS OK
PRESS OK
Balance 0
Auto Volume Off
Bluetooth Speaker Off
Sound Mode Standard
USE
TO SELECT
USE
TO SELECT
Use button to select different language. Follow
below figure.
Use buttons to select Y or N. If choose “Y” that
your unit will go to factory default setting.
To select different project direction
Normal / left-right mirror / up-down mirror / left-right and
up-down mirror.
To select 5S, 10S, 15S, 20S, 25S, 30S, Never
For service center use only
Using Projector Menu 3.0
18
Czech English French Hungarian Polish Romanian Slovak
Danish Spanish Croatian Dutch Portuguese Serbian Simplified
Chinese
German Greek Italian Norwegian Romanian Finnish
Press button to enter projector menu, press buttons to select
OPTION menu.
This OPTION menu showed on right upper of
view screen.
OSD Languag hsailgnE e
Restore Factory Default
Rotate 0
OSD Duration 30 S
Software Update(USB)
Restore Factory Default
OSD Language English
USE
TO SELECT
USE
TO SELECT
PRESS OK
PRESS OK
USE
TO SELECT
PRESS OK
Rotate 0
USE
TO SELECT
PRESS OK
OSD Duration 30 S
USE
TO SELECT
PRESS OK
Software Update(USB)
OK
OK
Specifications
Specifications are typical, individual units might vary. They are subject to
continuous improvement without notice and without incurring any obligation.
19 20
Bluetooth Version
Light Source Type
Display Native Resolution
HDMI Input Supported
Video Resolution.
Power Consumption
Power Input
Connect Included Adapter
Included Adapter
Connect DC input of unit
Display Color
Projection Size
Input Port
USB Port
TF Card
Net Weight (unit)
Product Dimensions
4.2
LED
White light output ANSI IDMS V1.03 SECTION 15.3 33 LMS
White brightness output ANSI IEC/ISO 21118 33.1LMS
800 x 480 RGB
1080p , 1080i , 720p, 576i , 480p, and 480i
Operating 30W; Standby 1.1W
DC 12V , 2.5A
Input AC100-240V,50/60Hz
Output DC12V, 2.5A
16.7M
37-100 inch
AV/ VGA / HDMI X 2
Support USB device up to 32GB
Support format Mpeg1, Mpeg2, Mpeg4, mp3, Jpeg
Support TF card up to 32GB
Support format Mpeg1, Mpeg2, Mpeg4, mp3, Jpeg
0.95 KG
7.9” L x 6.1” D x 3.3” H
For service assistance and product information, please call: 1-800-968-9853.
Pour obtenir assistance et information appelez: 1-800-968-9853.
Curtis International Ltd.
7045 BECKETT DRIVE, UNIT 15,
MISSISSAUGA, ON, L5S 2A3
www.curtisint.com
To make a warranty claim, do not return this product to the store. Please email
support@curtiscs.com or call 1-800-968-9853.
90 day Warranty
This product is warranted to be free from defects in material and workmanship for a
period of ninety (90) days from the date of original purchase. During this period, your
exclusive remedy is repair or replacement of this product or component found to be
defective, at our option; however, you are responsible for all costs associated with
returning the product to us. If the product or component is
no longer available, we will
replace with a similar one of equal or greater value. Prior
to a replacement being sent,
the product must be rendered inoperable or returned to us.
This warranty does not cover glass, filters, wear from normal use, use not in conformity
with the printed directions., or damage to the product resulting from accident, alteration,
abuse, or misuse. This warranty extends
only to the original consumer purchaser or gift
recipient. Keep the original sales receipt, as proof of purchase is required to make a
warranty claim. This warranty is void if the p
roduct is used for other than single-family
household use or subjected to any voltage and waveform other than as on the specified
rating on the label (e.g., 120V~60Hz).
We exclude all claims for special, incidental, an
d consequential damages caused by
breach of express or implied warranty. All liability is limited to the amount of the
purchase price. Every implied warranty, including any statutory warranty or
condition of merchantability or fitness for a particular purpose, is disclaimed
except
to the extent prohibited by law, in which case such warranty or condition is
limited to the duration of this written w
arranty. This warranty gives you specific legal
rights. You may have other legal rights that vary depending on where you live. Some
states or provinces do not allow limitations on implied warranties or special, incidental, or
consequential damages, so the foregoing limitations may not apply to you.
For faster service, locate the model, type, and serial numbers on your appliance.
Ideal for dark viewing environments for optimal performance.
Please note:Projector brightness is measured in ANSI lumens.
Your viewing environment is the deciding factor on how many lumens your projector needs.
 Loading...