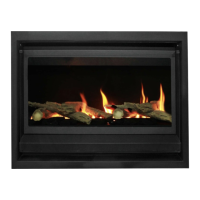
Natural Gas burner
Fill the burner tray with the vermiculite supplied ensuring the burner tube is completely covered. Lay logs and
coals on top of the vermiculite as shown in the log/coal layout drawing. Note that the shelf at the back of the
burner is also used. Do not place logs or coals close to the pilot.
It is important that the coals are not too tightly placed as this will aect heat output. The flame picture and radiant
glow is better when there is good spacing between the coals.
The L.P.G. burner is a flat steel burner. This burner is supplied with a bag of coarse vermiculite, spread this thinly (5
to 10mm) over the surface of the burner. Follow instructions for coal placement as with Natural Gas burner.
L.P.G. Burner
If the burner is fitted with an electric On/O solenoid, there will be an electrical lead with a connector plug in the
base of the fire. The plug connects to the solenoid. The electrical lead should be wired to a wall switch by an
electrician. The burner will not operate without electrical supply to the solenoid on.
Optional Electric On/Off option
Turn the control knob to ignite the pilot, this may take several attempts until air has been purged. Once the pilot
is alight, keep the control knob depressed for about 20 seconds. Then release and turn on the main burner. Check
that the flame travels easily across the burner and that coal placement does not aect ignition. Re - position coals
if required.
Commissioning of the Burner
Check burner gas pressure from the test point on the burner supply pipe on the Natural Gas Model and on the
injector elbow on the L.P.G. model.
Burner Gas pressure
Adjust the pressure at the regulator if required.
See appliance data badge for pressure settings
 Loading...