Once the fireplace cavity has been prepared and the gas supply pipe is positioned at the rear right hand side. The
firebox can be installed.
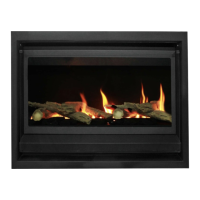
Installation instructions - Firebox
The firebox will have two electrical leads from the rear of the firebox. All fireboxes are pre wired for electrical
options, Fan and Electric On/O. The leads are approximately 1.2 metre long, they are intended to be connected
by an electrician to a wall switch for the user near the fireplace. The lead(s) will need to be left accessible after the
firebox is installed. This will mean drilling through the masonry cavity base, side, or rear as appropriate. Feed the
lead(s) through as the firebox is positioned into the masonry cavity. The leads(s) must be positioned low and not
touching the back of the firebox.
Note - Electrical options
As the fire is positioned into the masonry cavity, the 10mm copper gas pipe is pushed through the hole at the
right hand rear of the firebox (RH from the front of the fire) This pipe is to be connected to the burner after
firebox installation. Apply high temperature sealant to the back of the flange around the front of the firebox. Push
the firebox into position carefully and ensure a good seal is made between the flange and the masonry. If required
the firebox can be secured in place by drilling the flange and securing to the masonry with screws.
Installation instructions - Firebox continued
A cowl spigot plate is fixed to the chimney by masonry screws or mortar. The cowl is then pushed firmly onto the
spigot.
Installation instructions - Cowl
realfires.co.nz