EasyManua.ls Logo

RED SHIELD WS500 - User Manual

RED SHIELD WS500
12 pages
Print Icon
To Next Page IconTo Next Page
Loading...
USER GUIDE
WIRE-FREE HOME PROTECTION SYSTEM WS500
Section 1 – Getting started
1.1 General system overview
1.2 Introduction to the system
1.3 Items included with the system
1.4 Introduction to the Smart Panel
1.5 Introduction to the Smart Panel backlight
Section 2 – Installing the Wire-free Home Protection System
2.1 Installing the Smart Panel
2.2 Powering up the Smart Panel
2.3 Understanding the battery and AC adaptor icon
Section 3 – Using the Wire-free Home Protection System
3.1 Programming your 4-digit PIN
3.2 Transmitting an emergency (Panic) alarm
3.2.1 Using the Panic alarm
3.2.2 Using the Panic alarm without activating the siren
3.3 Operating different modes
3.3.1 STANDBY mode
3.3.2 ARM mode
A. Adjusting Exit Delay
B. Adjusting Entry Delay
C. Adjusting the Alarm Duration
D. Muting the Audible Countdown
E. Arming the system
F. Disarming the system
G. Zone settings
H. Triggers in ARM mode
3.3.3 ALERT mode
A. Entering the ALERT mode
B. Exiting the ALERT mode
C. Zone settings
3.3.4 HOME mode
A. Entering the HOME mode
B. Exiting the HOME mode
C. Zone settings
Section 4 – Installing the Sensors
4.1 Introduction to the Sensors
4.2 Installing the Sensors
4.2.1 Installing the Door/Window Sensor
A. Powering up the the Door/Window Sensor
B. Installing the Door/Window Sensor
C. Mounting with the double-sided adhesive pad
4.2.2 Installing the Motion Sensor
A. Powering up the Motion Sensor
B. Installing the Motion Sensor
C. Sensor sensitivity
D. Walk test
E. Mounting using screws
4.2.3 Introduction of Key Fob Remote Control
A. Introduction
CONTENTS
B. Operation
i. Powering up the Key Fob Remote Control
ii. Enrolling the Remote Control onto the Smart Panel
iii. Operating the Key Fob Remote Control
iv. Deleting a Remote Control from the Smart Panel
v. Querying the ID Number of a Remote Control
4.3 House Security Code settings
4.4 Zone Code settings
Section 5 - Troubleshooting
5.1 FAQ
5.2 Troubleshooting
Section 6 – General Information
6.1 Product information
6.2 Specifications
6.2.1 Smart Panel
6.2.2 Key Fob Remote Control
6.2.3 Door/Window Sensor
6.2.4 Motion Sensor
6.3 Maintenance
6.4 Batteries
1
3
5
13
WS500_Rev.A_20140918

Table of Contents

Question and Answer IconNeed help?

Do you have a question about the RED SHIELD WS500 and is the answer not in the manual?

Summary

Section 1 - Getting started

1.1 General system overview

Provides a high-level overview of the system's purpose and components.

1.2 Introduction to the system

Explains the WS500 system, its control panel, and sensors.

1.3 Items included with the system

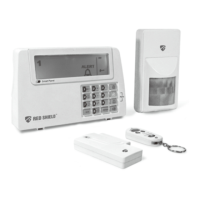
Lists all components that should be present in the product package.

1.4 Introduction to the Smart Panel

Details the LCD screen, function buttons, keypad, and other features.

1.5 Introduction to the Smart Panel backlight

Explains the sound alerts and backlight indications for different operating modes.

Section 2 - Installing the Wire-free Home Protection System

2.1 Installing the Smart Panel

Covers locating, tamperproofing, and wall mounting the Smart Panel.

2.2 Powering up the Smart Panel

Guides on how to correctly power the Smart Panel using batteries and AC adapter.

2.3 Understanding the battery and AC adaptor icon

Explains the meaning of battery status and AC adaptor icons on the panel.

Section 3 - Using the Wire-free Home Protection System

3.1 Programming your 4-digit PIN

Instructions on how to change the default PIN for system access.

3.2 Transmitting an emergency (Panic) alarm

Details how to trigger an immediate alarm signal using the panel or remote.

3.3 Operating different modes

Explains how to use the system's STANDBY, ARM, ALERT, and HOME modes.

Section 4 - Installing the Sensors

4.1 Introduction to the Sensors

Provides an overview of the wireless sensors included with the system.

4.2 Installing the Sensors

Guides on determining sensor locations and the general installation process.

Section 5 - Troubleshooting

5.1 FAQs

Presents common questions and answers regarding the system's setup and operation.

5.2 Troubleshooting

Addresses common issues like AC power failure, system battery failure, and sensor communication.

Section 6 - General Information

6.1 Product Information

Discusses wireless system limitations and general considerations for reliable operation.

6.2 Specifications

Lists technical details for the Smart Panel, Key Fob, Door/Window Sensor, and Motion Sensor.

6.3 Maintenance

Provides guidelines for cleaning and maintaining the system components.

6.4 Batteries

Offers instructions on battery handling, replacement, and disposal.

Overview

The Red Shield WS500 Wire-free Home Protection System is a high-quality security system designed for home or office use, offering a range of user-friendly features. It operates wirelessly, with a Smart Panel acting as the central control unit, gathering information from various sensors placed throughout the property. In the event of a security breach, the Smart Panel will activate indicator lights and sound the siren(s) to alert users.

Function Description

The system operates in four distinct modes: STANDBY, ARM, ALERT, and HOME, each tailored to specific security needs.

  • STANDBY Mode: This is the default state where the Smart Panel is ready for mode selection or programming.
  • ARM Mode: When in ARM mode, the system is fully armed. If a sensor is triggered, the Smart Panel's siren will sound, and its RED indicator light will flash every 1.5 seconds, indicating the triggered zone. The Smart Panel also flashes RED every 5 seconds as an intruder deterrent even when no intrusion occurs. An exit delay allows users to leave the property before the system fully arms, and an entry delay provides time to disarm the system upon return. These delays are adjustable.
  • ALERT Mode: In ALERT mode, the Smart Panel's chime will sound, and its GREEN indicator light will flash every 1.5 seconds when a sensor detects a visitor in the protected area. This mode is useful for monitoring activity without triggering a full alarm.
  • HOME Mode: This mode combines aspects of both ARM and ALERT modes, allowing the system to operate with different zone settings for each. It's designed for situations where certain areas need to be armed while others are in alert mode.

The system also features an emergency (Panic) alarm. Pressing the Panic buttons on the Keypad or Key Fob Remote Control immediately transmits an alarm signal to the Smart Panel, activating the siren and sending a signal to any optional response devices (like an Auto Dialer or Outdoor Bell Box). A Duress Password allows users to disarm the system silently, transmitting an alarm signal to response devices without sounding the siren.

Usage Features

  • Smart Panel Control: The Smart Panel serves as the central hub. Users can program a personalized 4-digit PIN, which is essential for arming, disarming, and adjusting system settings. The default PIN is "1234" and can be changed for enhanced security.
  • Adjustable Delays: Both the exit delay (time to leave before arming) and entry delay (time to disarm upon return) are adjustable from 10 to 60 seconds, allowing users to customize the system to their needs.
  • Alarm Duration: The duration of the alarm siren can be adjusted from 1 to 6 minutes.
  • Audible Countdown Mute: When the Smart Panel is armed, the audible countdown (beeper) can be silenced by pressing the MUTE button, and reactivated by pressing it again.
  • Zone Settings: Each sensor can be assigned to a specific zone (1-8), and these zones can be programmed to be active or inactive in ARM, ALERT, or HOME modes. This allows for flexible security configurations, such as arming only specific areas at night.
  • Key Fob Remote Control: The Key Fob Remote Control provides remote operation of the system. It allows users to arm, disarm, activate ALERT mode, HOME mode, or trigger a Panic alarm instantly from inside or outside the property. Remote Controls must be enrolled onto the Smart Panel before use.
  • Door/Window Sensor: This two-part sensor (transmitter and magnet) triggers an alarm when a door or window is opened. It is pre-programmed to Zone 1.
  • Motion Sensor: Designed to detect movement in a given area, the Motion Sensor is pre-programmed to Zone 8. It has adjustable sensitivity settings ("High," "Middle," or "Low") to prevent false alarms, especially with pets. A built-in sleep timer conserves battery power by making the sensor ready to signal only after 3 minutes of no movement.
  • House Security Code: The system uses a House Security Code, which can be adjusted via jumpers/dip-switches on each device (Smart Panel, sensors, Key Fob). This is important for avoiding interference with other alarm systems in the vicinity.
  • Zone Code: Sensors are pre-assigned to zones, but their zone code can be changed by adjusting a jumper on the sensor.

Maintenance Features

  • Battery Back-up: The Smart Panel includes a 9V battery for power back-up in case of a mains power cut, ensuring continuous operation for approximately 6 hours. A low battery icon on the LCD display indicates when the back-up battery needs replacement.
  • AC Adaptor Icon: An AC adaptor icon appears on the LCD when the Smart Panel is connected to a wall socket, and the backlight remains ON for 10 seconds during connection.
  • Sensor Battery Indication: For the Door/Window Sensor, a slow flashing RED LED on the transmitter indicates low battery. For the Motion Sensor, a flashing RED LED indicates low battery.
  • Regular Testing: Users are advised to test the system at least once per week to ensure sensors and siren(s) are working properly.
  • Walk Test: After mounting a Motion Sensor, a walk test should be performed in ALERT mode to ensure the sensor is detecting the correct area and to adjust its angle for optimal coverage.
  • Cleaning: The product can be cleaned with a soft damp cloth and then wiped dry. Abrasive, solvent-based, or aerosol cleaners should be avoided to prevent damage or discoloration. Water should not enter the unit.
  • Battery Care: Batteries should not be allowed to corrode or leak. Users should ensure correct polarity when inserting batteries and avoid mixing new and old batteries or different types. Rechargeable batteries are not recommended. Used batteries should be disposed of at a suitable Recycling Centre, not with normal household waste.
  • PIN Reset: If the 4-digit PIN is forgotten, pressing the "RESET" button inside the battery compartment of the Smart Panel will restore the factory default PIN "1234."
  • Remote Control Deletion: Damaged or lost Key Fob Remote Controls can be deleted from the system to maintain security.
  • Remote Control ID Query: The ID number of a Key Fob Remote Control can be queried through the Smart Panel.

RED SHIELD WS500 Specifications

Smart Panel

Power IconPower
power sourceAC adaptor
back up power9V alkaline battery x1pc
Operating Specifications IconOperating Specifications
operating frequencies433.92MHz +/-0.5MHz
siren output120dB (Duration-adjustable)
sensor numbersUnlimited

Key Fob Remote Control

Power IconPower
power source12V alkaline battery x 1pc
Operating Specifications IconOperating Specifications
RF working transmission frequency433.92MHz +/-0.5MHz
wireless range to Smart Panel<65 meters (215ft, open area)
house code4 Jumpers

Door/Window Sensor

Power IconPower
power sourceAAA alkaline battery 1.5V x 2pcs
Operating Specifications IconOperating Specifications
RF working transmission frequency433.92MHz +/-0.5MHz
wireless range to Smart Panel<150 meters (500ft, open area)
house code4 Jumpers

Motion Sensor

Power IconPower
power source9V alkaline battery x1pc
Operating Specifications IconOperating Specifications
RF working transmission frequency433.92MHz +/-0.5MHz
PIR detection angle<110 Degree (@9VDC)
PIR detection range“H”:< 15M(50ft); “M”:< 6M(20ft); “L”:< 4M(13ft)
wireless range to Smart Panel<150 meters (500ft, open area)

Related product manuals