EasyManua.ls Logo

Redline QuickLIFT - User Manual

Redline QuickLIFT
4 pages
Print Icon
To Next Page IconTo Next Page
Loading...
5-3/4"
18”
Please gather the following tools before you begin the
installation:
* Power Drill
* 3/16" or indexed #11 drill bits
* Fine permanent marker or felt tip pen
* Tape Measure or ruler
* Masking Tape
* Hammer & center punch
* Rivet gun, capable of 3/16" rivets (most brands can handle
this size)
Note: Only use the rivets supplied in the QuickLIFT system.
Remove all it
ems from the packing tube. You should have the following before beginning:
* (2) Gas springs (RT-QL-200-5A) - Be sure to cycle them a few times before installing.
* (8) 3/16" #2 Multi-grip Rivets
* (4) Steel ball-stud mounting brackets
* Printed Color Instructions
A. Leave your hood closed.
B. Using a piece of masking tape
and a permanent marker, carefully
measure from the hood's corner
(near windshield) and measure
along the fender line. Wrap the
end of the tape measure over the
corner lip and place a mark on the
fender masking tape at
5-3/4".
Then place a mark on the
hood tape at 18”.
Ste
p 1 - Unpack QuickLIFT system and verify contents.
Step 2 - Gather the required tools.
Step 3 - Mark centerline of hood bracket location.
Jeep Cherokee 1986-2001 Hood QuickLIFT
1986-2001 Jeep Cherokee
QuickLIFT Installation Guide
This manual is property of Redline Tuning LLC. Any unauthorized duplication or use
without written permission from Redline Tuning LLC, violates Copyright laws.
Copyright © 2020 Redline Tuning LLC. All Rights Reserved.
Manual Rev.
1.03
21-20001
These marks will be used to
align the centerline of the
bracket's ball-studs in the
following steps.
18”
5-3/4"
Question and Answer IconNeed help?

Do you have a question about the Redline QuickLIFT and is the answer not in the manual?

Summary

QuickLIFT Installation Guide

Unpack and Verify System Components

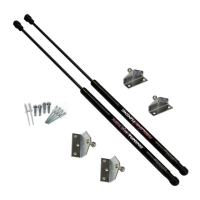
Confirm all parts of the QuickLIFT system are present before starting.

Gather Installation Tools and Materials

List of required tools and materials for the QuickLIFT installation.

Mark Hood Bracket Mounting Location

Precisely measure and mark the hood for the bracket's ball stud.

Align Hood Bracket and Drill First Hole

Position the bracket, mark the first hole, and prepare for drilling.

Drill Pilot Hole for Hood Bracket

Drill the pilot hole using the specified drill bit size.

Rivet Lower Hood Bracket End

Secure the lower end of the bracket to the hood using rivets.

Drill and Rivet Second Hood Bracket Hole

Drill and rivet the second hole for hood bracket reinforcement.

Install Passenger Side Hood Bracket

Repeat previous steps to install the second hood bracket.

Mark First Hole for Fender Bracket

Position and mark the first hole for the driver's side fender bracket.

Attach Drivers Side Fender Bracket

Rivet one side of the fender bracket to the vehicle's fender.

Mark, Drill, and Rivet Fender Bracket

Mark, center punch, drill, and rivet the second hole for the fender bracket.

Attach Passenger Side Fender Bracket

Repeat steps to attach the passenger side fender bracket.

Install Gas Springs

Install the gas springs onto the ball studs on the hood and fender.

Remove Original Hood Prop Rod

Remove the original hood prop rod assembly.

Redline QuickLIFT Specifications

General IconGeneral
BrandRedline
ModelQuickLIFT
CategoryAutomobile Accessories
LanguageEnglish