EasyManua.ls Logo

Reece Posh Solus MK3 - User Manual

Reece Posh Solus MK3
2 pages
Print Icon
To Next Page IconTo Next Page
Loading...
Installation Instructions
Posh Solus MK3 Shower Mixer with Extended Lever
Mixer must be installed to the requirements of AS/NZS 3500 by a qualified plumber. Your mixer comes to you
already factory assembled and tested. We do not recommend the dismantling of any internal part of the mixer.
The mixers are factory tested and sealed so as to give the best performance.
Installer is responsible for ensuring water connections to the mixer body are watertight.
INSTALLATION REQUIREMENTS:
1. Flush out new pipe work prior to connecting the new mixer.
2. Mixer body (7) must be installed onto a noggin or mounting plate in the wall and be fixed using suitable
mounting screws (not supplied). Provisions must be made by the installer to ensure the mixer body (8) is
mounted vertically level.
3. Hot water supply must be connected to the ‘H’ marked inlet and the cold-water supply must be connected
to the ‘C’ marked inlet.
4. Mixer body must be installed with the outlet facing upwards. For bath spout outlet connections, pipe work
must be redirected around the mixer body.
5. If installing the mixer to a bath, then outlet must point upward, and water line must be toward the shower.
6. Cover plate (2) is designed to sit flush when the mixer body is installed to a level finish wall.
7. After the cover plate (2) has been fitted, assemble the handle (1) using a 1.5 mm Allen key and fit the diverter
(6) to the diverter socket.
NOTE:
Mixer must be installed only with pressurised hot water storage and instantaneous water systems
only
Tile dome and diverter tile plug must only be removed when it’s time to fit the cover plate, handle
and diverter
SERVICING - REPLACEMENT OF CARTRIDGE:
1. Disassemble the handle (1) from the mixer body by removing the locking grub screw cap and unscrewing
the locking grub screw with a 1.5 mm Allen key.
2. Unscrew the cartridge dome (3) and use a wrench to unscrew the cartridge locknut (4).
3. Remove and replace the mixer cartridge (5). Reassemble the locknut (4), cartridge dome (3) and handle
assembly (1).
4. Test reassembled mixer for leaks.
CLEANING RECOMMENDATIONS
We recommend the use of soapy water or approved cleaners.
This product should not be cleaned with abrasive materials.
Damage caused by any improper treatment is not covered by the product warranty - refer to Warranty Condi-
tions.
Please ensure a copy of the installation instructions is left with the end user for future reference.
Question and Answer IconNeed help?

Do you have a question about the Reece Posh Solus MK3 and is the answer not in the manual?

Summary

Installation Requirements

Flush New Pipework

Flush out new pipe work prior to connecting the new mixer.

Mixer Body Mounting

Install mixer body vertically level using suitable mounting screws.

Water Inlet Connections

Connect hot water to 'H' and cold water to 'C' marked inlets.

Mixer Body Outlet Orientation

Install mixer body with the outlet facing upwards.

Bath Spout Pipework

Redirect pipe work for bath spout outlet connections around the mixer body.

Bath Installation Details

For bath installation, outlet must point upward, water line toward shower.

Cover Plate Fitment

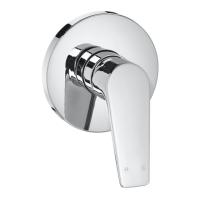
Cover plate is designed to sit flush when mixer body is installed to a level wall.

Handle and Diverter Assembly

Assemble handle using Allen key and fit diverter to the diverter socket.

Servicing and Cartridge Replacement

Handle Disassembly

Remove handle by unscrewing the locking grub screw with an Allen key.

Cartridge Dome and Locknut Removal

Unscrew cartridge dome and use a wrench to unscrew the cartridge locknut.

Cartridge Replacement

Remove and replace the mixer cartridge, then reassemble parts.

Leak Testing

Test the reassembled mixer for leaks after servicing.

Cleaning Recommendations

Overview

The Posh Solus MK3 Shower Mixer with Extended Lever is a plumbing fixture designed for controlling water flow and temperature in showers and baths. It is factory assembled and tested to ensure optimal performance and is intended for installation by a qualified plumber in accordance with AS/NZS 3500 requirements.

Function Description:

The mixer's primary function is to blend hot and cold water to achieve a desired temperature and to control the flow of this mixed water to either a showerhead or a bath spout. The extended lever provides ease of use for adjusting water flow and temperature. A diverter mechanism allows the user to switch between the shower and bath outlets.

Important Technical Specifications:

  • Water Supply: The mixer is designed for use with pressurized hot water storage and instantaneous water systems only.
  • Inlet Connections: Hot water supply must be connected to the 'H' marked inlet, and cold water supply to the 'C' marked inlet. Both inlets are Rp 1/2".
  • Outlet Orientation: The mixer body must be installed with the outlet facing upwards. For bath spout outlet connections, pipework must be redirected around the mixer body.
  • Installation Dimensions:
    • Minimum wall cavity depth: 27 mm
    • Maximum wall cavity depth: 49 mm
    • Minimum distance from wall to center of outlet: 42 mm
    • Maximum distance from wall to center of outlet: 64 mm
  • Operating Pressure:
    • Minimum: 0.5 bar
    • Maximum: 5 bar
  • Operating Temperature:
    • Maximum: 80°C
    • Recommended range: 45°C - 65°C

Usage Features:

  • Extended Lever: The mixer features an extended lever (1) for easy and precise control of water flow and temperature. Handle options include standard, 200mm, and 270mm lengths.
  • Diverter: A diverter (6) is integrated into the design, allowing users to easily switch water flow between a shower outlet and a bath outlet.
  • Flush Installation: The cover plate (2) is designed to sit flush against a finished wall, providing a clean and aesthetic appearance.
  • Vertical Mounting: The mixer body (7) must be mounted vertically level, ensuring proper operation and alignment with the cover plate and handle.

Maintenance Features:

  • Cartridge Replacement: The mixer cartridge (5) is a replaceable component. To replace it:
    1. Disassemble the handle (1) by removing the locking grub screw cap and unscrewing the grub screw with a 1.5 mm Allen key.
    2. Unscrew the cartridge dome (3).
    3. Use a wrench to unscrew the cartridge locknut (4).
    4. Remove the old cartridge (5) and replace it with a new one.
    5. Reassemble the locknut (4), cartridge dome (3), and handle assembly (1).
    6. Test the reassembled mixer for leaks.
  • Cleaning Recommendations: The manufacturer recommends cleaning the product with soapy water or approved cleaners. Abrasive materials should not be used, as damage caused by improper treatment is not covered by the product warranty.

Installation Requirements (Summary):

  1. Flush new pipework before connecting the mixer.
  2. Install the mixer body (7) onto a noggin or mounting plate in the wall, ensuring it is fixed using suitable mounting screws (not supplied) and is mounted vertically level.
  3. Connect hot water to the 'H' inlet and cold water to the 'C' inlet.
  4. Install the mixer body with the outlet facing upwards.
  5. If installing for a bath, the outlet must point upward, and the water line must be directed toward the shower.
  6. The cover plate (2) is designed to sit flush with a level finished wall.
  7. After fitting the cover plate (2), assemble the handle (1) using a 1.5 mm Allen key and fit the diverter (6) to its socket.
  8. The tile dome (3) and diverter tile plug (6) should only be removed when it's time to fit the cover plate, handle, and diverter.

Components List:

  • 1: Handle complete (available in standard, 200mm, and 270mm lengths)
  • 2: Cover plate
  • 3: Cartridge dome
  • 4: Cartridge locknut
  • 5: Cartridge
  • 6: Cartridge sleeve (also referred to as diverter)
  • 7: Mixer body

Reece Posh Solus MK3 Specifications

General IconGeneral
BrandReece
ModelPosh Solus MK3
CategoryBathroom Fixtures
LanguageEnglish

Related product manuals