26
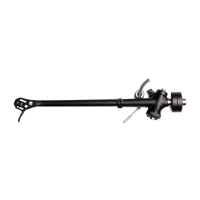
Names of Tonearm parts
Introduction
Designed using the latest 3D CAD & CAM technology,
the new RB330 is the culmination of more than 35 years
of tonearm design experience. Featuring a brand
new bearing housing and our latest tonearm tube
designed using intelligent redistribution of mass, ensure
this arm will exhibit fewer points of possible resonance.
Extreme stability with almost friction free movement
from the new high precision, horizontal and vertical
bearing assemblies guarantees to gather more
information from your vinyl than ever before. The
RB330 offers a new bias assembly, re-designed stiffer
vertical bearing housing, integrated arm clip and an
improved spring housing with easier to read numbers.
You will also find Rega made new low capacitance
phono cables terminated with high specification
Neutrik plugs.
Arm balancing and setup
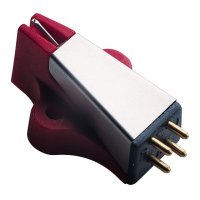
With the cartridge correctly mounted and with the
stylus guard removed, ensure that the tracking force
dial and bias adjustment are set to zero. Adjust the
balance weight until the arm is “floating” with the stylus
approximately 1mm clear of the record. Note: It is
normal for the arm to swing back towards the arm clip
position even with the bias set at zero. Therefore it is
advisable to gently hold the arm bearing carrier (just
below the tracking dial) thus preventing horizontal
movement during the balancing procedure.
Applying tracking pressure
Once the arm is balanced, rotate the tracking force
adjustment dial to the required tracking force.
Numbers ‘0’ to ‘3’ are marked on the dial. If in doubt,
it is usually advisable to use a tracking force that
corresponds with the upper limits of the cartridge
manufacturer’s range.
Applying Anti - Skating (bias) adjustment
Set the bias adjustment slider located to the same
figure as the cartridge tracking force pressure quoted
by your cartridge manufacturer. Note: This is not critical
and a figure between 1.5 & 2.0 will normally be suitable
for most moving magnet cartridges.
Your arm is now balanced, setup and ready to use. If
you have any doubts regarding installation or setup
please contact your official Rega dealer who will be
able to carry out the work for you. Thank you for
purchasing this Rega product and we wish you many
hours of musical enjoyment.
www.rega.co.uk
Made in England
RB330 TONEARM
Protractor &
arm mounting
data included.
Cueing
Platform
Tracking
Dial
Headshell
Finger lift
Arm Clip
Cueing device
lift/lower handle
Balance
Weight
2
1
0
Bias adjustment