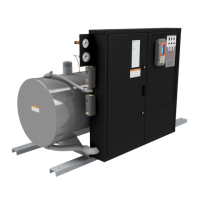
This document is an installation, operating, and maintenance manual for Reimers Electra Steam, Inc. electric steam boilers, specifically models R & RH 10 through 30 of the RB Series.
Function Description:
Reimers Electra Steam Boilers are designed to generate steam using immersion-type heating elements. They are equipped with automatic controls to maintain a pre-set operating pressure and ensure the proper water level. These boilers are built to meet ASME standards and are individually inspected and stamped by an authorized National Board Insurance Inspector, with all boilers registered with the National Board of Boilers and Pressure Vessel Inspectors.
Important Technical Specifications:
The manual provides a parts list for the R & RH 10 thru 30 (RB SERIES) models, including various components and their specifications:
- Condensate Tank: 11-gallon square with valve (Part #20422).
- Contactors: Available in 50A 120V (Part #02530) and 50A 240V 3P (Part #02531).
- Heating Elements:
- 240V 10KW 3PH (Part #04165)
- 240V 15KW 3PH (Part #04253)
- 240V 9KW 3PH (Part #02686)
- 480V 9KW 3P (Part #04153)
- Fuses:
- 250V 15A (Part #02125)
- 250V 3A (Part #03470)
- 250V 60A (Part #02127)
- 600V 80A CLASS J (Part #03349)
- Fuse Blocks:
- 250V 30A (Part #02140)
- 250V 60A (Part #02142)
- 600V 100A 3P (for J fuse) (Part #03770)
- Gasket Element: Part #02281.
- Gauge Glass: .625" X 3" (Part #04180).
- Gauge Rubber Washer: Part #02006.
- Lights: Red 250V (Part #02416) and Red W/White 120V (Part #04215).
- Pressure Controls: 14# (Hi-Limit or Operating) (Part #04162) and 91# (Hi-Limit or Operating) (Part #04163).
- Pressure Gauges: 2" (Part #02299) and XUC 0-30# (Part #02394).
- Pumps:
- 1/3 HP 120-240V 1P BURKS (Part #02360)
- 120V 1PH POSITIVE (Part #04178)
- 240V 1PH 50/60 HZ (Part #03774)
- Relays: Solidstate CTRL (Part #03382) and Solidstate CTRL 240V 2-WAY (Part #03423).
- Strainers: .375" Y (Part #03262) and 1" (Part #02027) with screen (Part #02358).
- Switches: Illuminated 120V (Part #04213), Illuminated Red 250V (Part #04214), and Manual Reset NC MO (Part #03943).
- Valves:
- Ball: .5" 200# (Part #02490) and .5" W/LATCH (Part #03346).
- Check: .5" (Part #02370).
- Globe: .5" (Part #02011) and 3/8" (Part #02325).
- Safety: .5" (Part #02637) and .75" 15# (Part #02010).
- Solenoid: .375 120V (Part #02585) and .375 240V (Part #02584).
- Water Gauge Set: Part #02396.
The manual also includes "RECOMMENDED BOILER INSTALLATION PARAMETERS" with clearance dimensions (A, B, C2, D, EL, ER, F) for various boiler models (JR./AR 3-9, RA 9-18, R-RH-RHC 10-150, RLP 100-500, RHP 100-500, HMR 10-25, HLR 12-500). These clearances are critical for safe operation and maintenance, especially for servicing heating elements.
Usage Features:
- Installation: Boilers should be placed on a level surface, as close as possible to the equipment being supplied with steam, to minimize heat losses. Steam lines should be insulated and made of black pipe (not galvanized) by an experienced steamfitter, adhering to all state/local codes. A minimum 24" clearance at the element end is required for servicing.
- Water Supply: For models with a pump and/or solenoid valve, the water supply connects to a strainer on the intake side of the solenoid valve. For models with a condensate return tank, the water line connects to the makeup valve at the tank end.
- Condensate Return: Condensate can be returned by gravity (for closed systems without a tank or steam trap) if the load discharge is at least 2 feet above the boiler water level, with return lines pitched 2 inches to 10 feet of pipe length. A swing check valve is used for the return connection. For systems with a significant amount of intermittent live steam from long lines, this gravity return system is not recommended. Condensate return systems with a tank are also detailed, requiring connection of the water supply to the tank, condensate return line from equipment, and proper venting to the outside. A pressure reducing valve is needed for city water pressures exceeding 40 PSI.
- Safety Valve: Designed to discharge hot steam if the set pressure is exceeded. The discharge port must point away from the operator and aisles. Any discharge piping must be rigidly supported and never smaller than the valve outlet.
- Electrical: All wiring must comply with the National Electric Code and local codes, performed by a certified electrician. Supply wires must be rated at 125% of full load, using only copper wire. A fused disconnect switch must be installed within sight of the boiler.
- Operation Sequence:
- Close the boiler drain valve, open gauge glass valves (top and bottom), and slightly open the steam line valve to allow air to escape.
- Turn on the main water supply (ensure it's OPEN before main power). For pump models, never let the pump run dry.
- Throw the main disconnect switch and toggle switch to ON. Water will automatically fill to the proper operating level.
- Push the low water manual reset switch to power the heating elements. Close the steam valve to allow pressure to build.
- Once working pressure is reached, open the steam valve slowly over 2-3 minutes, then fully open. Keep it open during operation.
- Pressure adjustment is done by turning the knob on the pressure control (clockwise to increase, counterclockwise to decrease), being careful not to lift the safety valve.
- To shut off, turn the toggle switch to OFF, then the main power supply disconnect switch to OFF. Leave the steam line open to allow pressure to drop and the boiler to cool slowly.
Maintenance Features:
Maintenance must be performed by experienced personnel only when the boiler is cold, drained, and has no pressure or electricity. All electrical/steam safety precautions must be observed.
- Blowdown: Essential for removing minerals, scale, and foreign matter. Frequency depends on water quality and condensate return:
- Softened Water: Weekly if little condensate is returned, bi-weekly if a large part of condensate is returned and little make-up water is used.
- Hard Water: Daily if little or no condensate is returned, weekly if a large part of condensate is returned and little make-up water is used.
- Turn power off, allow pressure to drop to 5 psig, then open each blowdown valve for about 10 seconds. Ensure blowdown is safely piped and stand clear of scalding water/steam.
- Water Level Controls: Must be kept clean. Probes should be inspected and cleaned periodically, at least every three months. A .5" plugged hole is provided in the boiler head for probe maintenance.
- Pressure Adjustment: Factory preset; seldom required.
- Safety Valve Test: Minimum once per month. Hold the trip lever open for five seconds to flush the valve seat, then allow it to "slap" shut. Repeat or replace if it leaks.
- Element Test (Condition): If the unit doesn't heat up/maintain pressure:
- Voltage Test: Read rated voltage across each element. If no voltage, check voltage before/after fuses and at the contactor.
- Amperage Test: Read rated amps on each element wire. If no or unbalanced amp reading, replace the element.
- Element Cleaning: Use a stiff wire brush to remove scale/foreign matter.
- Element Replacement: Open the front cabinet door, disconnect and label terminal wires, remove 4 nuts from the element flange, pull out the element, and clean the flange surface before installing a new element and gasket.
- Control Circuit Test: If the unit doesn't heat up when powered on, filled with water, and the pressure control is calling for steam, perform a voltage test at the control circuit fuse and each control point (low water control, hi-limit pressure control, operating pressure control, aux. low water cutoff, toggle switch).
- Gauge Glass Replacement: Minimum once per year. Ensure the boiler is cold/drained and has no pressure/electricity.
- Close gauge glass valves (top and bottom).
- Open the petcock on the bottom fixture.
- Loosen nuts at the top and bottom of the glass.
- Slide the glass up, pull out from the bottom, and remove.
- Install by reversing the procedure, always using new rubber washers.
- Water Feed & Low Water Cutoff:
- If the boiler doesn't take water, check the city water valve and strainer for clogging.
- If the boiler floods (cold water feed), check the solenoid for sticking.
- Evaluate the circuit board.
- LEFT LED indicates pump/solenoid status. If water doesn't feed when lit, investigate pump/solenoid. If it doesn't light when water is low, remove the probe wire from terminal H; if it lights, clean the probe. If not resolved, replace the circuit board.
- RIGHT LED indicates ample water for element operation. If elements don't energize when lit, investigate the electrical control circuit (pressure controls, fuses, contactor). If it doesn't light when water is over half full and manual reset is pushed, jump terminals LLCO & G with insulated ground wire; if it lights, clean the probe. If not resolved, replace the circuit board.
- Pump Motor: Maintenance is not normally required.
- Fuse Failure: Evaluate for short circuits (clear the line, remove the cause, then install a new fuse) or poor contact (discolored fuse clips indicate poor contact; replace the fuse holder).
- Fuse Replacement: Do not insert fuses into live circuits. Brighten clips and fuse caps with emery cloth if not clean. If the fuse is easily inserted or rotated, draw the clips together for sufficient contact pressure.
- Contactors: Ensure the contactor coil receives proper voltage. If voltage is present but contacts don't pull in, replace the coil. If contacts pull in but chatter, clean/replace contact points. Mechanical difficulties may require complete contactor replacement.
The ASME data plate, containing the National Board number, is located on the end of the pressure vessel behind the label.