Do you have a question about the REP 4000 Series and is the answer not in the manual?
Lists various bolts, nuts, and washers required for assembly.
Lists tools that are not included with the product but are necessary for assembly.
Emphasizes using two people and a ladder for safe and easy installation.
Guides on using a stud finder to mark stud positions for secure mounting.
Instructions for attaching uprights to crossmembers using specified hardware.
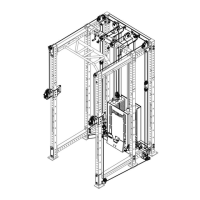
Detailed instructions for mounting the 4000 series rack to the wall.
Detailed instructions for mounting the 5000 series rack to the wall.
Checks for stringer flatness, upright feet on ground, and upright parallelism.
Fully tighten bolts connecting the stringer to the crossmembers.
Fully tighten hardware connecting uprights to crossmembers and accessories.
Guides on aligning the stringer with desired stud spacing and remarking if necessary.
Instructions and visual guides for drilling pilot holes straight and level into studs.
Guides on installing lag bolts with drill bushings for 16" and 24" stud spacing.
Using a masonry drill bit to drill anchor holes to a minimum depth.
Instructions for hammering sleeve anchors into the pre-drilled holes.
Tighten sleeve anchors using a wrench until snug, ensuring a minimum of four turns.
| Material | Steel |
|---|---|
| Series | 4000 |
| Color | Black |
| Lockable | No |
| Adjustable Leveling Feet | Yes |
| Ventilation | Open Frame |